Vendor Management gives your legal operations team one central list of all the external law firms and service providers you work with. You register each vendor once, link it to the matters it is authorized to work on, and reuse it everywhere spend is recorded. This article explains who can use it and how, step by step.
✅ Who can do what
- Administrator – can access the Vendors list, create, edit and delete vendors, and link a vendor to a matter.
- Contributor – can access the Vendors list, create, edit and delete vendors, and link a vendor to a matter.
- Reader – has no access to the Vendors module.
- Users with Configuration or Administrator permission – are the only ones who can access General settings and turn on the vendors setting and e-billing.
Good to know:
- Linking a vendor to a matter also depends on your access to that matter. If you cannot see a matter, you cannot link a vendor to it.
- If you have no Vendors permission at all, the Vendors entry is not displayed in the navigation.
- A user without access to the Vendors module cannot create vendor-matter links from the matter side.
⚖️ What vendor management gives you
A vendor is an external law firm or legal service provider registered in your organization. Once created, a vendor is a reusable record with its own profile, identifiers and billing contact. Instead of scattering provider information across spreadsheets and individual matters, you keep it in one place.
- A centralized registry – all your external counsel and service providers in one dedicated screen, instead of one-off entries scattered across matters.
- Controlled matter assignments – you decide which firms are authorized to work and bill on each engagement by linking vendors to matters.
- Cleaner spend data – the vendor picker in the Spend form only offers vendors linked to the matter. Spend is always attributed to an authorized, correctly spelled firm.
- Consolidated visibility – every spend points back to the same vendor record, so you can see all activity for a given firm in one place.
- A timekeeper directory per vendor – the individuals who bill under each firm, with their classification and their approved rates over time. You reuse them instead of re-entering them on every invoice.
- A full audit trail – creation, edition and deletion of vendors are tracked. You see them on the vendor and in the global activity feed.
The result: a consolidated view of your external relationships and a reliable reference to check what gets billed, to which matter, by which firm.
⭐ Step 1: Turn on vendors in your organization
The Vendors screen only appears once an administrator turns on a dedicated setting. It is off by default.
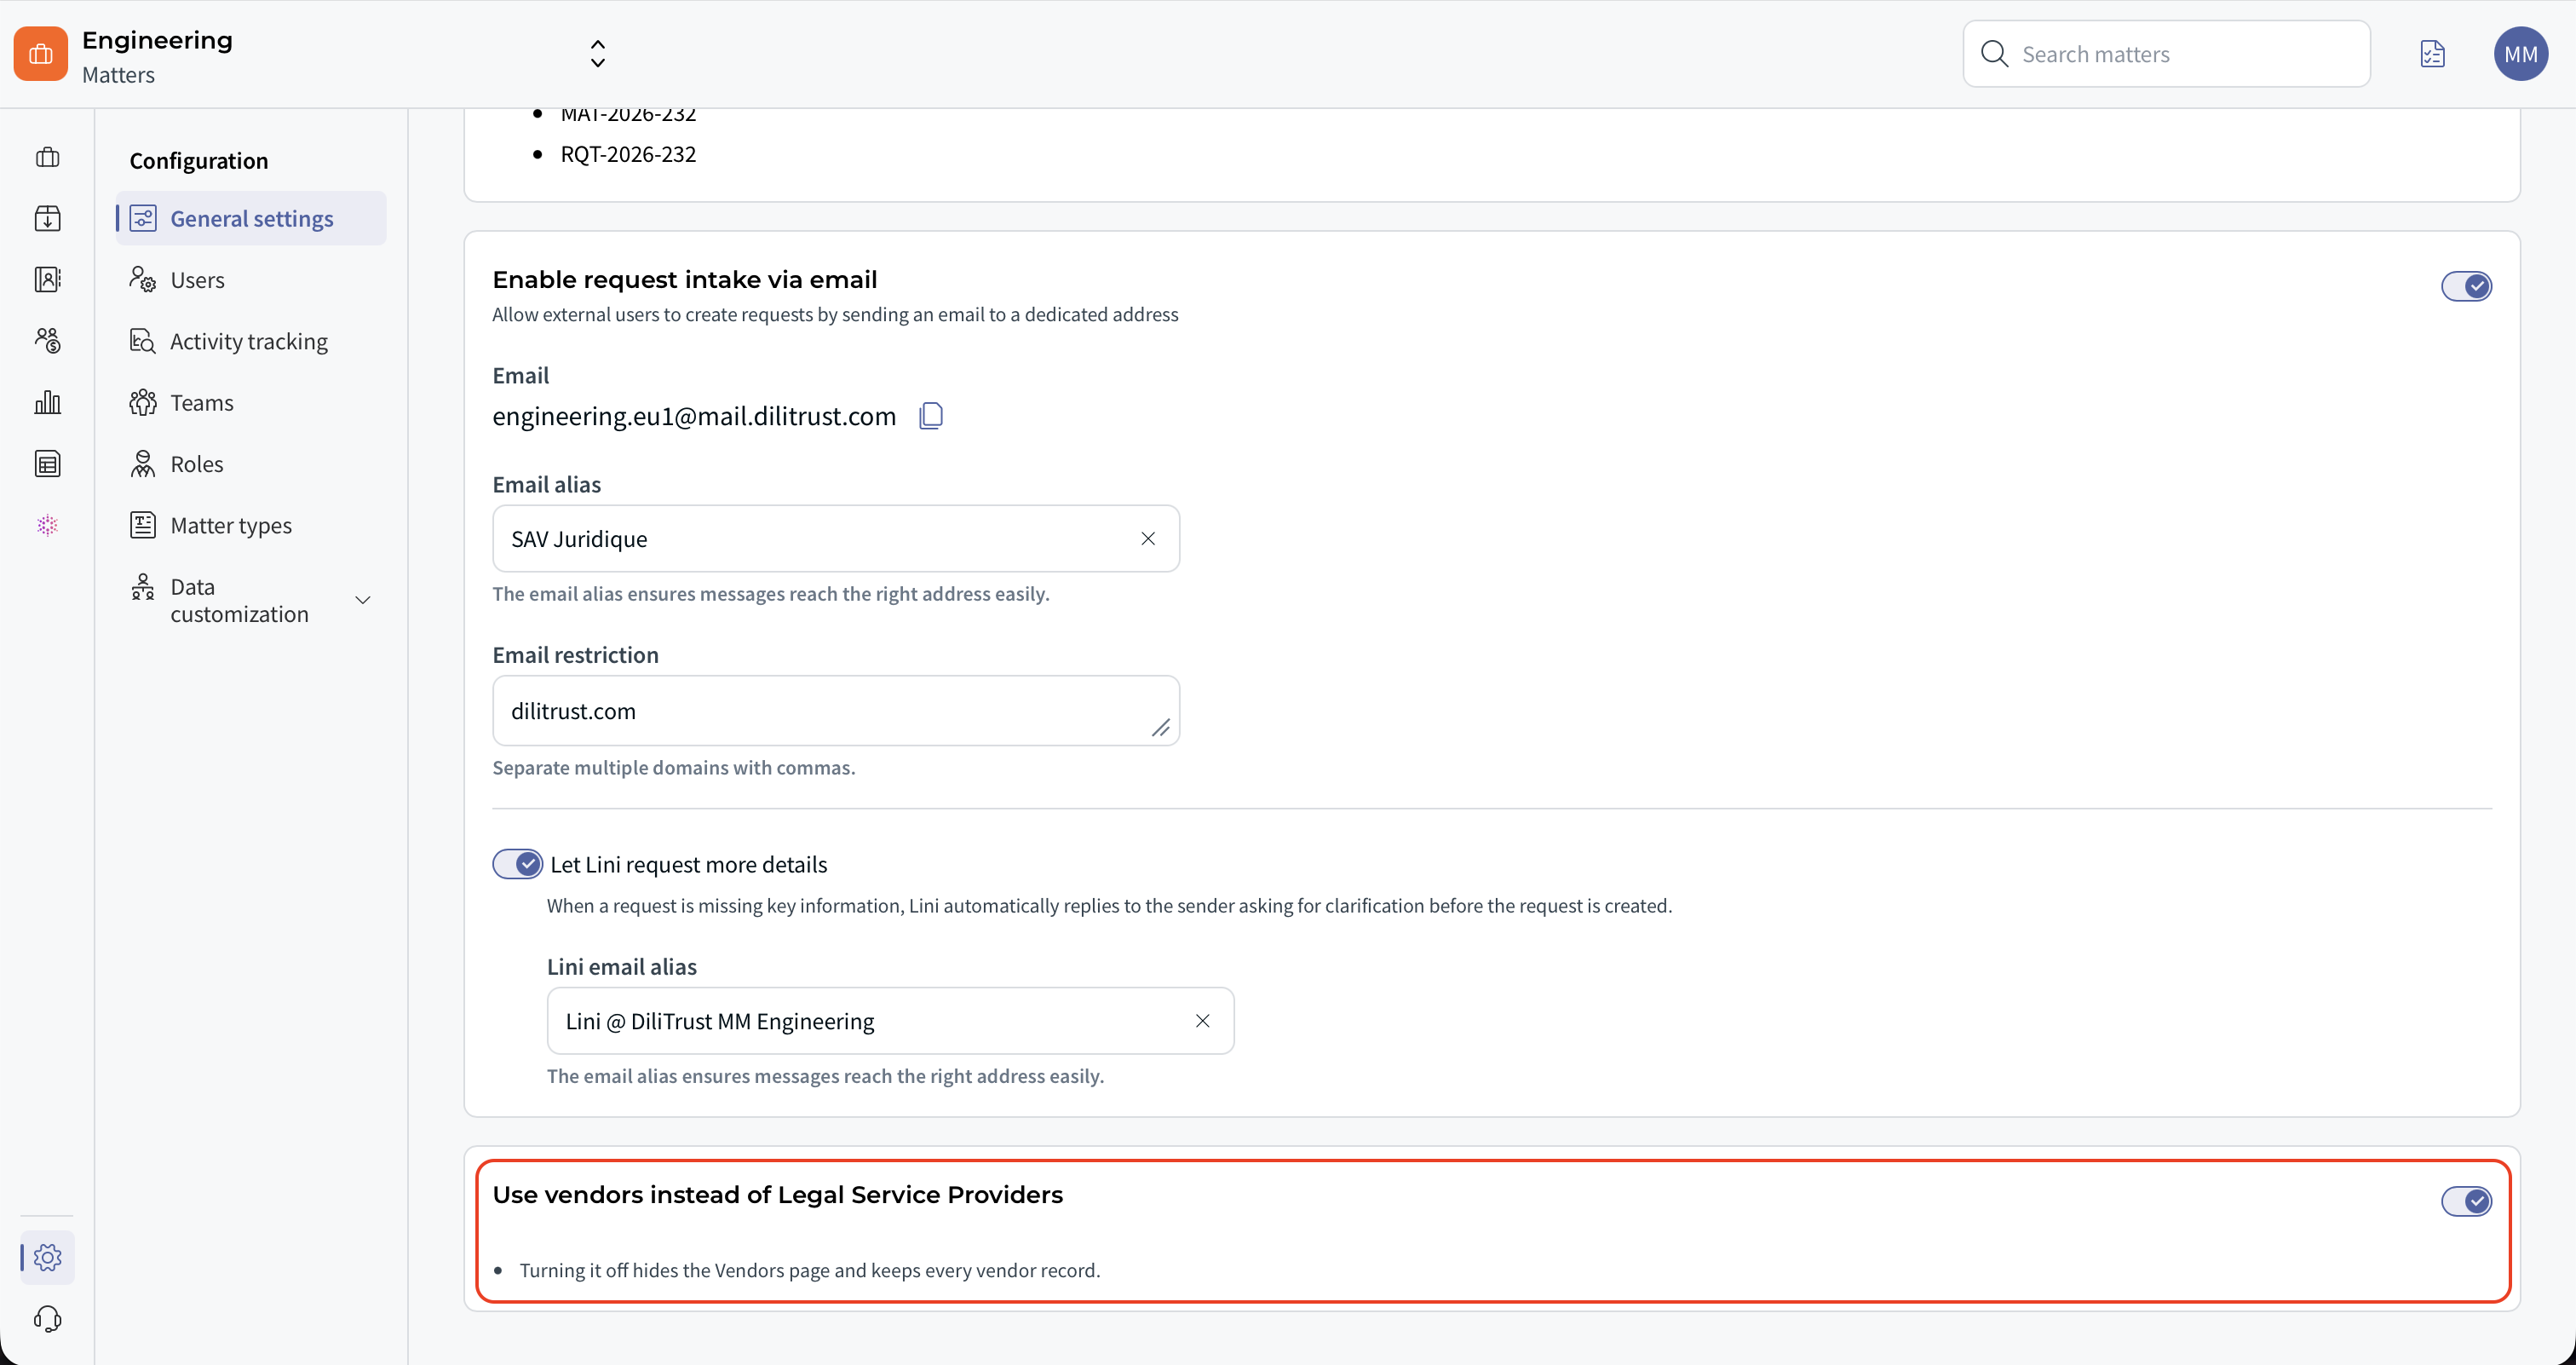
- Go to Configuration > General settings.
- Turn on the Use vendors instead of Legal Service Providers toggle.
Result: the Vendors tab is displayed.
- When the toggle is off (default), the Vendors tab is hidden.
- Turning the toggle off does not delete your vendor records or their data. It only hides the section.
✍ Find a vendor in the list
- Click Vendors in the left navigation bar.
Result: a table of every vendor registered in your organization opens, with 30 rows per page by default. It shows these columns: Vendor name, Vendor ID, Tax ID, Billing Contact, Practice areas, Status, Last update and Actions.
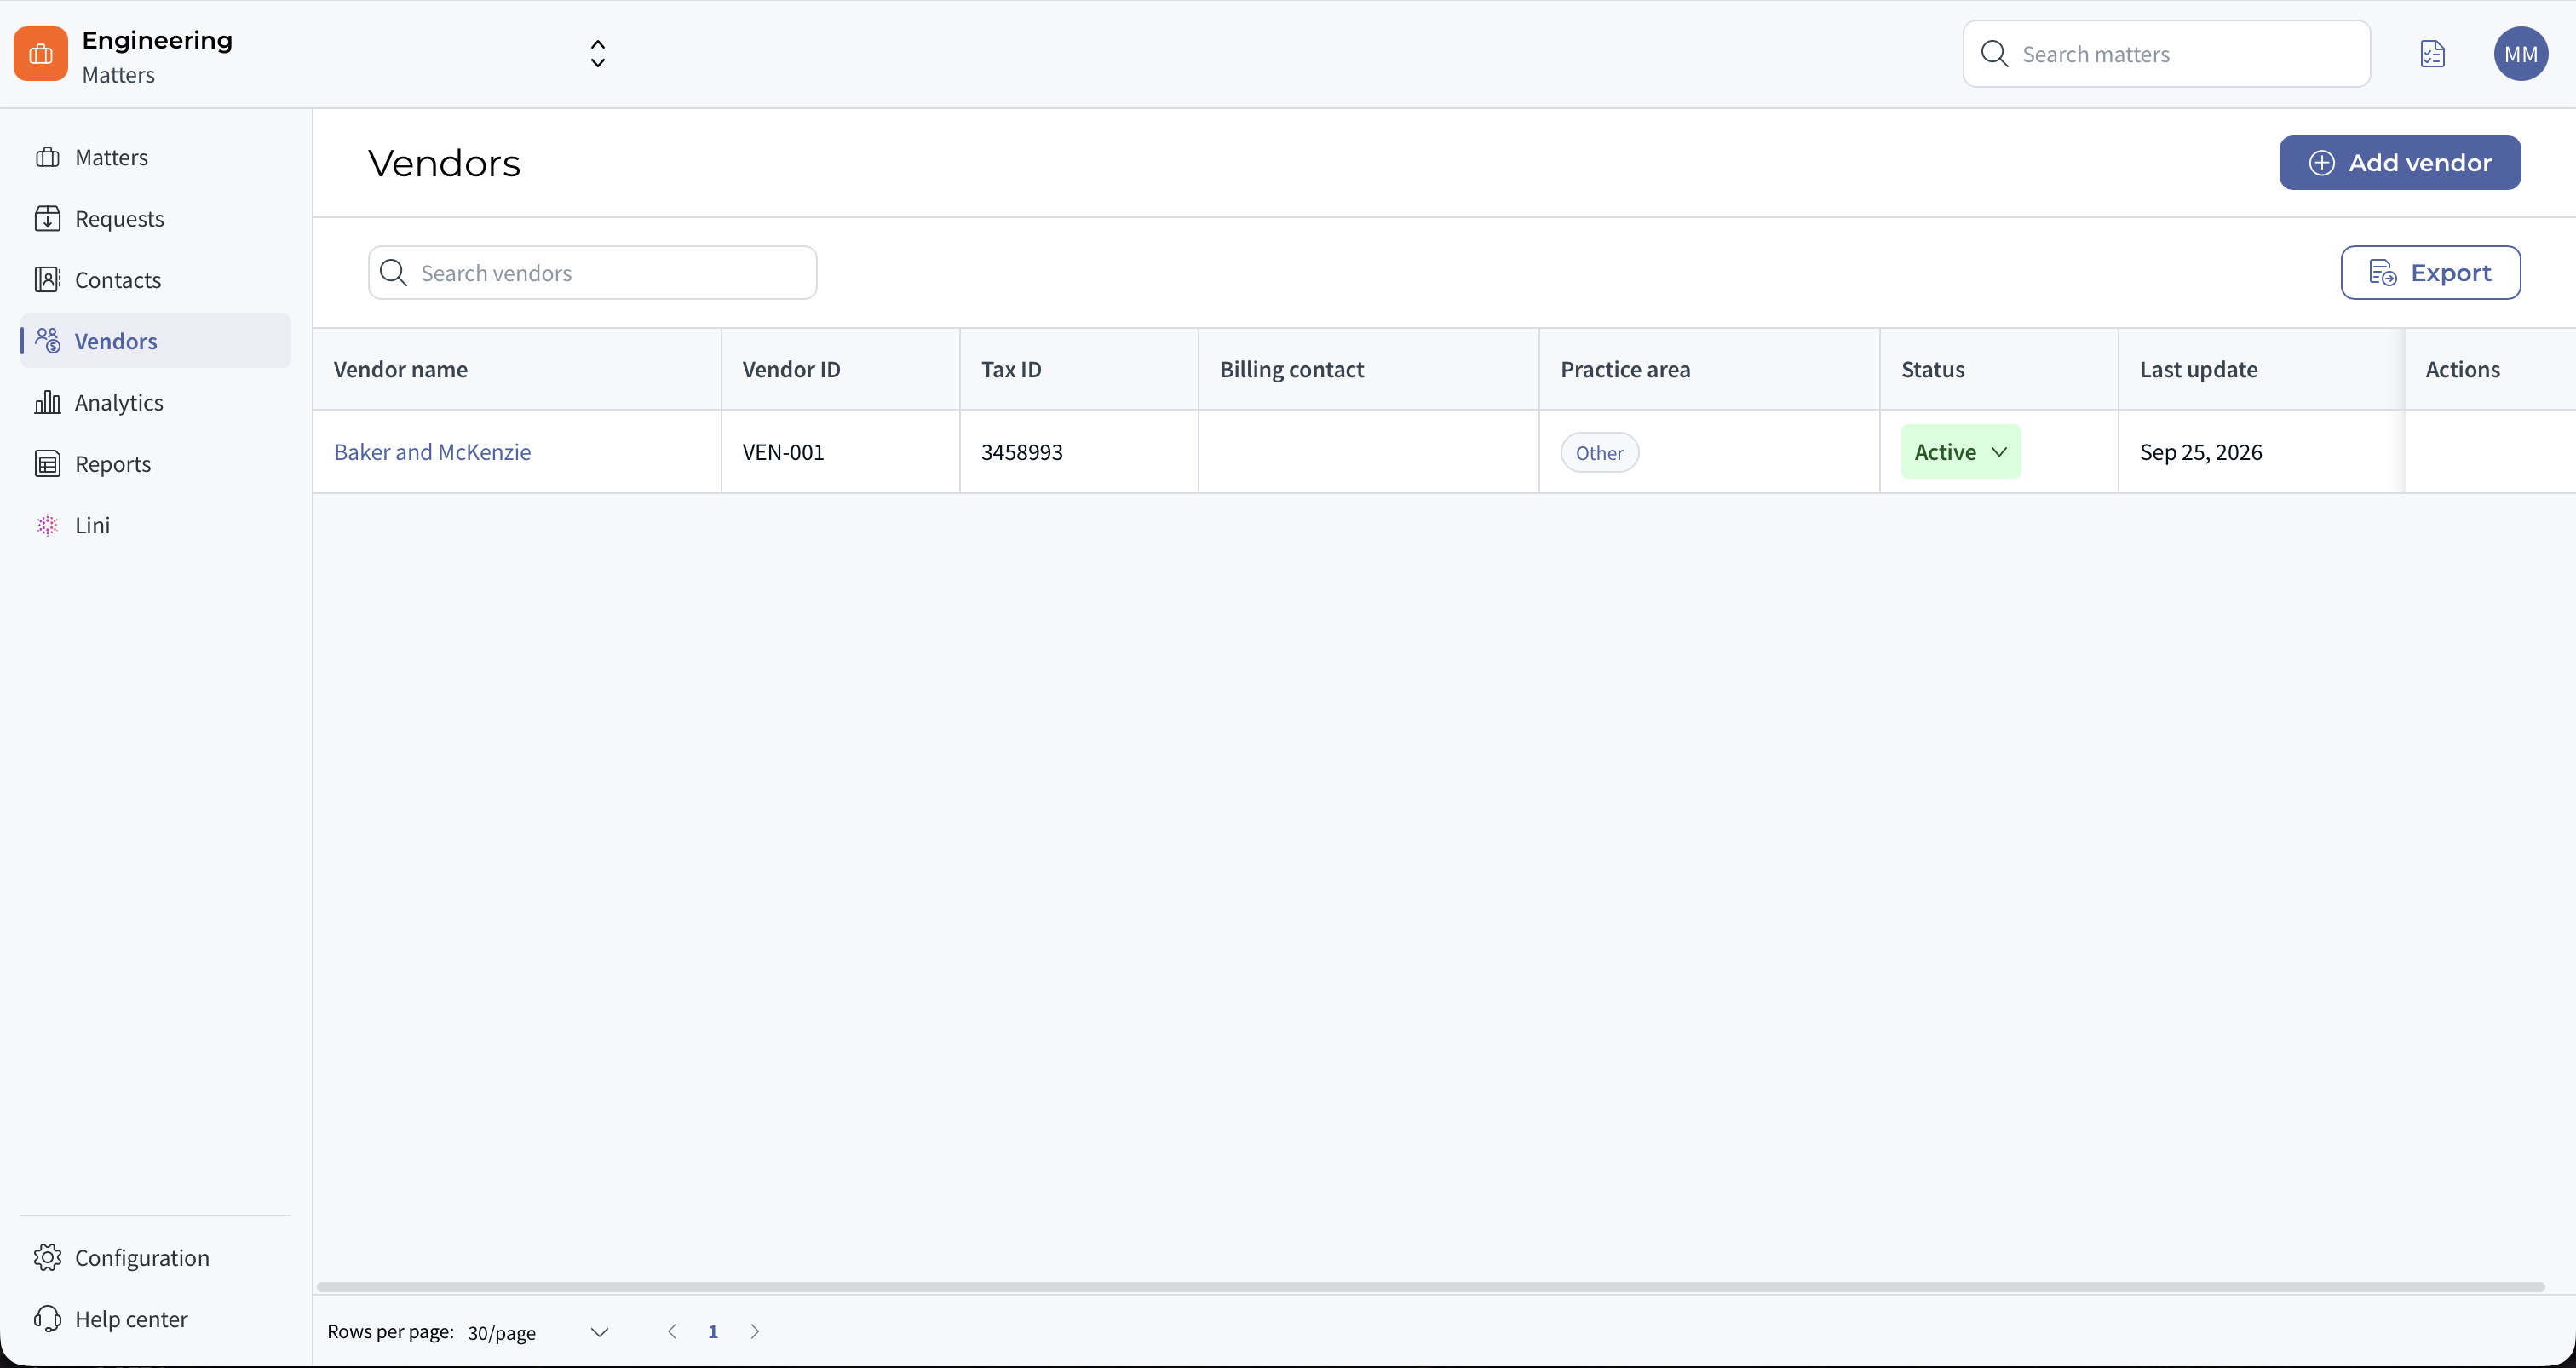
- To find a vendor, type in the search field. You can search by Vendor name, Vendor ID or Tax ID. The search matches any part of the value and ignores upper and lower case.
Result: the list shows only the matching vendors. Your search is kept when you move between pages.
Good to know:
- No results: when a search finds nothing, a dedicated "no results" message is shown. It is different from the message shown when the section itself is empty.
- Sorting: the list is sorted by Vendor name by default. You can sort the Last update column in descending order to see the most recently modified vendors first.
- Empty list: you see the message "This section is currently empty. Add your first vendor to proceed." Export is disabled while the list is empty, but Add vendor and Import .xls remain available.
- Export: the export includes all the columns visible in the list.
- Blank Billing Contact: it simply means no contact has been registered yet for that vendor. It is not an error.
✨ Add a vendor
- In the Vendors screen, click Add vendor.
Result: a side panel opens with two sections. - Fill in the Vendor information section:
- Vendor name (required) – free text, up to 255 characters. A name made only of spaces is treated as empty.
- Tax ID (required) – the firm's fiscal identifier, for example an EIN such as 80-812932. The same Tax ID may legitimately appear on different vendors, for instance firms registered in different countries.
- Practice area (optional) – one value chosen from the list below.
- Status (optional) – Active or Inactive. If you leave it empty, the vendor is created as Active.
- If you wish, fill in the Billing contact section:
- First name (optional) – free text.
- Last name (optional) – free text.
- E-mail (optional) – must follow a standard email format. An invalid address shows an error under the field and prevents you from confirming.
- Click Confirm.
Result: the system assigns the next Vendor ID automatically and the vendor appears in the list. A Creation event is recorded in the audit trail.
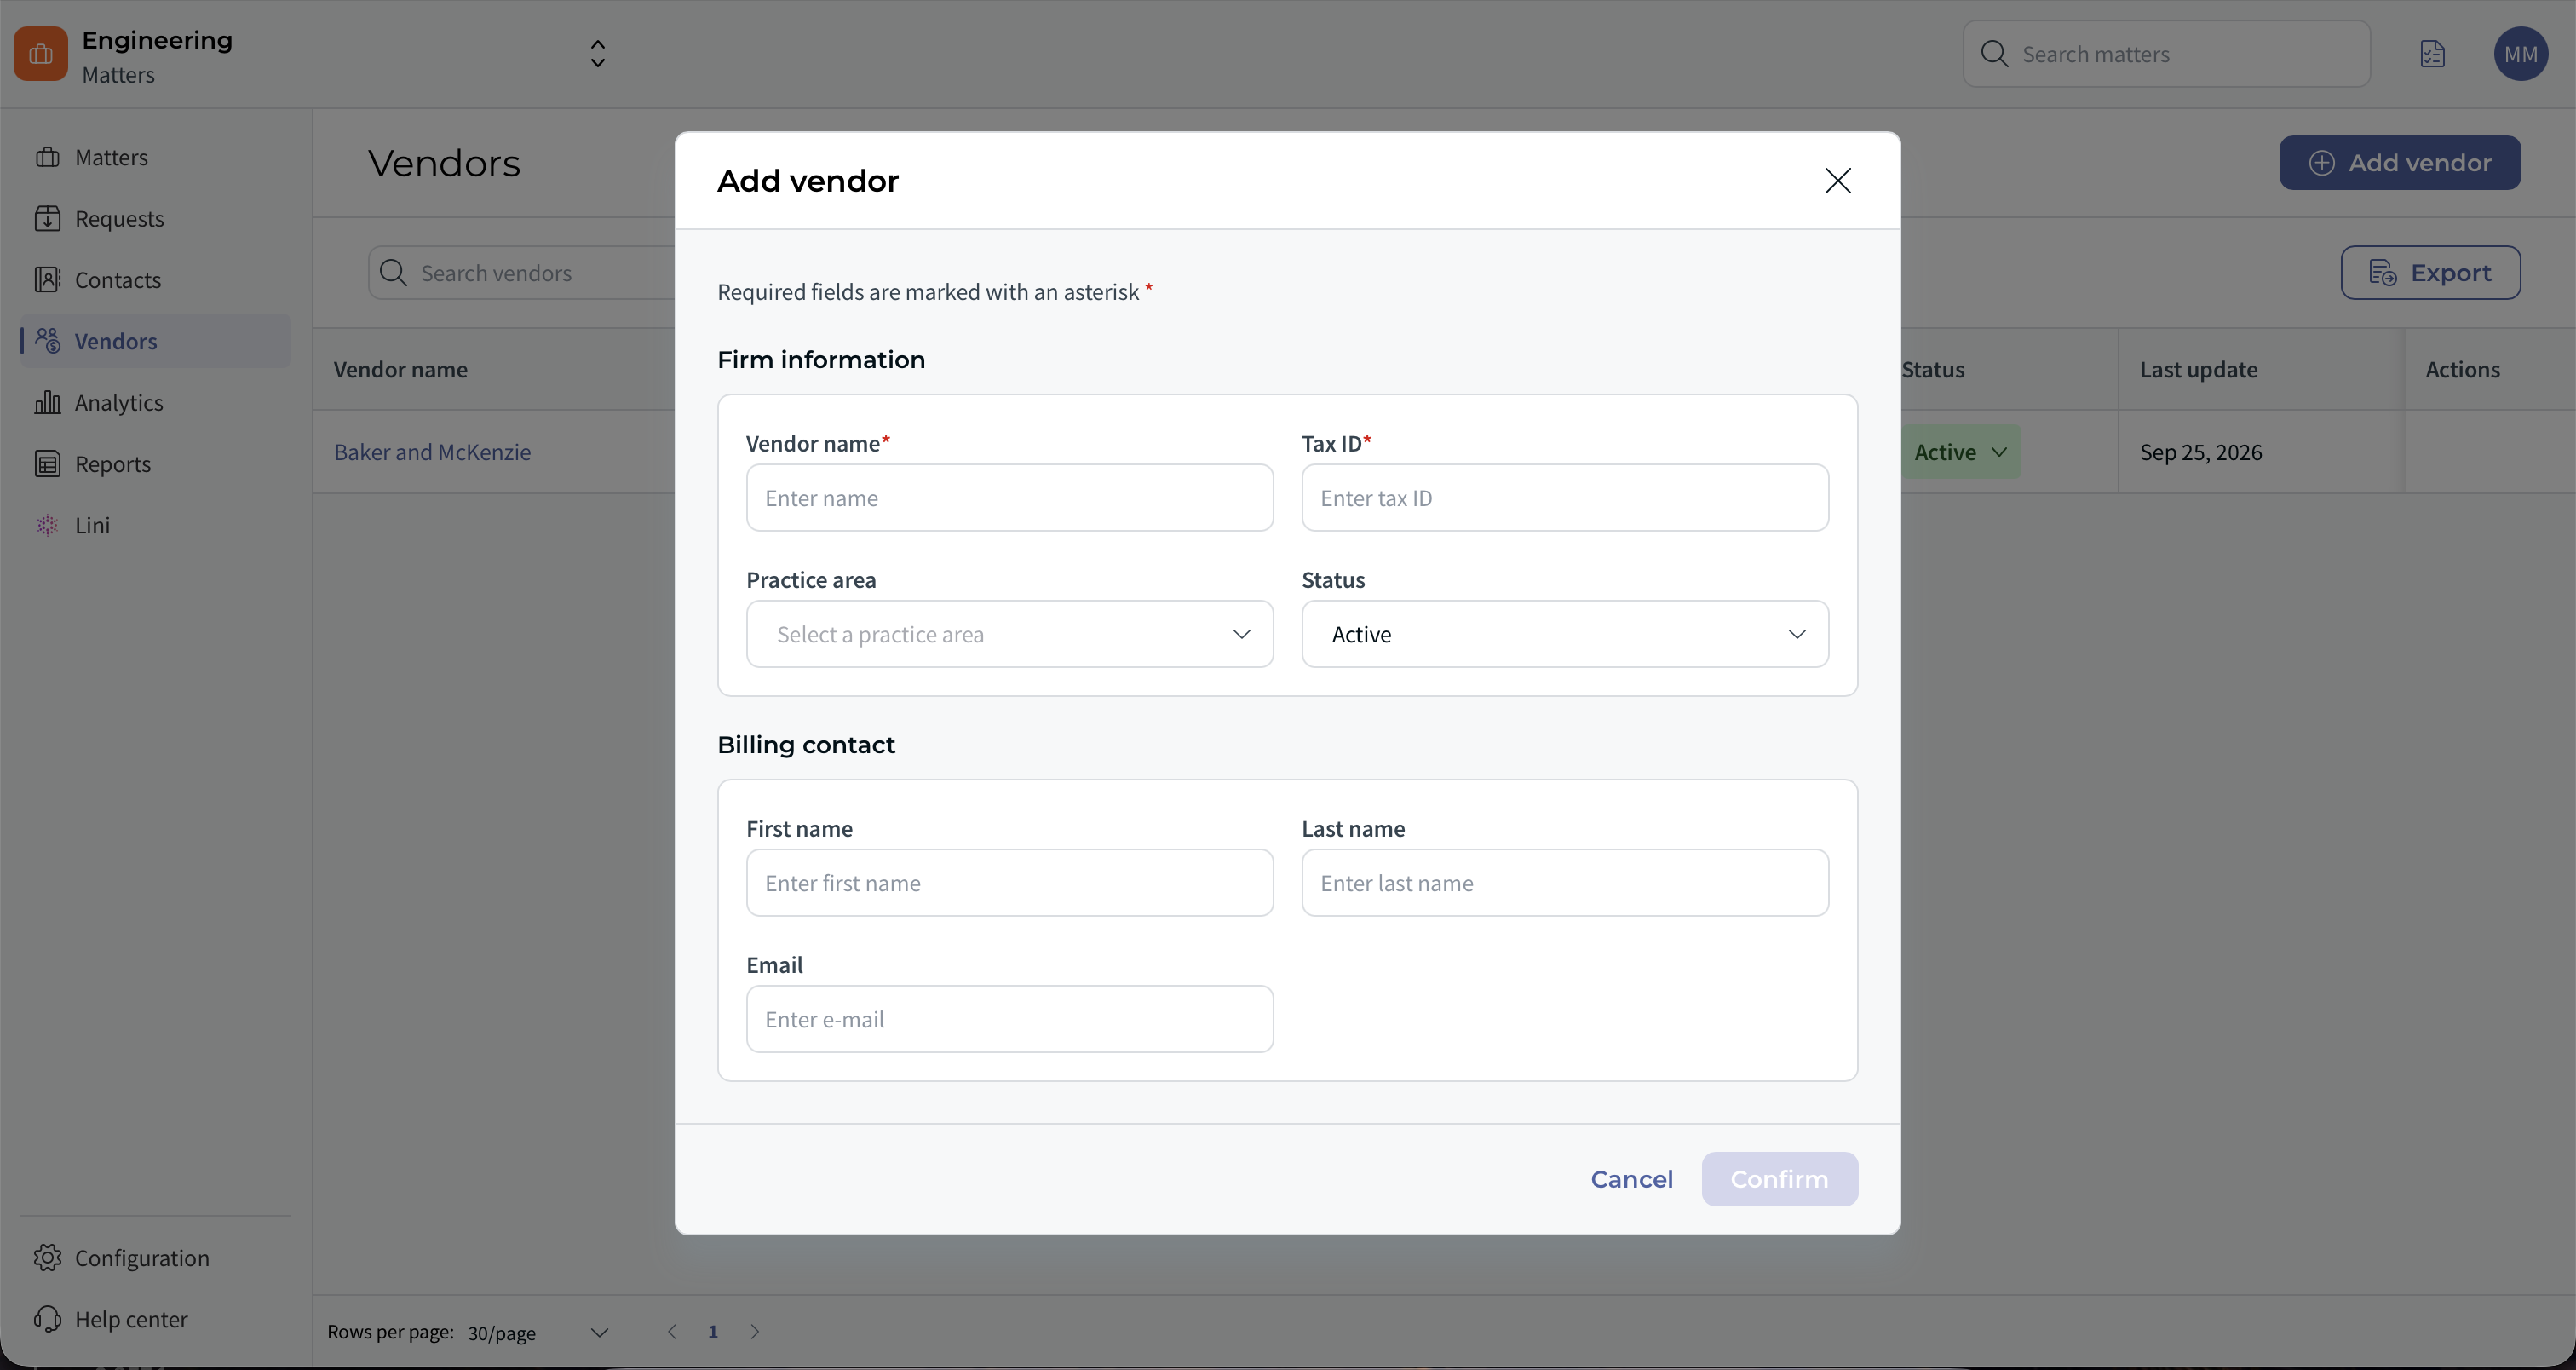
To leave without saving, click Cancel. If you have already filled in some fields, you are asked to confirm. No record is created.
Available practice areas: Antitrust & Competition, Banking & Finance, Bankruptcy & Restructuring, Capital Markets & Securities, Commercial & Contracts, Compliance & Investigations, Corporate & M&A, Criminal Law, Data Privacy & Cybersecurity, Dispute Resolution & Litigation, Employment & Labor, Environmental Law, Government & Public Law, Healthcare, Immigration, Insurance, Intellectual Property, International Law & Trade, Real Estate & Construction, Tax, Technology, Media & Comms, Transportation, Other.
Good to know:
- Vendor ID: it is generated by the system, follows a sequential pattern (VEN-001, VEN-002 and so on) and can never be edited.
- Same name: two vendors may share the same name. You see a soft warning, but the vendor is created.
- Same Tax ID: a duplicate Tax ID behaves differently. A warning is displayed and creation is blocked.
✌ Open and edit a vendor profile
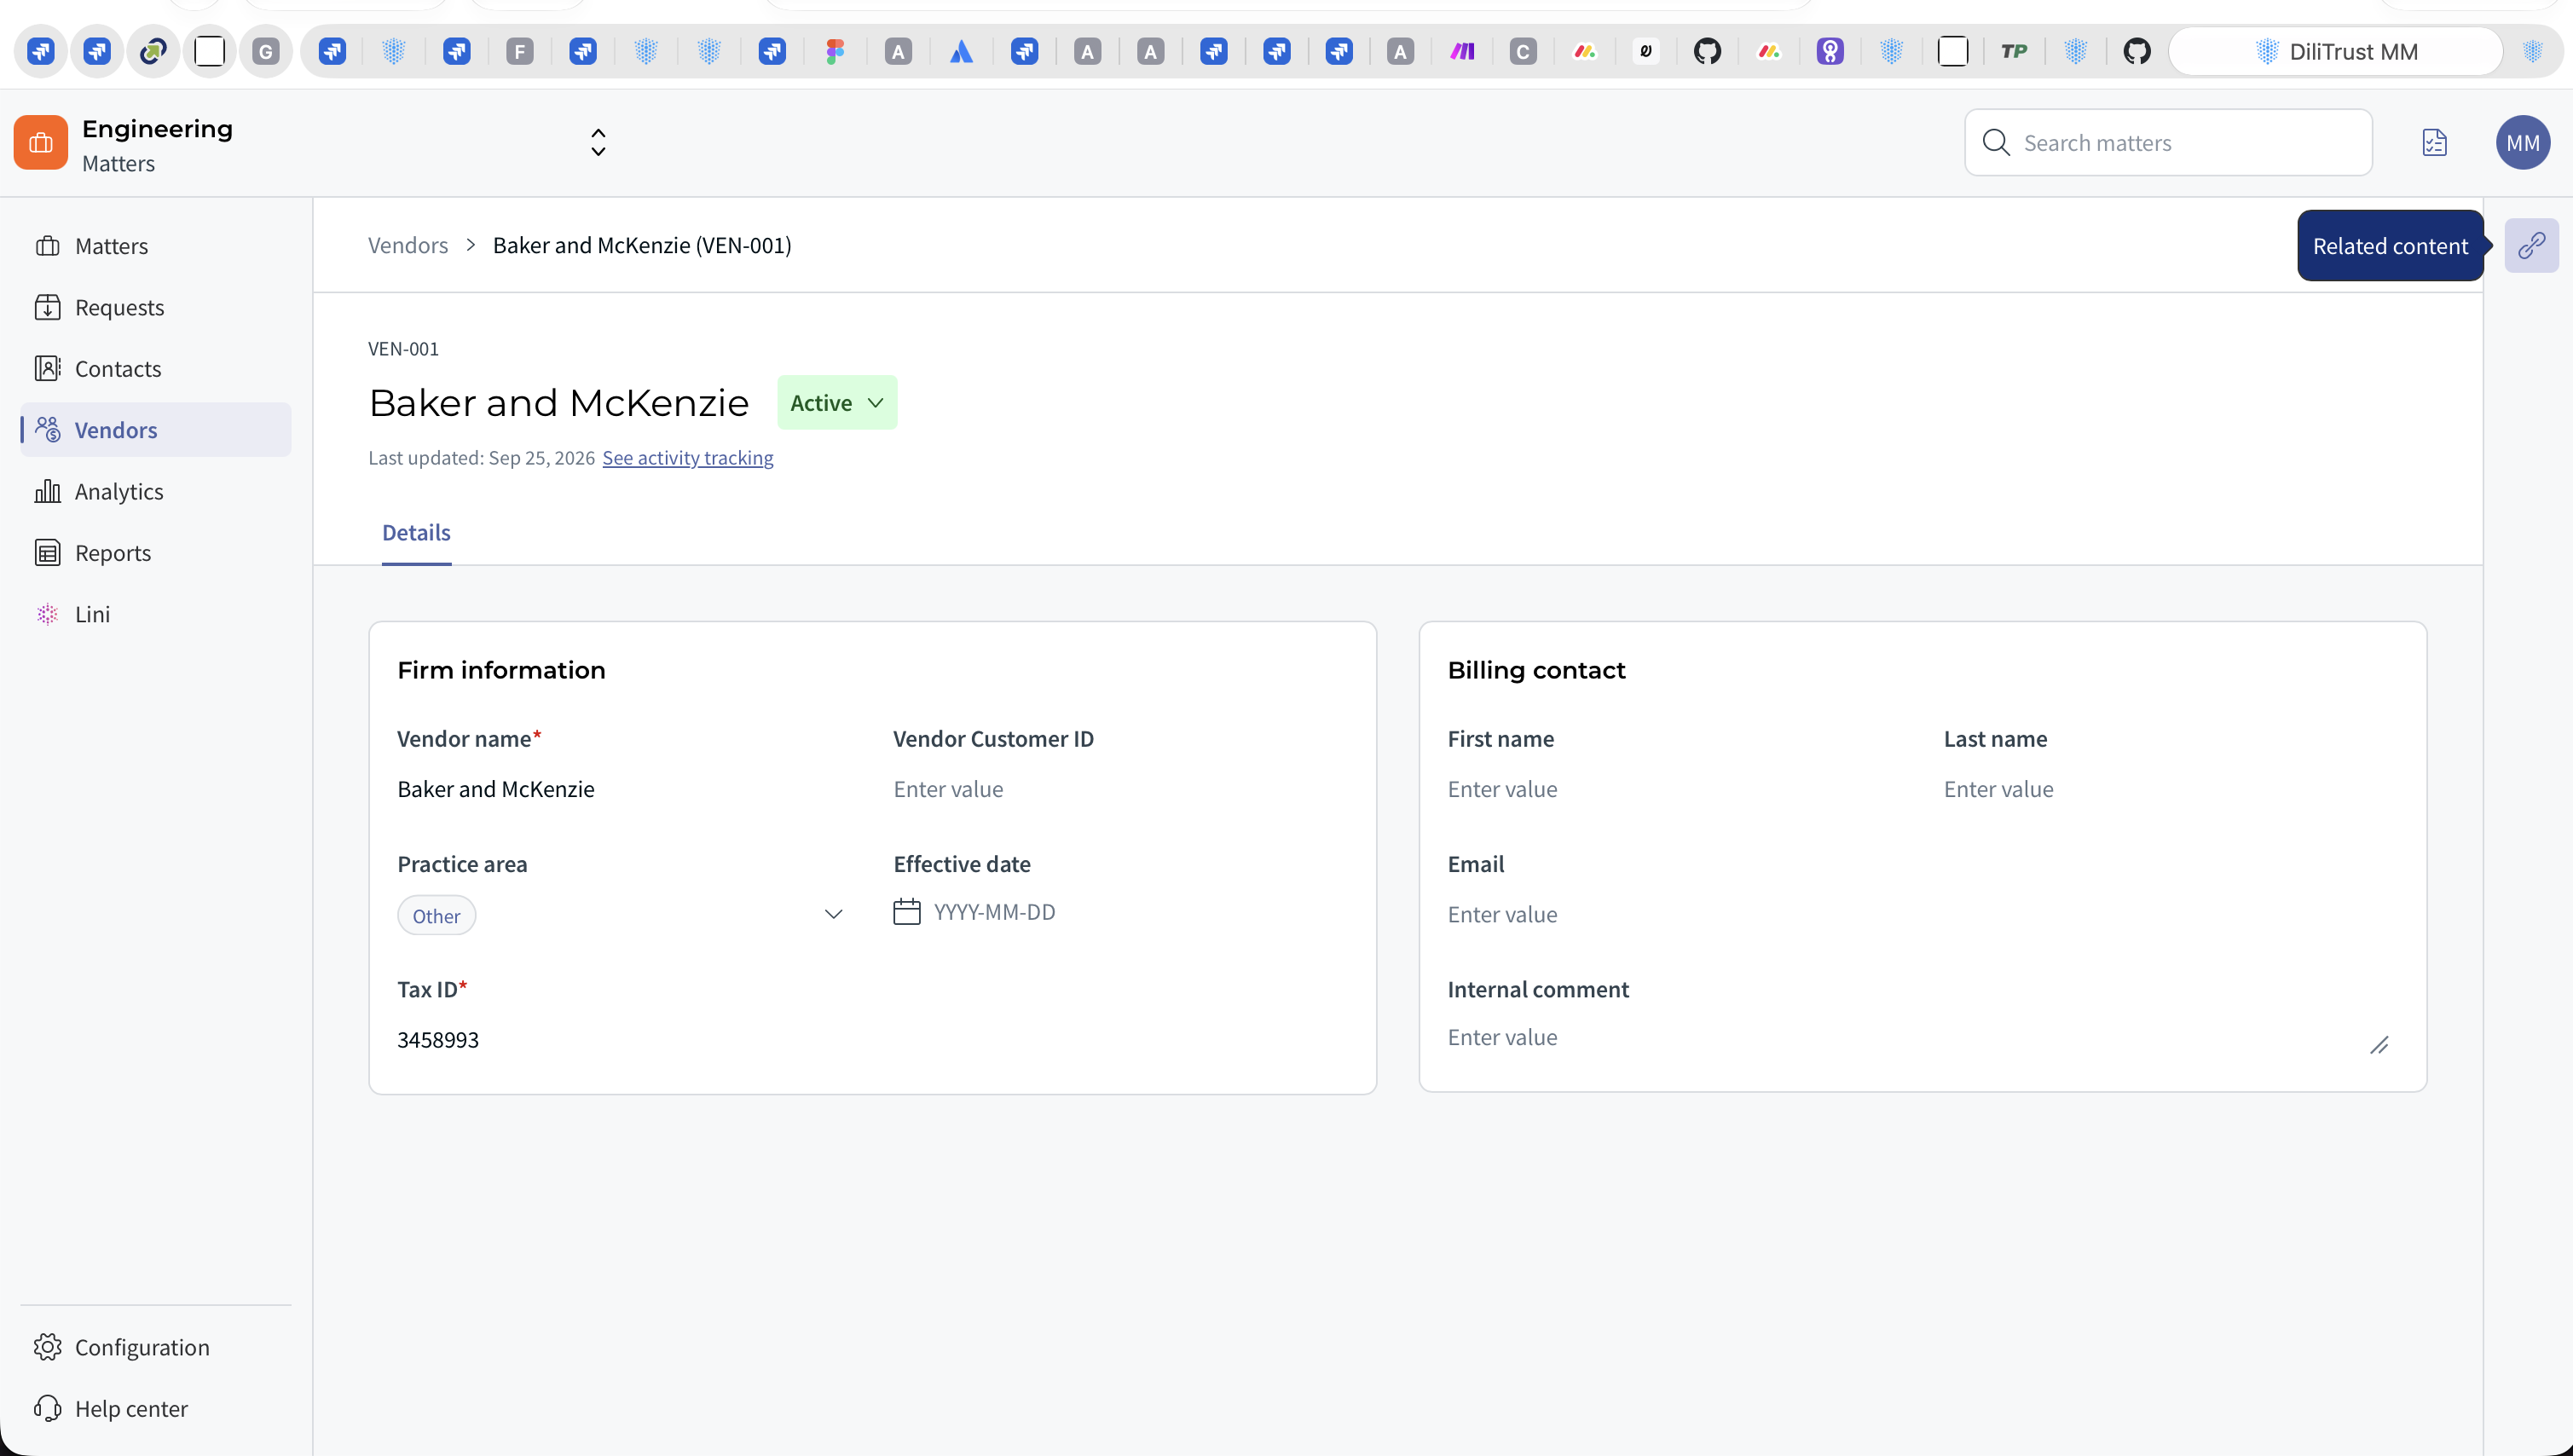
- In the list, click a vendor.
Result: its detail page opens. The header shows the Vendor ID badge, the vendor name, the status badge and the last updated date. A Delete vendor button sits in the top-right corner. - To change the vendor's information, use the Details tab. It is opened by default and contains the same fields as the creation panel. You can update them at any time.
The page has the following tabs:
- Details – the vendor's information.
- Timekeepers – the individuals who bill under this vendor, with their classification and their rates. This tab is displayed only when e-billing is turned on for your organization.
- Related content – the matters linked to this vendor.
- Activity tracking – the history of everything that happened on this vendor.
Activity tracking
Vendor events follow the same model as matters. They are visible on the vendor and in the global activity feed. Each entry shows:
- the vendor and its ID;
- the user and the date;
- the event type: Creation, Edition or Deletion;
- for edits, what changed, for example "Vendor name edited: Baker McKenzie → Baker McKenzie, LLC" or "Tax ID edited: 12-3456789 → 98-7654321".
⏳ Manage timekeepers and their billing rates
A timekeeper is an individual who works and bills under one of your vendors, for example a partner, an associate or a paralegal. You register timekeepers once at vendor level. Your team no longer re-types the same names and rates every time an invoice is recorded. You also always have a reference to check whether a person was authorised to bill, and at which rate.
Turn on e-billing (administrators)
Timekeepers are part of the e-billing capabilities. The Timekeepers tab only appears once an administrator turns on e-billing.
- Go to Configuration > General settings.
- Open the Features tab.
- Turn on the E-billing toggle.
Result: the Timekeepers tab is displayed and fully usable on every vendor detail page.
- When e-billing is off, the Timekeepers tab is hidden. The Vendors page itself remains accessible.
- Turning e-billing off does not delete any timekeeper or rate. It only hides them. When you turn it back on, all previously saved timekeepers and rates are displayed again.
Open the timekeeper list
- Open a vendor.
- Select the Timekeepers tab.
Result: the list opens, with 30 rows per page by default. It shows these columns: Name, Vendor timekeeper ID, Classification, Rate, Status and Actions. The tab header shows the number of timekeepers, for example Timekeepers (1).
- Rate shows the timekeeper's current billing rate. It stays blank if no rate has been defined.
- Status shows whether the timekeeper is Active or Inactive.
- Click a timekeeper's name to open their details in a side panel.
- Click Export to download the list. The export includes every available timekeeper field, including fields that are not displayed in the list.
- Click Add timekeeper to register a new one. Its dropdown also offers Import .xls.
- When no timekeeper has been added yet, you see the message "This section is currently empty. Add your first timekeeper to proceed."
Add a timekeeper
- In the vendor's Timekeepers tab, click Add timekeeper.
- Fill in the Timekeeper information section:
- First name and Last name (required) – cannot be empty or contain only spaces.
- Vendor timekeeper ID (required) – the firm's own internal reference for this person, for example their initials. It must be unique within the vendor.
- Status (required) – Active or Inactive. Active is selected by default.
- Classification (optional) – chosen from the standard LEDES classification codes, for example Associate.
- Fill in the Billing rate section:
- Base rate (optional) – the rate before any discount, with its currency.
- Approved rate (required) – the negotiated rate, with its currency. It must be a positive amount. The currency is USD by default.
- Effective from (required) – the start date of the rate, in DD/MM/YYYY format.
- Effective until (optional) – the end date of the rate. Leave it empty if the rate is ongoing.
- Click Confirm.
Result: the system assigns the next timekeeper ID automatically (TK-001, TK-002 and so on) and the timekeeper appears in the list.
To close the window without creating the timekeeper, click Cancel. If you have already filled in some fields, you are asked to confirm that you want to leave without saving.
Good to know:
- Required fields are marked with an asterisk. The Confirm button stays disabled until they are all filled in. Every timekeeper is created with at least one rate.
- If the Vendor timekeeper ID is already used by another timekeeper of the same vendor, an error under the field blocks creation.
- If Effective until is earlier than Effective from, an error is shown under the field and you cannot confirm.
View and edit a timekeeper
- Click a timekeeper's name or the edit icon.
Result: their details open in a side panel on the right of the screen. - Update the timekeeper's information as needed.
The panel also shows the full billing rate history. Every rate has its own validity period, for example USD 1,095.00 /hour, Jan 01, 2023 – Dec 31, 2024. The rate in force is labelled Current.
Add a new rate
- In the timekeeper side panel, go to the Billing rate section and click Add rate.
Result: a form opens with the same rate fields as when adding a timekeeper. - Fill in the Approved rate and the Effective from date. If needed, also fill in the Base rate and the Effective until date.
- Click Save new rate. To close the form without saving, click Cancel.
Result: the new rate is added to the history. If you left Effective until empty, it becomes the Current rate.
Good to know:
- If the new rate overlaps the previous one, the previous rate is closed automatically.
- To apply a new effective date, add a new rate rather than editing the existing one.
- All rates of a timekeeper must use the same currency.
- If Effective until is earlier than Effective from, an error is shown under the field and the rate cannot be saved.
- When you fill in an approved rate, the panel invites you to compare it with peer timekeepers already registered in your registry.
Delete a rate
If a rate was entered by mistake, you can delete it from the timekeeper side panel. A confirmation step is required.
- The rate is permanently deleted.
- If you delete the Current rate, the next most recent rate becomes the current rate.
- You cannot delete a timekeeper's last remaining rate.
- If no remaining rate covers today's date, the panel shows a message inviting you to add a rate covering today.
Deactivate a timekeeper
A timekeeper cannot be deleted. When someone no longer bills under the vendor:
- Open the timekeeper side panel.
- Set their Status to Inactive.
Result: the timekeeper is inactive. Their rates are not deleted: the full rate history is preserved.
Import timekeepers from Excel
- In the vendor's Timekeepers tab, open the dropdown on the Add timekeeper button and select Import .xls.
- Download the import template offered in the dialog and fill it in. The required columns are: First name, Last name, Vendor Timekeeper ID, Approved rate and Effective from.
- Upload your file. Both .xls and .xlsx files are supported.
Result:
- If every row is valid, all rows are imported and a success notification is shown.
- If some rows fail, the failed rows are listed with the reason. A timekeeper is imported only if all of their rows are valid. For example, if a timekeeper has two rates on two rows and one row is invalid, neither row is imported for that timekeeper.
- Blank rows are skipped silently.
Timekeeper activity tracking
Changes to timekeepers are recorded in the vendor's activity tracking. Adding, editing or deactivating a timekeeper and managing their rates all modify the vendor record. So each entry shows the parent vendor as the content and Edition as the event. The details column describes the timekeeper action, for example:
- Timekeeper added: John Smith (TK-001)
- Timekeeper status edited: John Smith (TK-001) · Active → Inactive
- Timekeeper rate added: Sarah Johnson (TK-004) · 450 USD/hr · Effective from Jan 1, 2026
- Timekeeper classification edited: Sarah Johnson (TK-004) · Associate → Partner
Entries are listed from the most recent to the oldest.
⚡ Link a vendor to a matter
Linking decides which firms are authorized to work and bill on a given engagement. The link is bidirectional: whichever side you create it from, it appears on both.
From the vendor
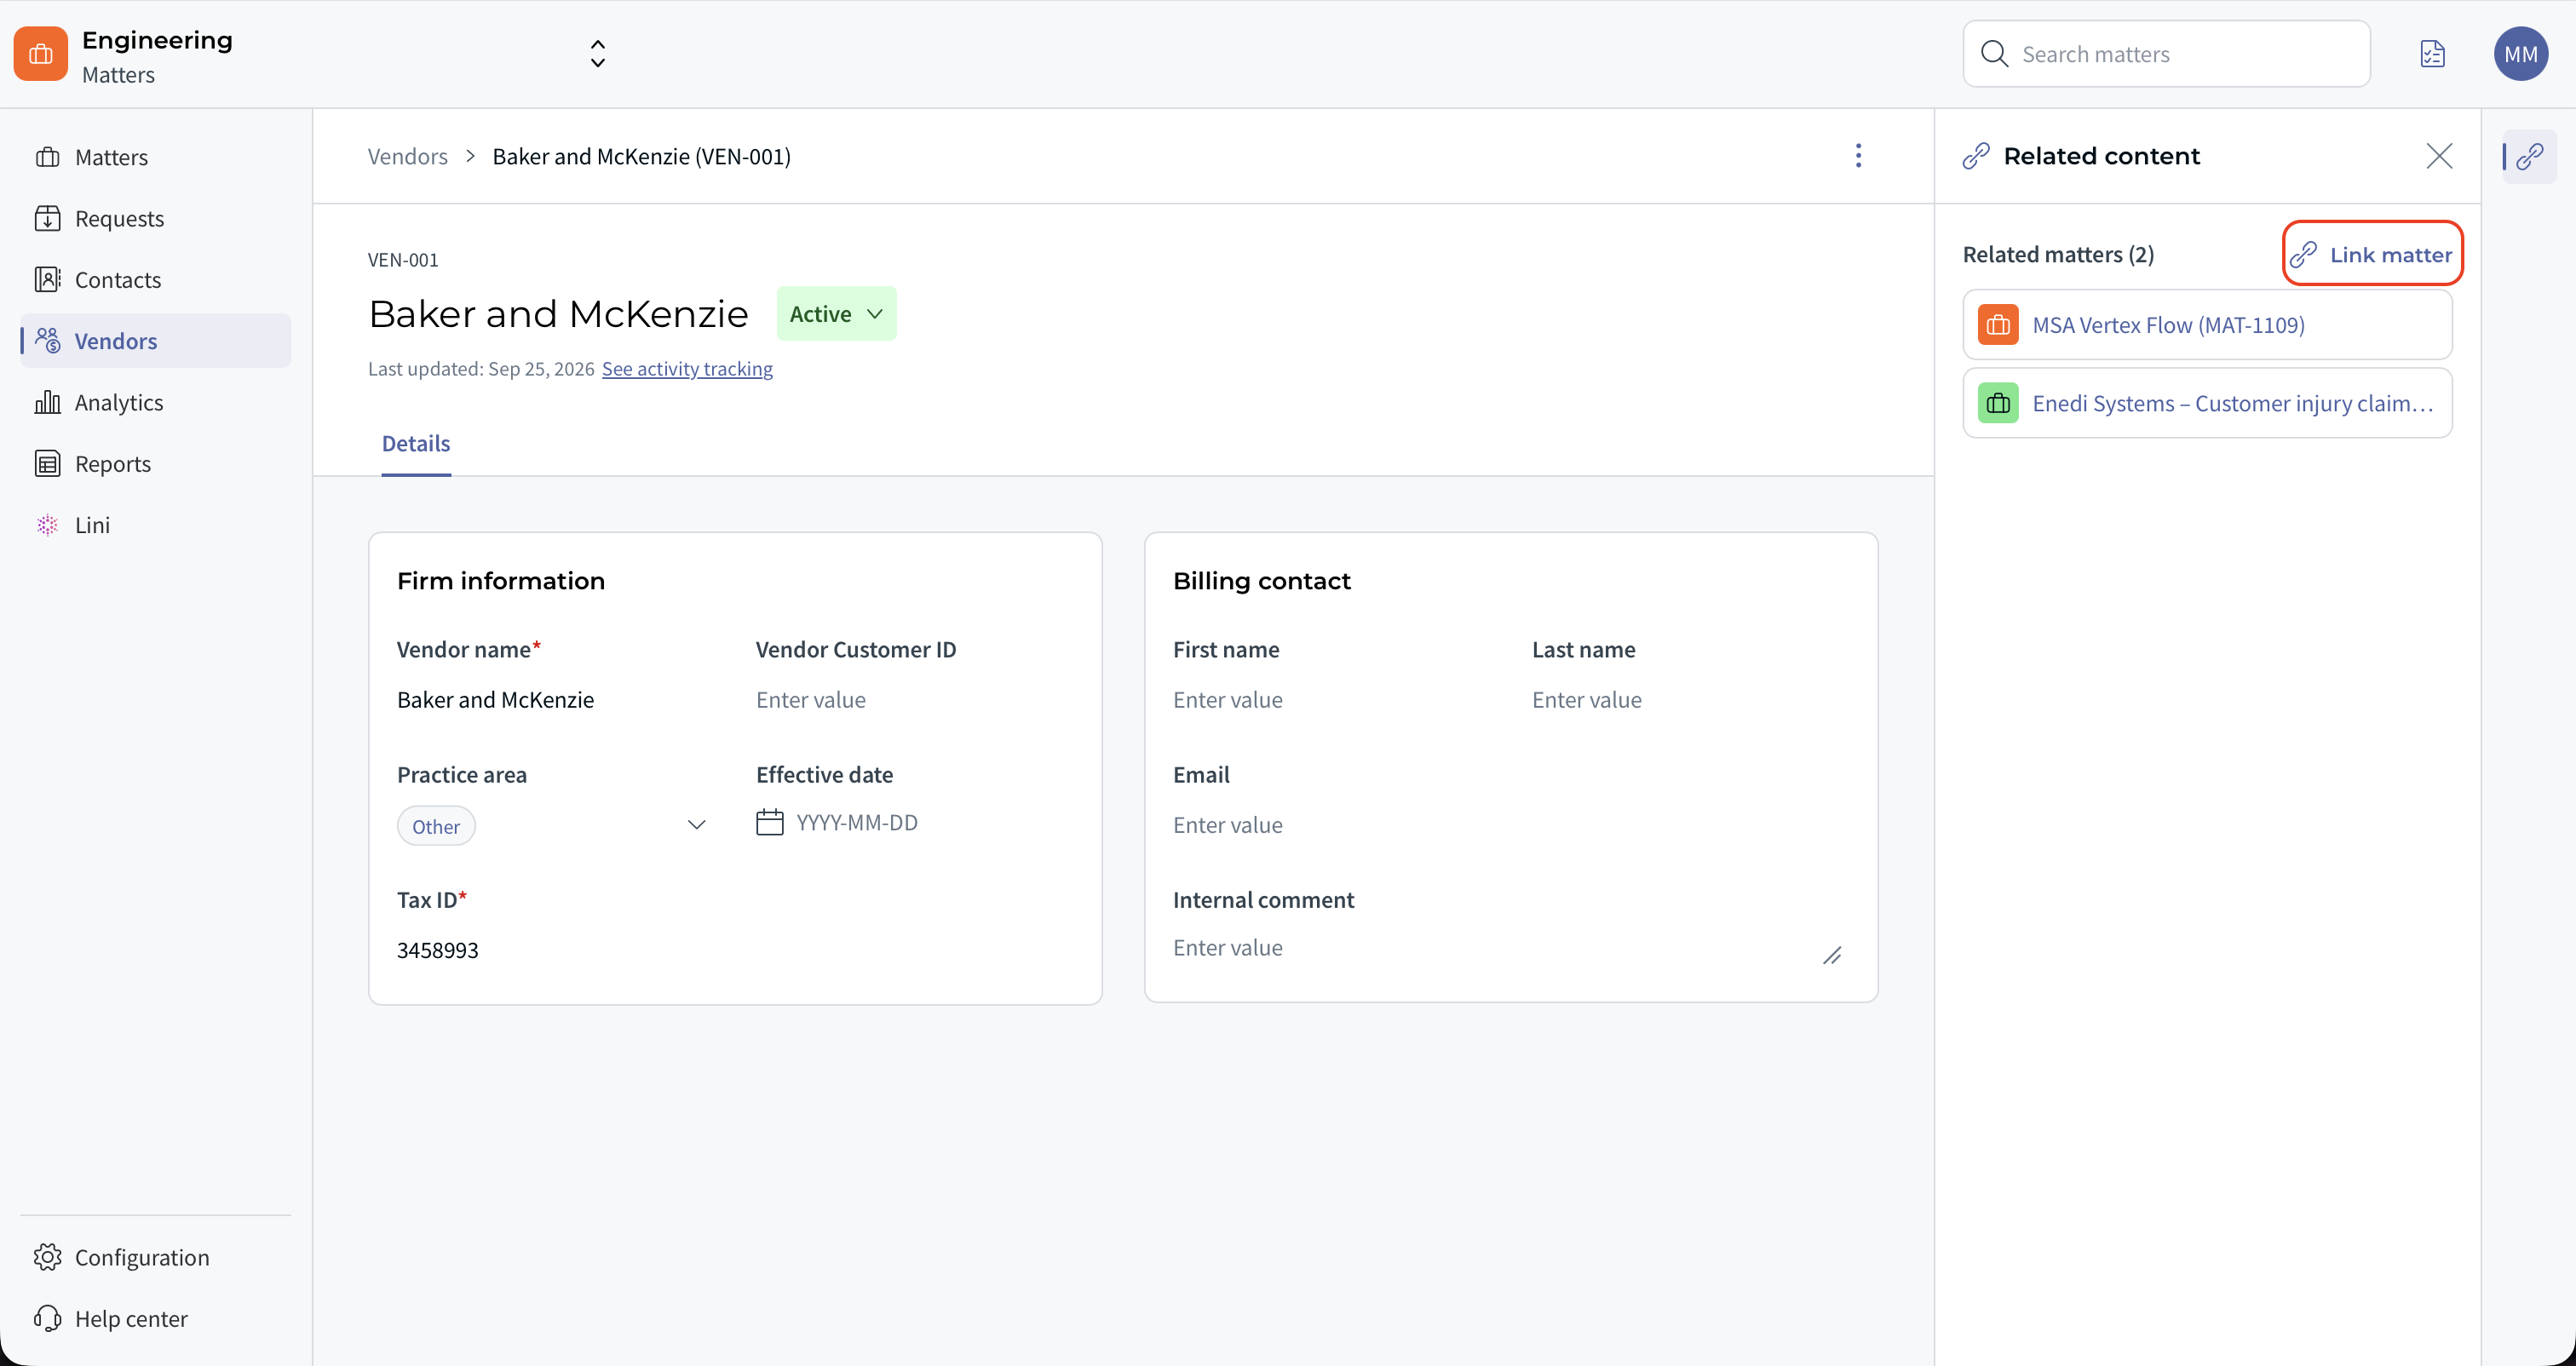
- Open the vendor and go to the Related content tab.
- In the Related matter (N) section, click Link matter.
- Search for the matter and select it.
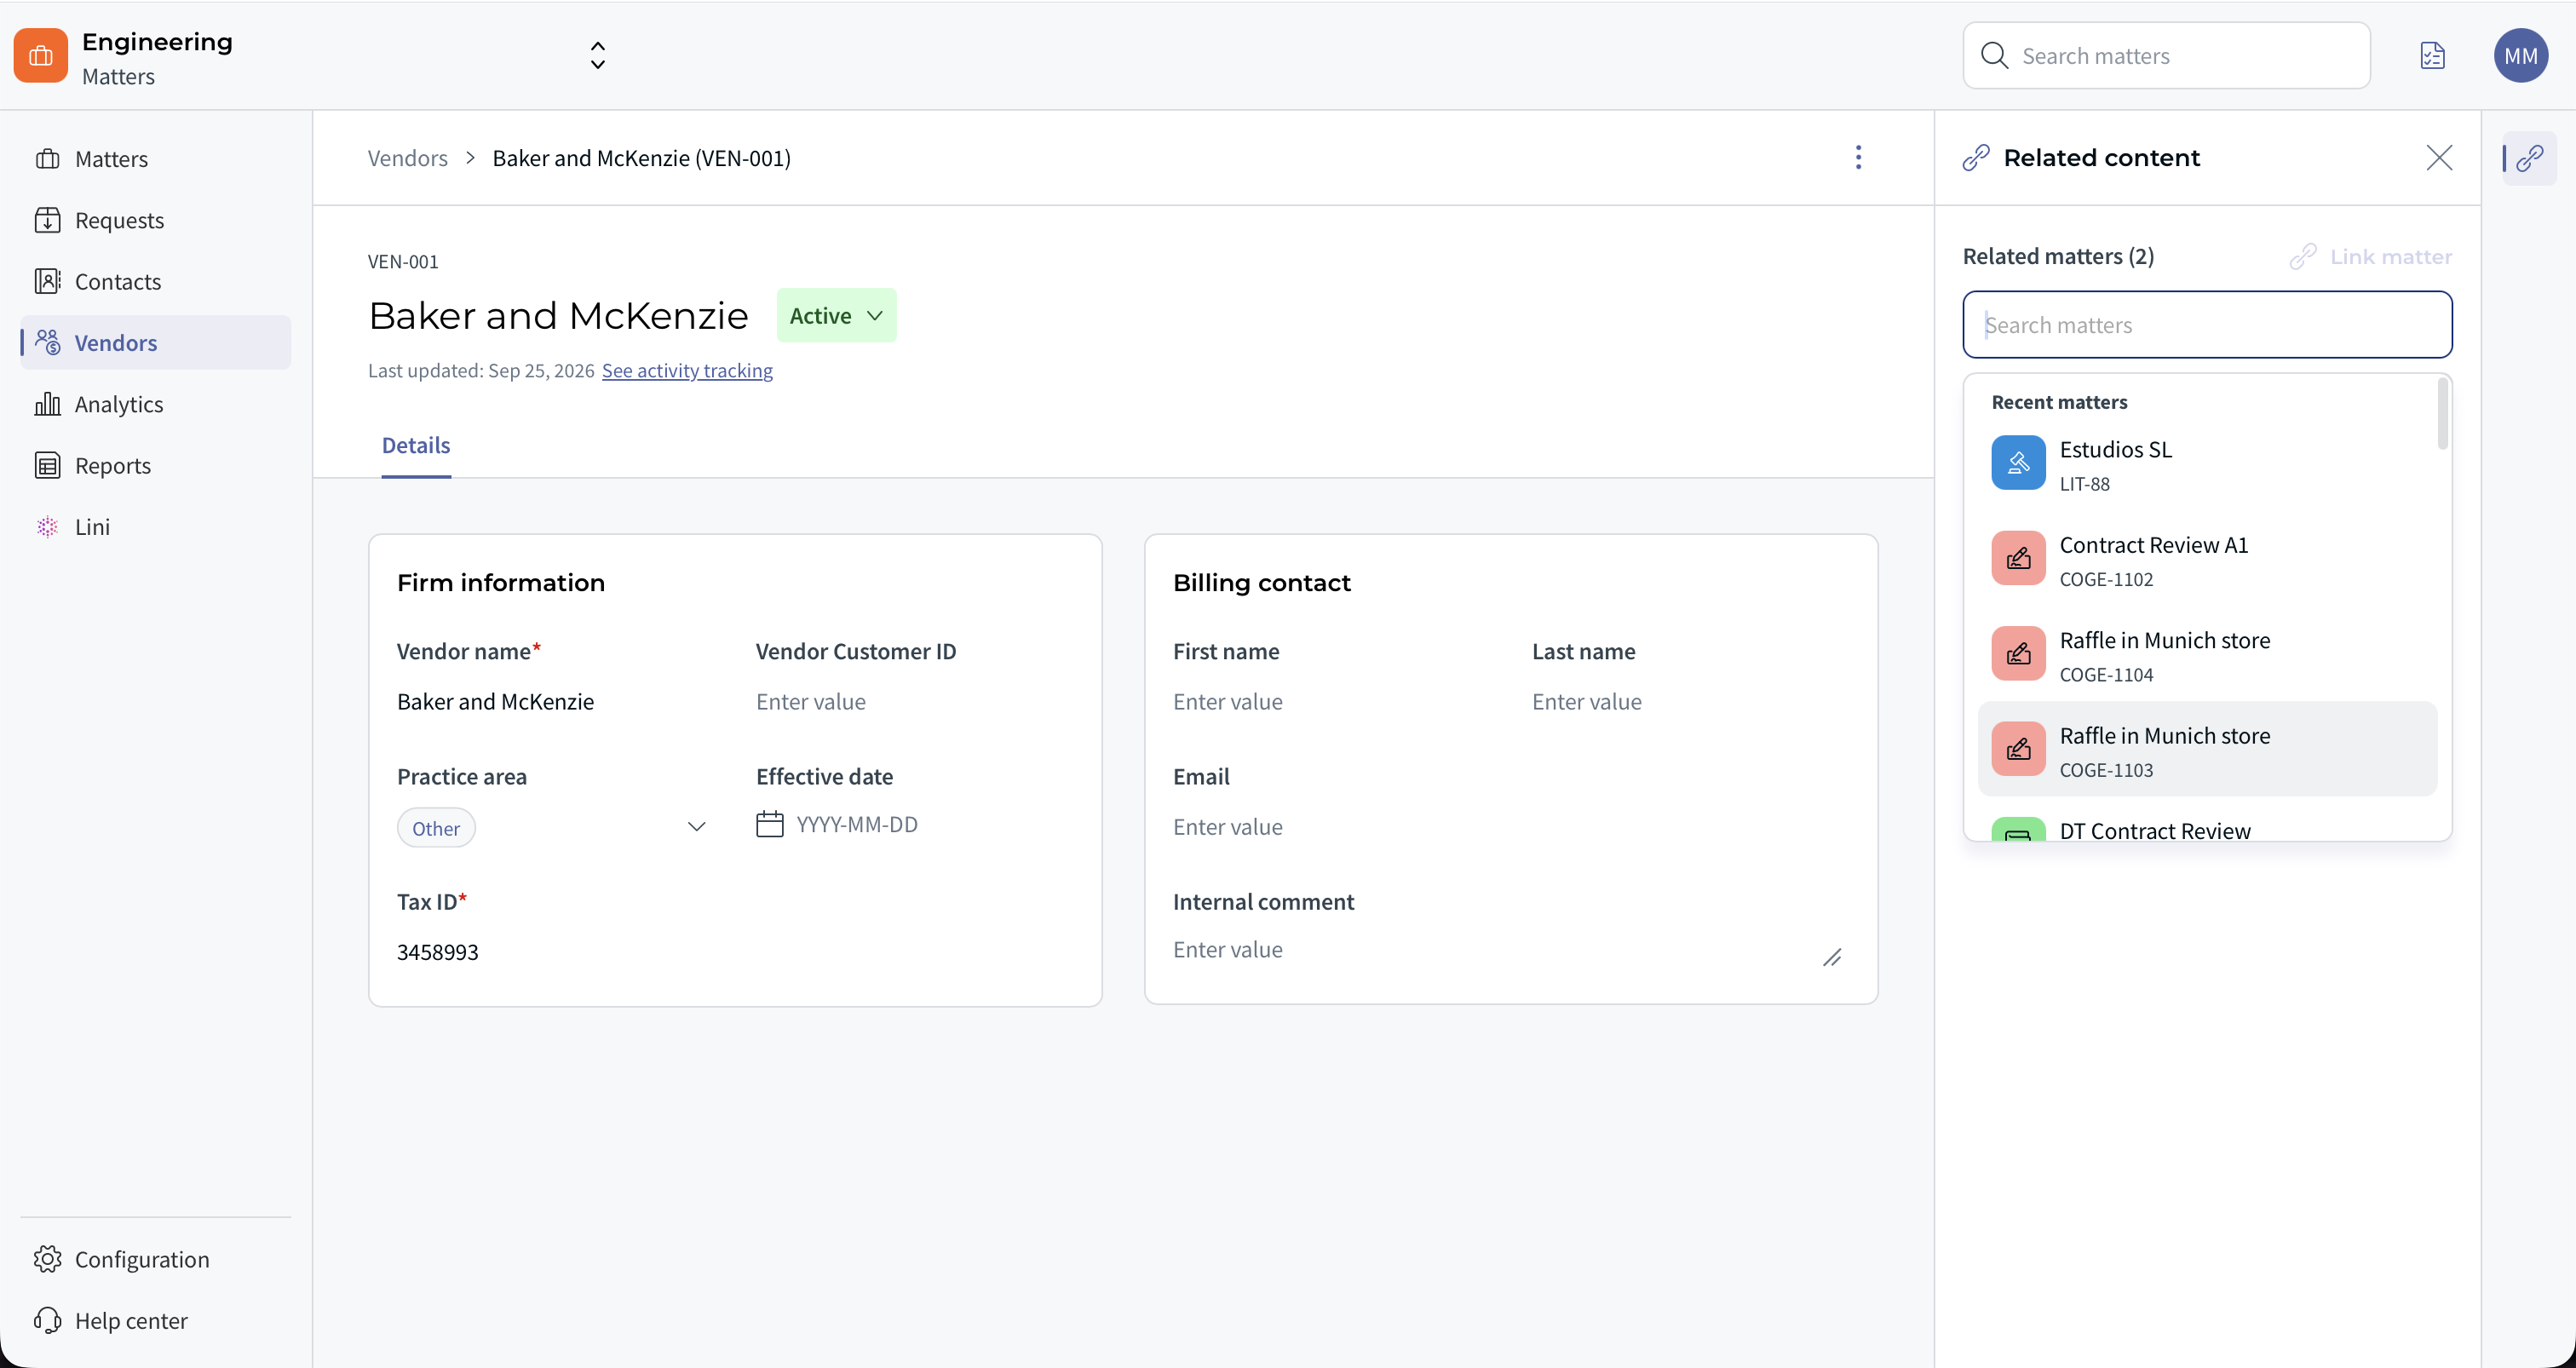
Result: the matter is linked. The mirror link is created at the same time in the matter's Related content > Related vendor section. When no matter has been linked yet, the tab shows "No related matters have been linked yet."
From the matter
- Open the matter and go to its Related content panel.
- In the Related vendor (N) section, click Link vendor.
- Select the vendor.
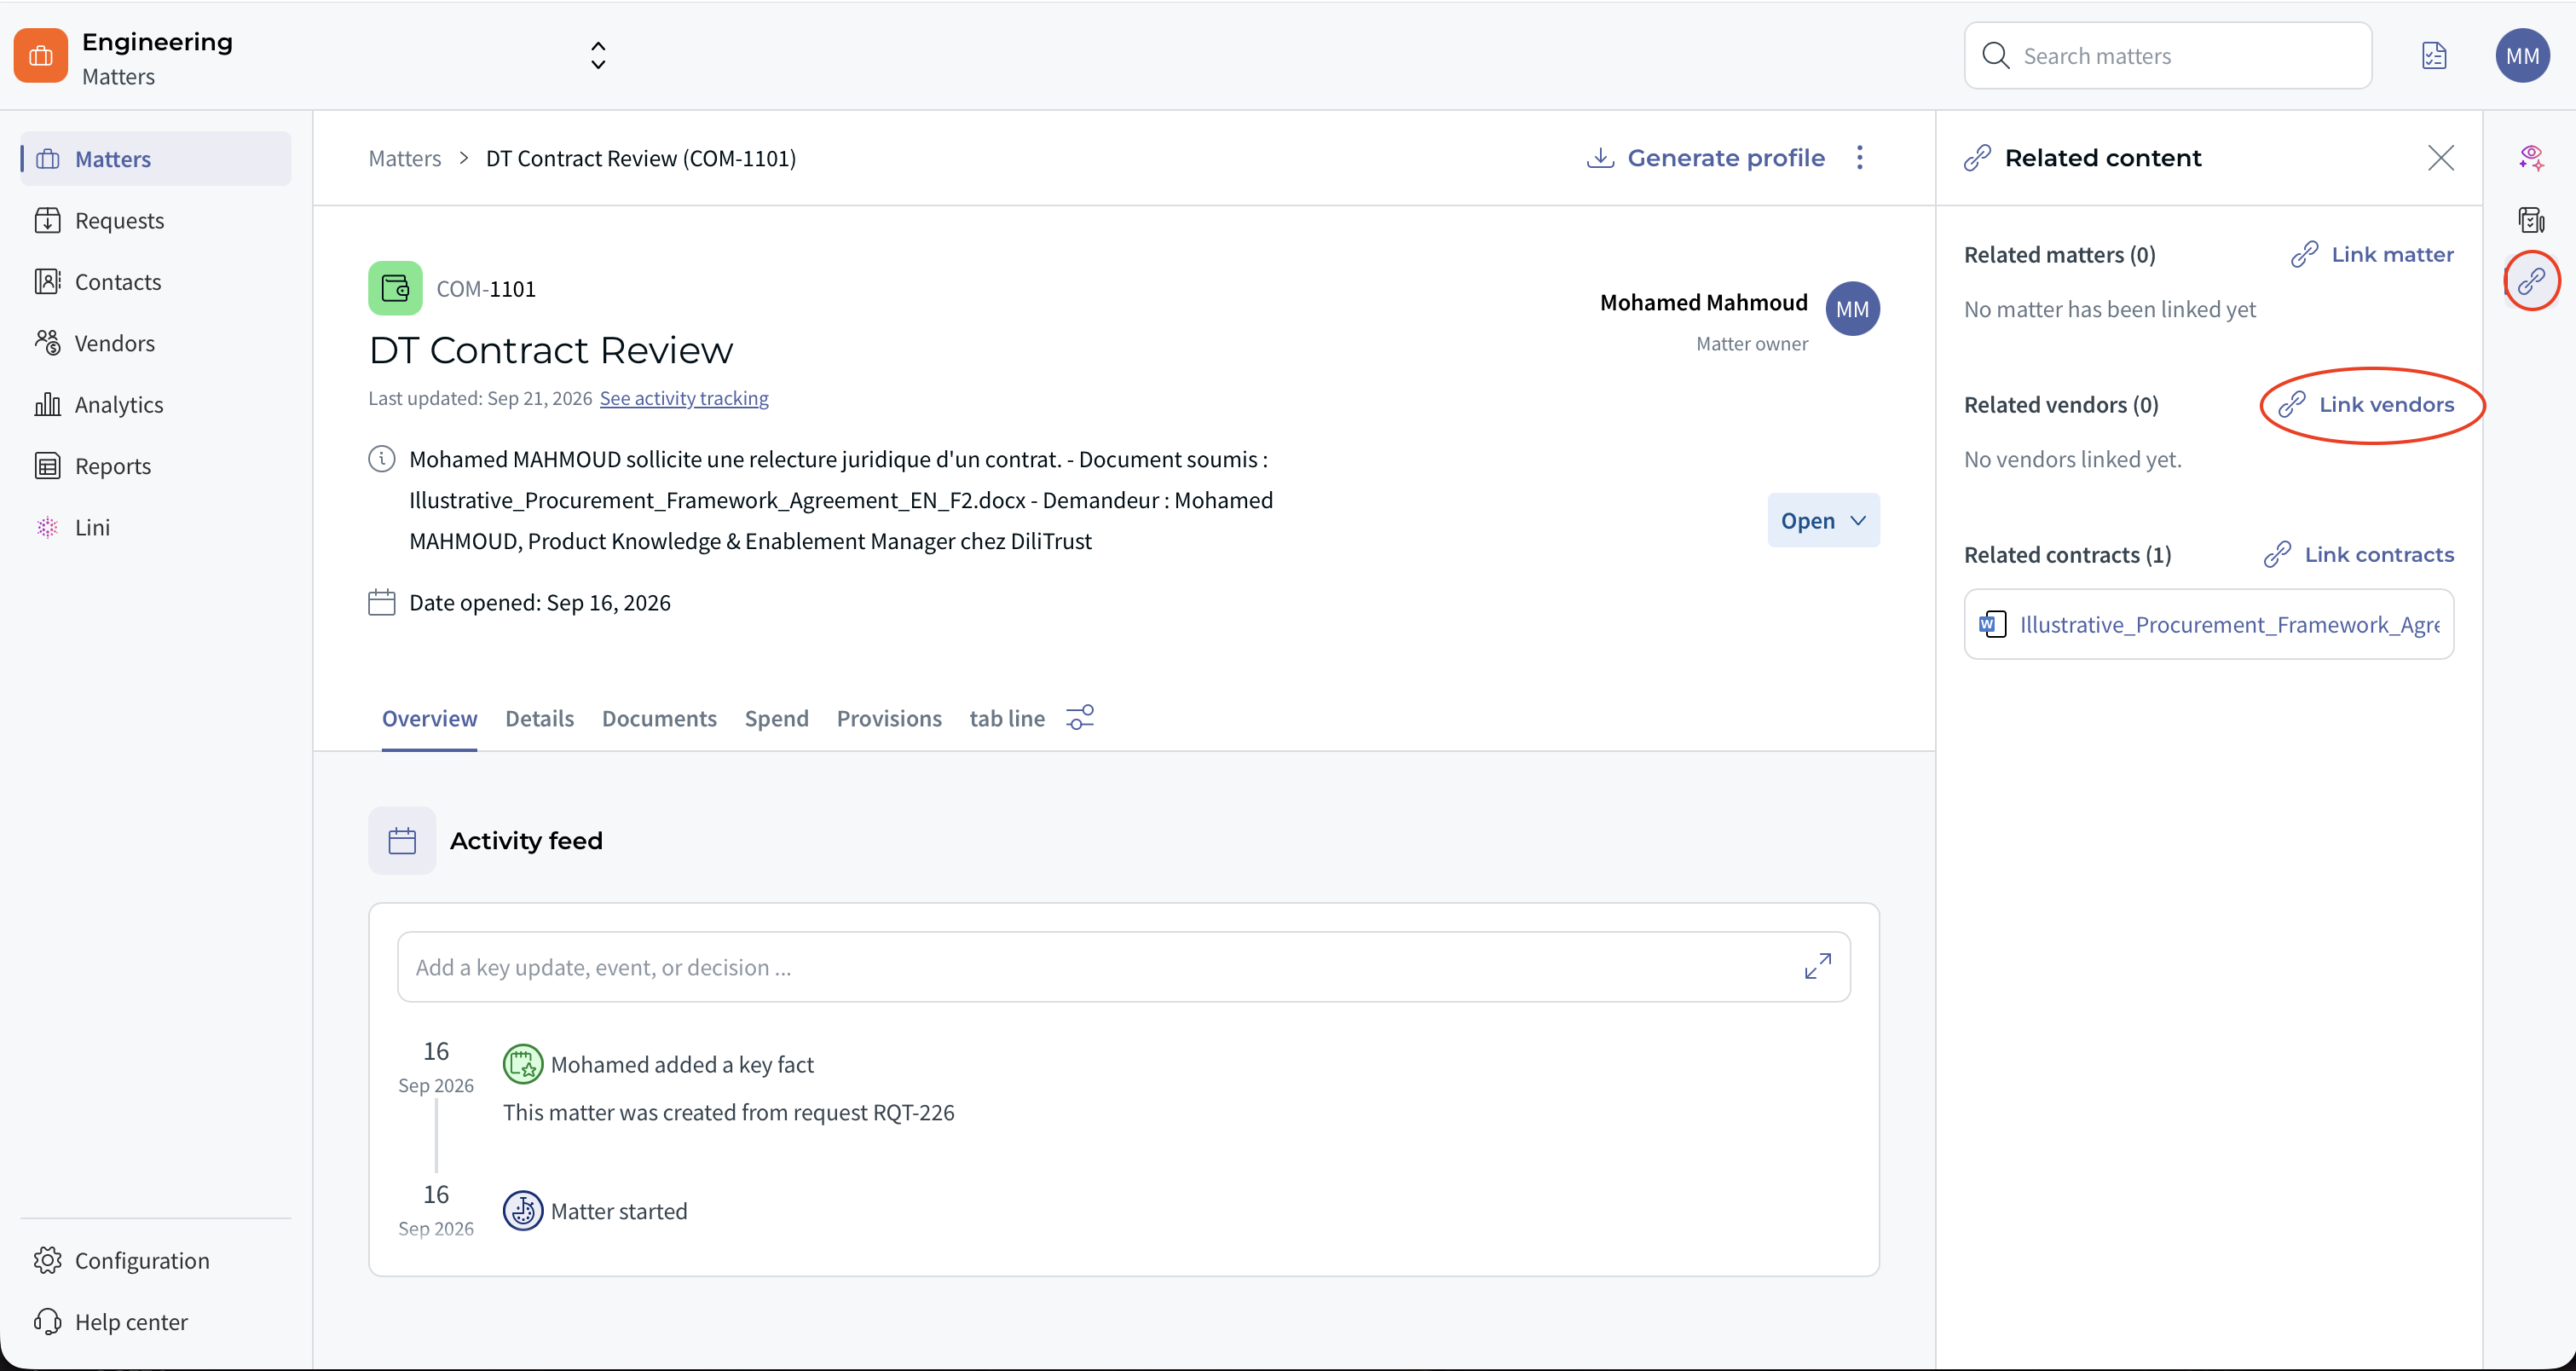
If you unlink a vendor from the matter side, the link is also removed from the vendor's Related content.
What to expect
- A vendor can be linked to any number of matters, and a matter can have several vendors.
- The matter search panel only shows matters you are allowed to see.
- Matters already linked to the vendor are hidden or disabled in the search panel, so you cannot create the same link twice.
☝ Record spend against a vendor
Once vendors are linked to a matter, the Spend form uses that list to keep spend attribution clean.
- In a matter, open the Add a spend form.
- In the Vendor dropdown, select the vendor. It only lists the vendors linked to that matter.
- If no vendor is linked yet, the dropdown is empty. Link a vendor first, from the vendor page or from the matter's Related content tab.
- Inactive vendors never appear in the Vendor dropdown for new spends, whatever their matter links.
- The matter's Spend tab has a Vendor column. Click a vendor name there to go straight to that vendor's detail page.
- If a vendor is unlinked after a spend was recorded, the existing spend keeps the vendor name as historical data. New spends can no longer select that vendor on this matter until you link it again.
⏩ Import several vendors at once
Rather than creating vendors one by one, you can fill the registry from an Excel file.
- In the Vendors list header, click Import .xls.
- Download the import template offered in the dialog and fill it in. Only Vendor name is required. Every other field is optional.
- Upload your file.
Result:
- If everything is valid, all rows are imported, the vendors appear in the list and a success notification is shown.
- If some rows fail, the valid rows are imported anyway. The failed rows are listed with the reason, for example a missing vendor name or an invalid email format.
- An invalid email in the Billing contact column raises a warning for that row only. It does not block the rest of the import.
- Duplicate Tax IDs: if a Tax ID already exists on another vendor, a warning is shown for that row and the row is not imported.
- Blank rows are skipped silently.
❌ Delete a vendor
- Open the vendor.
- Click Delete vendor in the top-right corner of the header.
Result: a confirmation dialog opens. If the vendor is linked to matters or referenced by spend records, you are warned explicitly and the impacted matters are listed. - Confirm the deletion.
Result: the vendor record is permanently deleted and all its matter links are removed.
- Spend records that referenced the vendor keep the vendor name as read-only historical text. Your past spend history stays readable.
- If a colleague deletes a vendor while you have it open, you see "This vendor no longer exists" and you are redirected to the list.
⭕ Moving from Legal Service Providers to Vendors
The Vendor concept fully replaces the former Legal Service Provider (LSP) concept. All LSP labels, navigation items and screens are removed. Your existing data is migrated for you, with no action required on your side.
- Every contact flagged LSP = Yes is automatically converted into a Vendor profile.
- The contact name becomes the Vendor name, and the contact email becomes the Billing contact e-mail.
- All other vendor fields, such as Tax ID, Practice area and Status, are left empty after migration. Complete them at your own pace.
- Contacts without an email are migrated with an empty billing contact email. This is expected, not an error.
- Contacts flagged LSP = No are not migrated and remain contacts only.
- If several LSP contacts share the same name, each one becomes a separate Vendor. No automatic merging is performed.
⚪ Tips and best practices
- Start with a clean Tax ID. The Tax ID is what makes a vendor uniquely identifiable in billing workflows. Enter it carefully at creation rather than later.
- Review your migrated vendors first. After the LSP migration, go through the list, complete the empty Tax ID, Practice area and Status fields, and merge any duplicates manually.
- Use Inactive rather than Delete. An Inactive vendor is removed from new spend selection, but its full record and history are kept. Deletion is permanent.
- Link vendors early. Link a firm to a matter as soon as it is engaged. Your team will never find an empty vendor dropdown when recording spend.
- Fill in the billing contact. A named contact and a valid email on the vendor save time whenever a billing question comes up.
- Use the import for onboarding. When you set up your registry for the first time, the .xls import is much quicker than creating vendors one at a time.
❗ Limitations and things to know
- The Vendors section is hidden until an administrator turns on the Use vendors instead of Legal Service Providers setting.
- Readers have no access to the Vendors module at all.
- A vendor cannot be created with a Tax ID that already exists on another vendor.
- The Vendor ID is system-generated and can never be edited.
- Deleting a vendor is permanent and removes all of its matter links.
- Only vendors linked to a matter can be selected in that matter's Spend form. Inactive vendors are never selectable for new spends.
- The LSP migration does not deduplicate contacts that share the same name.
- The Timekeepers tab is hidden until an administrator turns on E-billing in Configuration > General settings > Features.
- A timekeeper cannot be deleted, only set to Inactive.
- A timekeeper's last remaining rate cannot be deleted, and all of a timekeeper's rates must share the same currency.
- Only the common list of LEDES classification codes is available for timekeepers.
❓ Frequently asked questions
Can I change a Vendor ID?
No. Vendor IDs are generated by the system in sequence (VEN-001, VEN-002 and so on) and are permanent.
Two of our firms have the same Tax ID. Can I register both?
Not with the same Tax ID on both records: a duplicate Tax ID blocks creation. Duplicate names are allowed and only trigger a soft warning.
Why is the vendor dropdown empty in my Spend form?
Because no vendor is linked to that matter yet. Link one from the vendor's Related content tab or from the matter's Related content panel, and it will become selectable.
What happens to my spend history if I delete a vendor?
Your spend records are preserved. They keep the vendor name as read-only historical text, but the vendor record itself and all its matter links are gone.
Do I need to re-create my Legal Service Providers as vendors?
No. Every contact flagged LSP = Yes is migrated automatically into a Vendor profile, carrying over its name and email.
If I turn the vendors setting back off, do I lose my data?
No. Turning the toggle off only hides the Vendors tab. All vendor records and their data are preserved and reappear when it is turned back on.
Can one matter have several vendors?
Yes. A matter can be linked to several vendors, and a vendor can be linked to as many matters as you need.
Why can't I see a matter in the Link matter search panel?
Either you do not have access to that matter, or it is already linked to this vendor. Already-linked matters are hidden or disabled so the same link cannot be created twice.
What is a timekeeper, and where do I register one?
A timekeeper is an individual who bills under one of your vendors. You register them on the vendor’s Timekeepers tab, so they can be reused instead of being re-entered each time an invoice is recorded.
How do I change a timekeeper’s rate?
Add a new rate with its own Effective from date rather than editing the current one. The previous rate is kept with its validity period, so you keep a complete rate history. If the two periods overlap, the previous rate is closed automatically.
Why is there no Timekeepers tab on my vendor page?
E-billing is turned off for your organization. An administrator can turn it on in Configuration > General settings > Features.
If we turn e-billing off, do we lose our timekeepers?
No. Turning e-billing off only hides the Timekeepers tab. All timekeepers and rates are preserved and reappear when e-billing is turned back on.
Can I delete a timekeeper who has left the firm?
No. Set their status to Inactive instead. Their rate history is preserved.
Why can’t I delete a rate?
It is probably the timekeeper’s last remaining rate. A timekeeper always keeps at least one rate, so add the correct rate first, then delete the incorrect one.


Was this article helpful?
That’s Great!
Thank you for your feedback
Sorry! We couldn't be helpful
Thank you for your feedback
Feedback sent
We appreciate your effort and will try to fix the article