Important matter-related information often stays stuck in inboxes. The Matter Management Outlook Add-in solves this by allowing you to seamlessly link emails and attachments directly to your matters — without leaving Outlook ⚡.
This ensures that all relevant communications are centralized, searchable, and always available in the right matter.
☝ What Is the Outlook Add-in?
The Outlook Add-in connects your email workflow with DiliTrust Matter Management. It allows you to attach emails and documents to matters in just a few clicks, keeping your legal files complete and up to date.
- ✅ No more manual uploads
- ✅ No lost information in personal inboxes
- ✅ Full traceability of matter-related communications
⚡ Installation Guide
There are two ways to install the DiliTrust Matter Management Add-in, depending on how your organization manages Microsoft 365.
Option 1 — Centralized Deployment by IT (Recommended)
This is the preferred method for organizations. Your IT administrator deploys the add-in for all users (or a specific group) via the Microsoft 365 Admin Center — no action required from individual users once deployed.
For IT admins:
- Download the manifest file: MM_Outlook_manifest.production.xml attached on this page.
- Go to the Microsoft 365 Admin Center.
- Navigate to Settings > Integrated apps.
- Click Upload custom apps.
- Select Upload manifest file (.xml) and upload the DiliTrust manifest file.
- Choose the deployment scope: all users, specific groups, or specific users.
- Click Deploy — the add-in will appear in Outlook for targeted users within 24 hours.
Permissions: The add-in only requests ReadItem access — it reads the email you select, nothing more. No write access to your mailbox is granted.
Option 2 — Individual Installation
If your organization's policy allows it, users can install the add-in themselves directly from Outlook.
From Outlook on the web (OWA):
- Open Outlook on the web and sign in.
- Go directly to the in-client add-in store: https://outlook.office.com/mail/inclientstore.
- Click My add-ins in the left panel, then scroll down to Custom add-ins.
- Click + Add a custom add-in > Add from file.
- Upload the MM_Outlook_manifest.production.xml file provided by your DiliTrust account team.
- Confirm the installation — the DiliTrust button will appear in your Outlook toolbar when reading emails.
From Outlook desktop (Windows / Mac):
- Open Outlook and go to the Home tab.
- Click Get Add-ins (or Store depending on your version).
- In the Add-ins window, click My add-ins > Custom add-ins > + Add a custom add-in > Add from file.
- Upload the MM_Outlook_manifest.production.xml file and confirm.
⚠️ Individual installation may be restricted by your organization's IT policy. If the option is greyed out, contact your IT admin for a centralized deployment (Option 1).
Prerequisites
- Microsoft 365 plan: Any plan including Outlook (Business Basic or above)
- Outlook versions supported: Outlook desktop (Windows & Mac), Outlook on the web
- Minimum Mailbox API version: 1.3
- Shared / delegated mailboxes: ✅ Supported
- Mobile (iOS / Android): ❌ Not supported
- DiliTrust module required: Matter Management must be activated on your DiliTrust instance
- User permissions: Must have access to at least one matter in DiliTrust. To file content into a matter, you need "can edit" rights on that matter — the add-in only lets you choose among matters you can edit.
✋ Signing In and Choosing Your Tenant
The first time you open the add-in, you sign in with your DiliTrust account to reach your Matter Management environment.
- Open an email in Outlook and click the DiliTrust button in your toolbar.
- Sign in with your DiliTrust account.
- If your account is linked to several tenants, choose the one you want to work in from the Select tenant list.
- Click Continue. The button becomes active only once a tenant is selected.
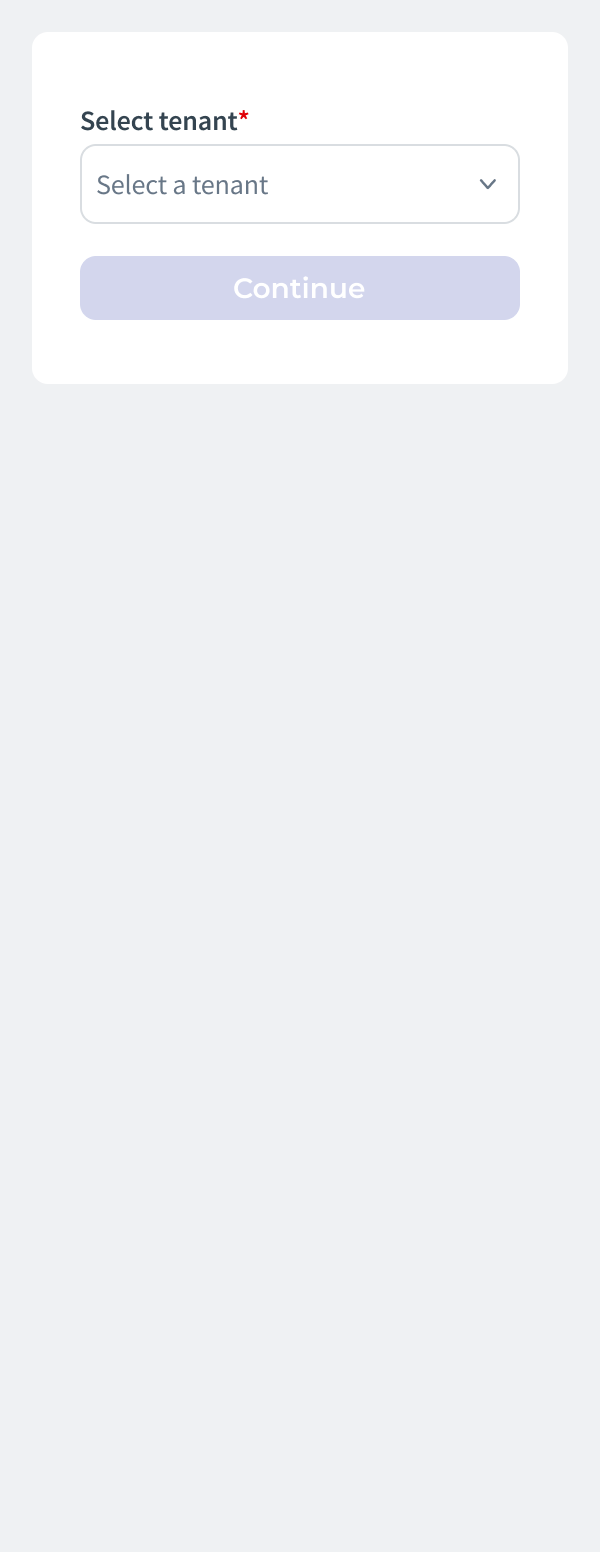
To work in a different tenant, open the options menu (the three-dot button at the top of the panel), choose Log out, then sign back in and pick the other tenant.
✍ Link Emails to an Existing Matter
The add-in appears in your toolbar when reading an email — it is not available in compose mode.
Attach an email directly to an existing matter in just a few clicks. The email content and metadata are securely stored in the matter.
You can choose to:
- Link only the latest email, or
- Link the entire email thread for full conversation context
Attach Documents
Any file received by email (PDF, Word, Excel, etc.) can be securely linked to the matter as an attachment.
Tip: The add-in can be pinned to stay open while you navigate between emails — ideal for batch filing sessions.
✅ How to Use the Add-in
The add-in works in two steps: first you choose what you want to file, then you choose where it should go.
Step 1 — Choose the content to add
On the Add content to a matter screen:
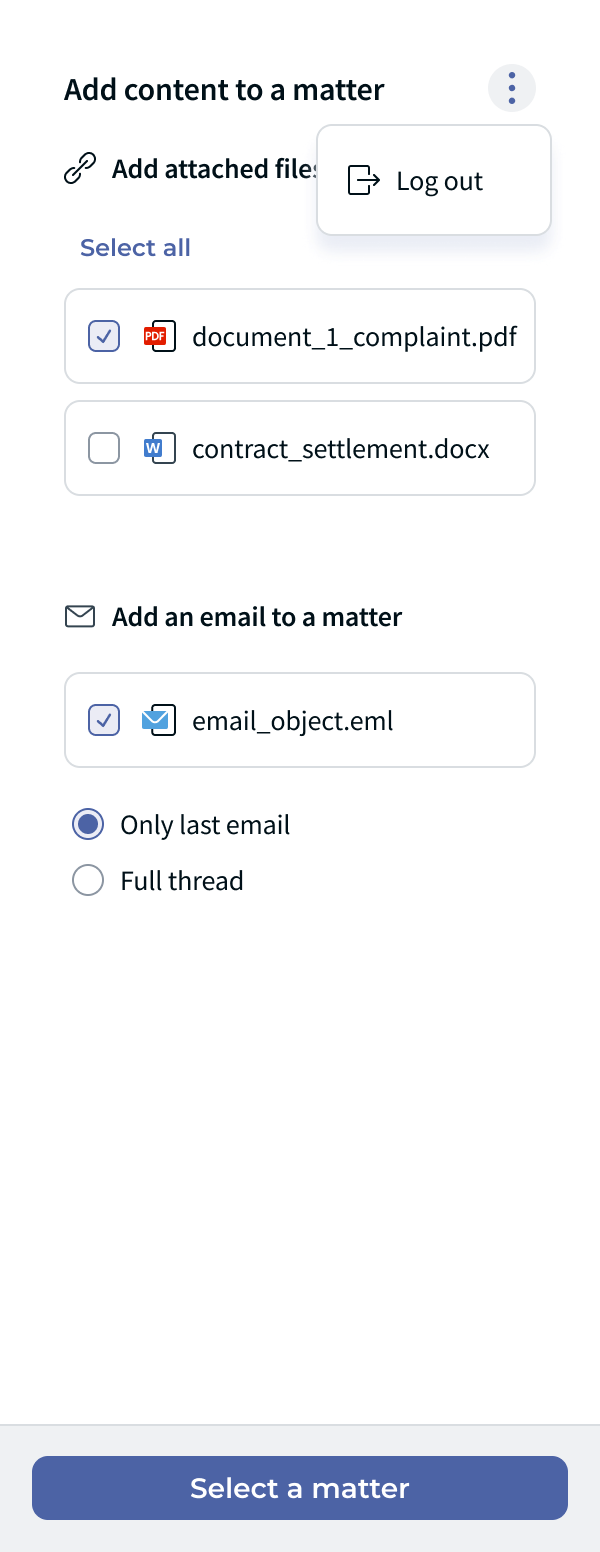
- Under Add attached files to a matter, tick the attachments you want to file. Use Select all to select every attached file from the thread at once. If the email has no attachment, the add-in shows No attached files.
- Under Add an email to a matter, tick the email itself if you also want to file the message. Once the email is selected, choose Only last email or Full thread.
- Need a clearer name? Click a file name (or the email name) to edit it before filing.
- Click Select a matter. The button becomes active as soon as at least one attachment or the email is selected.
Step 2 — Choose the destination matter
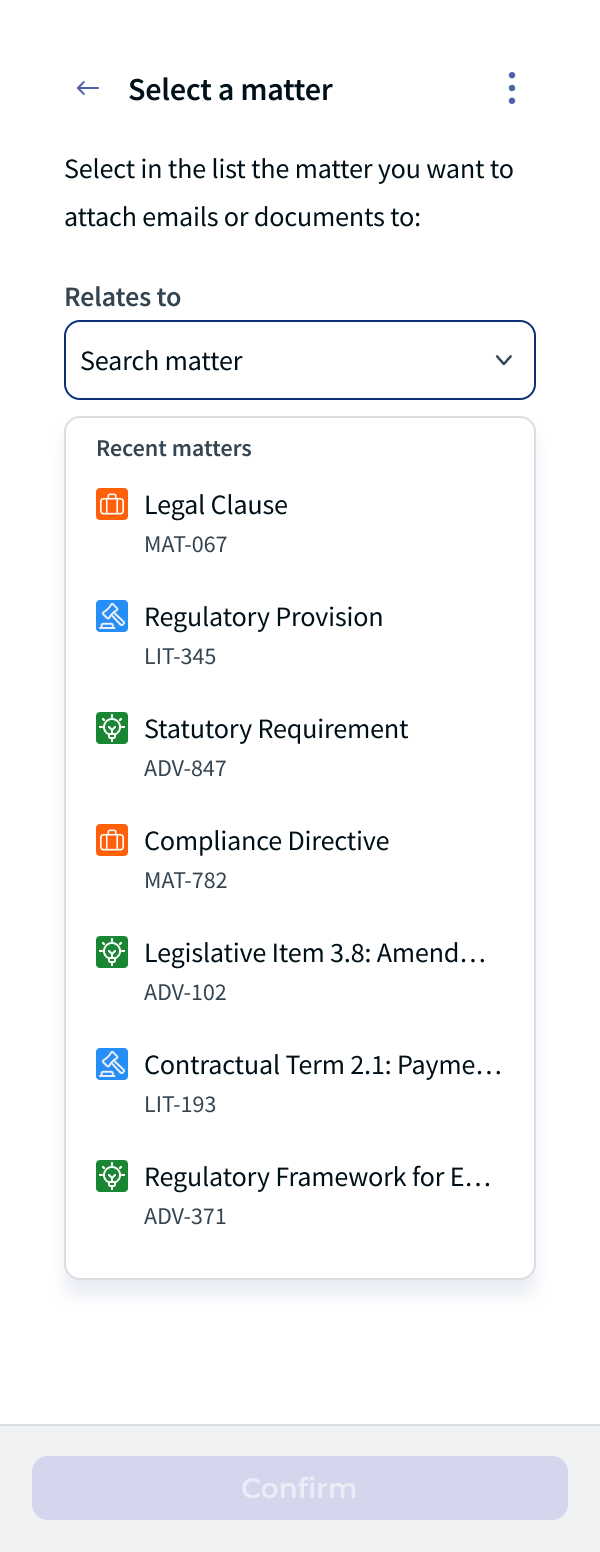
- On the Select a matter screen, open the Relates to list.
- Your Recent matters are shown by default. Start typing in Search matter to look for another one.
- Select the matter you want to file the content into.
- Click Confirm. The button becomes available once a matter is selected.
Use the arrow at the top left to go back to the previous screen if you need to change your selection.
Step 3 — Confirmation
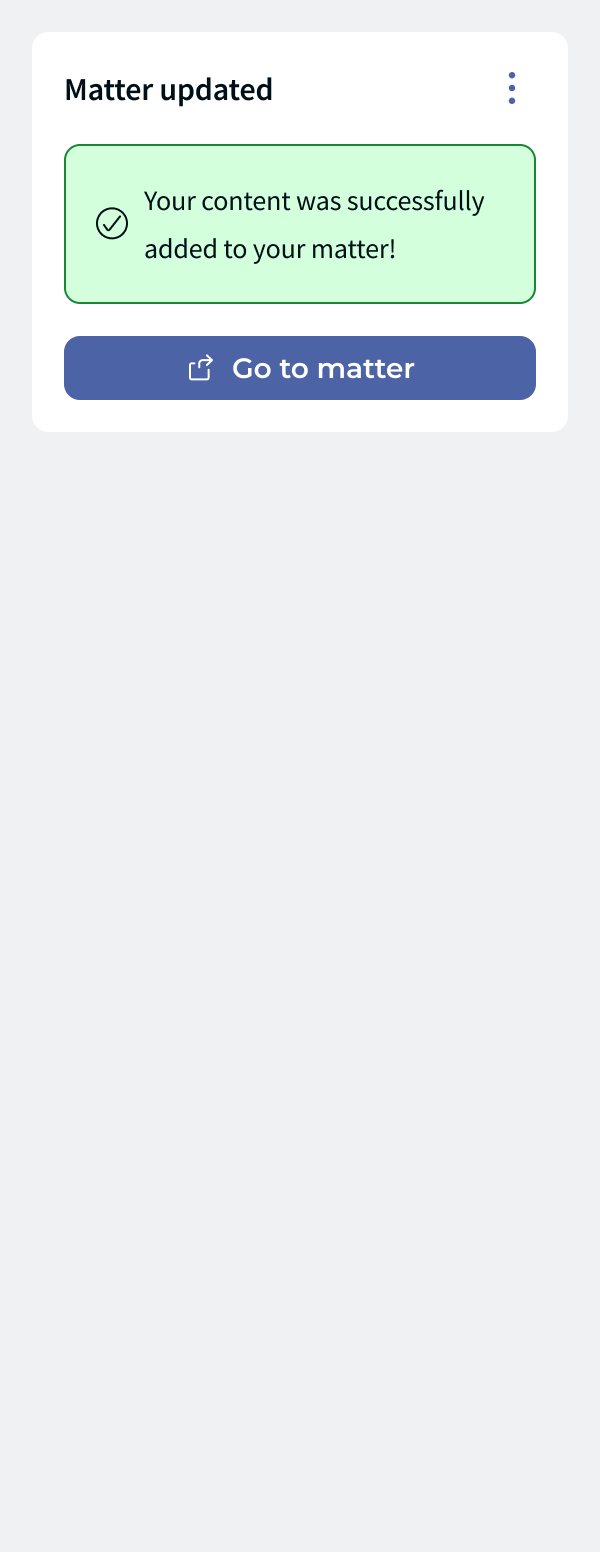
A Matter updated screen confirms that your content was successfully added to your matter. Click Go to matter to open the matter page in your browser.
If something goes wrong, the add-in displays: "An error occurred. We were unable to add your content to your matter." Check your selection and try again.
⚖️ Where Your Filed Content Lands in DiliTrust
Everything you file from Outlook is added to the Documents tab of the destination matter, so the whole team sees it in context.
- Attachments are stored in their original format.
- The email itself is stored as a document in the same tab.
⭐ Tips & Best Practices
- ⭐ Link emails as soon as they are received to avoid missing key information.
- ✍ Use full thread linking for negotiations or ongoing discussions.
- ⚖️ Attach documents directly from emails to maintain a complete audit trail.
- ☝ Pin the add-in panel to keep it open while browsing multiple emails.
- ✅ Use Select all when a thread carries several attachments you want to file together.
- ✍ Rename a file in the add-in before filing it so it is easy to recognize later in the matter.
- ⏩ Check Recent matters first — the matters you work on most often are already there, no search needed.
❓ Limitations & Things to Know
- The add-in is available in read mode only — it does not appear when composing or replying to emails.
- You can only link emails to existing matters — creating a new matter from the add-in is not supported.
- Access to matters depends on your permissions in Matter Management: only matters you can edit are available as a destination.
- Switching tenant requires you to log out first — you cannot change tenant while signed in.
- The add-in is not supported on Outlook for iOS or Android.
- Individual installation may be restricted by your IT policy — contact your admin if the option is unavailable.
❔ FAQ
Can I file the attachments without filing the email itself?
Yes. Select only the attachments you need. The Select a matter button activates as soon as at least one attachment or the email is selected.
What is the difference between "Only last email" and "Full thread"?
Only last email files the single message you are reading. Full thread files the whole conversation so the matter keeps the complete context.
Why can't I find a matter in the list?
The add-in only shows matters you have "can edit" rights on. If a matter is missing, ask your Matter Management administrator to review your permissions.
I have several DiliTrust tenants. How do I switch?
Open the options menu (three-dot button) in the add-in, click Log out, then sign in again and select the other tenant from the Select tenant list.
Can I rename a file before filing it?
Yes. Click the file name (or the email name) in the add-in and edit it before clicking Select a matter.
Where do I find the content after filing it?
In the Documents tab of the destination matter. You can jump there straight away with the Go to matter button on the confirmation screen.
✨ Conclusion
The Matter Management Outlook Add-in bridges the gap between your inbox and your legal workspace. By linking emails and attachments directly to matters, you ensure better visibility, stronger compliance, and a smoother daily workflow ⚡.
Was this article helpful?
That’s Great!
Thank you for your feedback
Sorry! We couldn't be helpful
Thank you for your feedback
Feedback sent
We appreciate your effort and will try to fix the article