✅ Who can do what
- Dust workspace Admin: connects the DiliTrust MCP server, adds the DiliTrust Help Center connection, creates the agent and shares it with users. Builders can also add website connections.
- Agent users: mention the agent in a Dust conversation and sign in once with their own DiliTrust account. The agent only sees and does what that user is allowed to see and do in DiliTrust.
With Dust, you can build your own AI agent and connect it to DiliTrust. Once it is set up, the agent can do two things for your users:
- Explain how to do things in DiliTrust, by using the DiliTrust Help Center as a knowledge source.
- Act in DiliTrust for them, by using the tools available in the DiliTrust MCP server.
MCP (Model Context Protocol) is an open standard that lets AI agents connect securely to external applications and use their features. This article walks you through the whole setup: connecting the DiliTrust MCP server to your Dust workspace, adding the DiliTrust Help Center as knowledge, and creating the agent.
✋ Before you start
Make sure you have:
- A Dust workspace and an Admin role in it. Adding MCP servers and website connections requires admin (or builder) rights.
- A DiliTrust user account. Each person using the agent signs in with their own DiliTrust account.
- The DiliTrust MCP connection details below. Keep this page open, you will copy them into Dust.
DiliTrust MCP connection details
- Server URL: https://mcp.dilitrust.com
- Client ID:- (got from DiliTrust once subscribed)
- Client secret:- (got from DiliTrust once subscribed)
- Authorization URL: https://auth.dilitrust.com/oauth2/authorize
- Token URL: https://auth.dilitrust.com/oauth2/token
- Scopes: mcp.access
- Dust redirect URI: shown by Dust in Step 1 (for example https://eu.dust.tt/oauth/mcp_static/finalize for workspaces hosted in Europe). Give this URL to DiliTrust when you request your Client ID, so it is allowed for your client.
Step 1️⃣: Connect the DiliTrust MCP server to your workspace
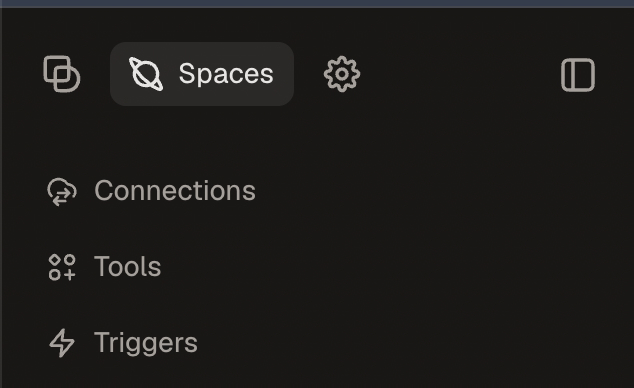
- Sign in to Dust, open Spaces (top of the left sidebar), then Tools
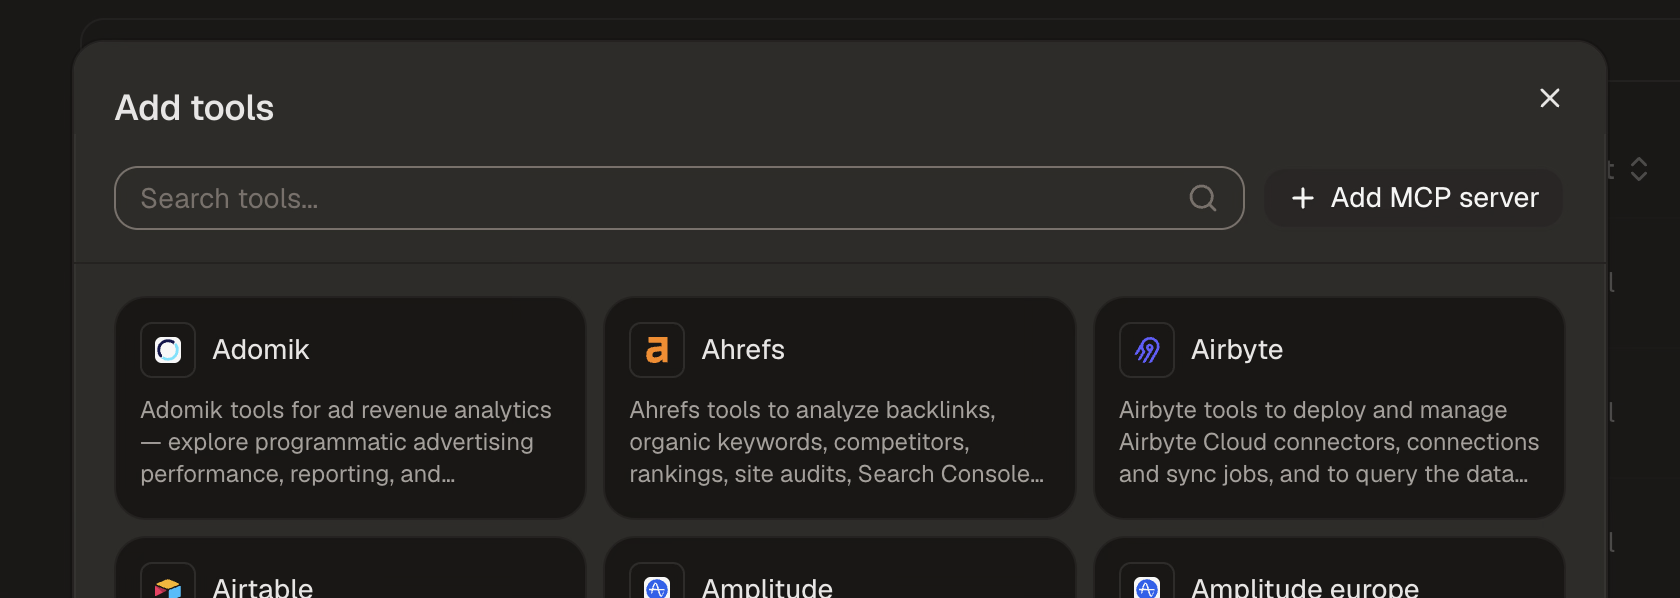
- Select Add tools, then Add MCP server

- In the Configure an MCP server window, enter the URL: https://mcp.dilitrust.com
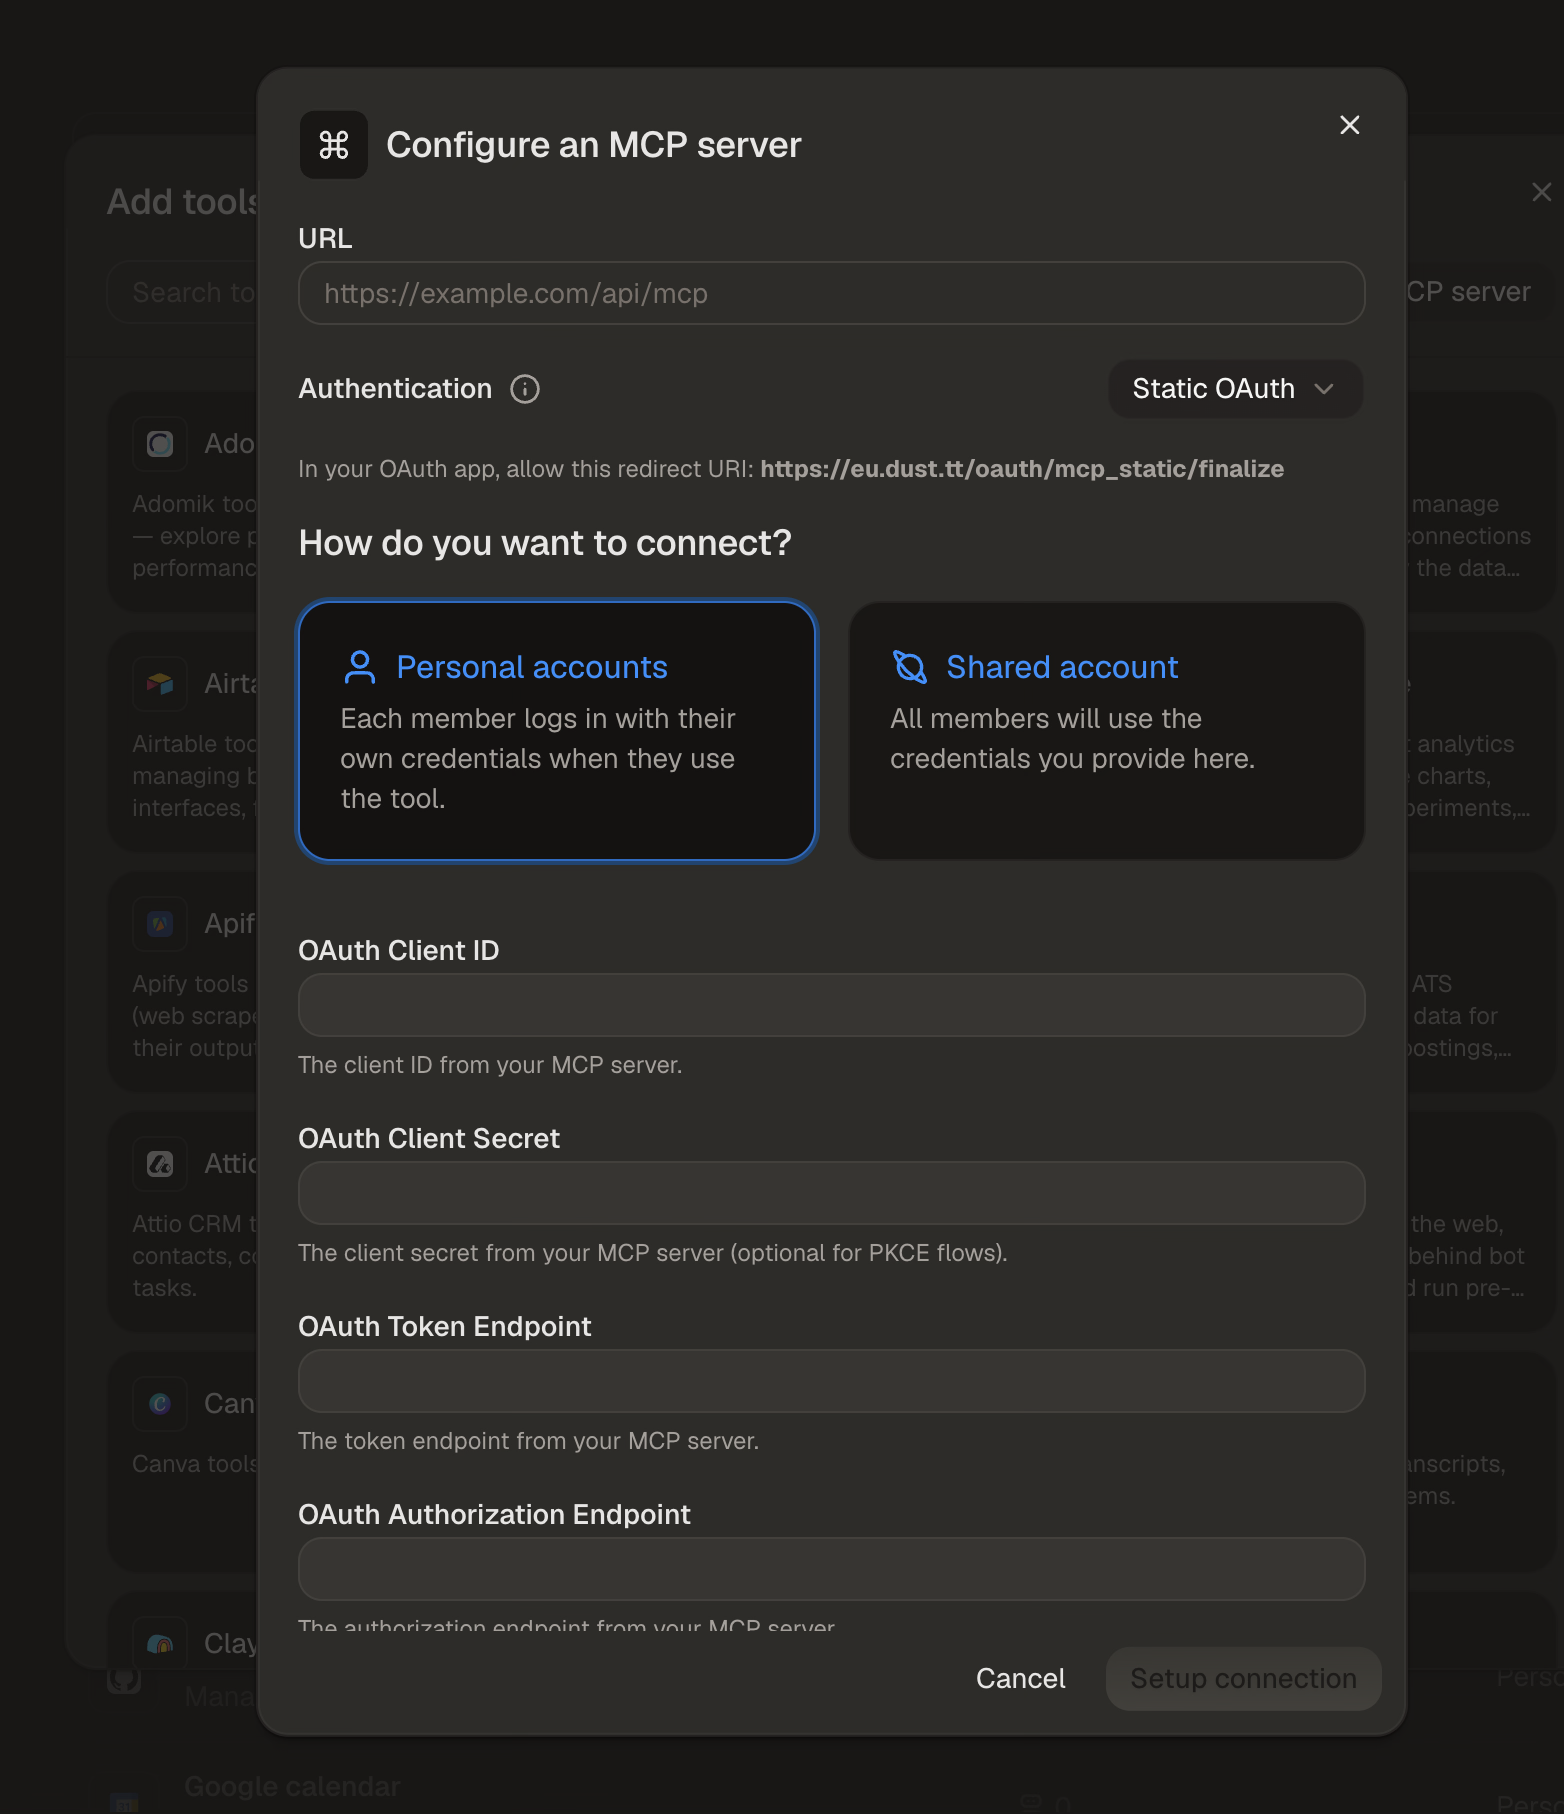
- In Authentication, select Static OAuth. Dust displays the redirect URI to allow in your OAuth app: check that it is the one registered by DiliTrust for your client.
- In How do you want to connect? Select Personal accounts, so that each user signs in with their own DiliTrust account and the agent only sees what that user can see in DiliTrust. Do not use Shared account: all users would act in DiliTrust with the same account.
- Fill in the OAuth fields with the DiliTrust connection details listed above:
- OAuth Client ID and OAuth Client Secret: the values provided by DiliTrust
- OAuth Token Endpoint: https://auth.dilitrust.com/oauth2/token
- OAuth Authorization Endpoint: https://auth.dilitrust.com/oauth2/authorize
- OAuth Scope(s): mcp.access
- Leave OAuth Resource / Audience empty, keep Token Endpoint Authentication Method on Request body (recommended), and leave Use custom headers off.
- Select Setup connection and sign in with your DiliTrust account when prompted. This first sign-in validates the configuration and enables the tool for your workspace.
Then open the new tool from the Tools list.
In the General tab, check the Name (for example "DiliTrust") and write a clear Description: the agent uses it to decide when to call DiliTrust, for example "Tools to search, read, and act on the user's DiliTrust data."
Authentication must show Active and Credentials must show Personal accounts.
In the Availability tab, choose who can use the tool: turn on Available to all workspace members, or turn it off to limit the tool to specific spaces (for example a restricted space for a pilot group).
Optionally, in the Tools & stakes tab, review the list of DiliTrust tools and set the Stake of each one: High (explicit user approval), Medium, Low or Never ask (runs automatically). We recommend asking for approval on tools that create or change data in DiliTrust.
Select Save.
The DiliTrust tools are now available to the agents of your workspace.
Step 2️⃣: Add the DiliTrust Help Center as knowledge
This step lets your agent explain how DiliTrust works, using the official Help Center articles.
- In Spaces, open Company Data (or the space where your agent's users are), then Websites.
- Select Add website.
- In Website entry point, enter https://support.dilitrust.com/en/support/solutions
- In Indexing settings:
- Crawling strategy: select Only child pages of the provided URL, so only Help Center articles are indexed.
- Refresh schedule: choose how often Dust checks for updates (for example every week).
- Depth of search: increase it if some articles are missing.
- Page limit: raise the default value so all articles are indexed (up to 1,024 pages per website).
- In Name, enter for example "DiliTrust Help Center", then select Save. Dust crawls the site; wait for the crawl to finish before testing.
Your DiliTrust tool and Help Center are now ready to be used directly in a conversation or a dedicated Agent.
✨ Tips & best practices
- Write precise descriptions. The agent decides which source or tool to use based on the MCP server description and the knowledge description ("What's the data?"). Clear wording gives better answers.
- Separate "explain" and "do" in the instructions. Telling the agent when to answer from the Help Center and when to act with the DiliTrust tools avoids confusion.
- Use personal accounts. Each user acts in DiliTrust with their own rights, which keeps DiliTrust permissions and audit trail intact.
- Set stakes on write actions. Ask for user approval on tools that create or change data in DiliTrust.
- Test before you share. Try a few typical questions and actions in the Preview tab, then adjust the instructions.
⛔ Limitations & known constraints
- The Help Center knowledge only covers publicly visible articles on support.dilitrust.com. Pages that require sign-in are skipped by the Dust crawler.
- A Dust website indexes up to 1,024 pages. The crawler only follows links it finds on the pages; it does not guess URLs.
- Each user signs in with their own DiliTrust account. The agent acts on their behalf through that connection.
- The Dust redirect URI depends on the region of your Dust workspace. Use the one displayed in the Configure an MCP server window.
- Only Dust admins (and builders, for websites) can add MCP servers and websites to the workspace.
❓ FAQ
Can I use the DiliTrust MCP server with other AI tools?
Yes. See DiliTrust MCP Server: Connect Your AI Tools to DiliTrust.
Why does the agent ask me to sign in?
The DiliTrust MCP server uses OAuth 2.0 with personal accounts: each user signs in with their own DiliTrust account so the agent can act on their behalf. Sign in once and accept the requested access.
The agent keeps asking me to authenticate, or the DiliTrust connection fails. What should I do?
Open your user menu in Dust, go to Tools & Triggers, disconnect the DiliTrust tool, then reconnect and sign in again with your DiliTrust account.
The connection fails when the admin selects Setup connection in Step 1. What should I check?
Check the Client ID, Client secret, endpoints and scope (mcp.access), and make sure DiliTrust has allowed the redirect URI displayed by Dust for your client.
The agent answers "how to" questions but does not act in DiliTrust. What should I check?
Check that the DiliTrust MCP server appears in the agent's Capabilities and knowledge, that you are connected with your DiliTrust account, and that your instructions tell the agent to use the DiliTrust tools when asked to perform an action.
The agent does not answer from the Help Center. What should I check?
Check that the DiliTrust Help Center website has finished crawling, that it is selected in the agent's knowledge, and that your instructions tell the agent to use it for "how to" questions.
A user cannot see or use the agent. Why?
Check that the agent is Published, and that the user belongs to the spaces that contain the DiliTrust MCP server and the Help Center website.
Was this article helpful?
That’s Great!
Thank you for your feedback
Sorry! We couldn't be helpful
Thank you for your feedback
Feedback sent
We appreciate your effort and will try to fix the article