⭐ Introduction
⚠️ Restricted access — This feature is currently available exclusively to certain clients under a specific contractual agreement. If you believe you should have access and do not see it, please contact your Customer Success Manager.
The Task & Obligation Management module lets teams create, track, and report on contractual obligations directly within DiliTrust CLM. Each obligation is modeled as a task, linked to a contract and — optionally — to a specific clause. Tasks can be made recurring, enriched with custom metadata, and monitored in a centralized Task Manager view, without ever leaving the platform.
The module responds to a concrete contractual risk: losing track of recurring deadlines, compliance checkpoints, or regulatory obligations buried inside long agreements. It replaces manual spreadsheet follow-ups with obligation management anchored in the contract lifecycle itself. It is organized into four scopes, described below.
⚙️ Module overview
The module revolves around two main objects:
- Task type — an obligation category template defined by an administrator (e.g. "Non-compete obligation", "Financial covenant", "Quarterly reporting"). It sets the name, purpose, and optional custom fields available for all tasks of that category.
- Task — a specific obligation, created by a user and always linked to at least one contract (the Related content). Tasks carry a status, a due date, a responsible user, and optionally a clause, custom fields, attached documents and recurrence settings.
The module comprises four scopes:
| Scope | |
|---|---|
| 1️⃣ Scope 1: Task Types & Task Manager (Core) | Admin configuration of task types (name, purpose, custom fields). User creation and management of tasks: general information, extra information, attached documents. |
| 2️⃣ Scope 2: Recurring Tasks & Occurrences | Recurring tasks with configurable frequency and schedule; generation and management of occurrences in the Task Manager. |
| 3️⃣ Scope 3: VisuScreen integration & Task Manager tools | Task panel in the document VisuScreen (view, create, mark as done). Open tasks filtered by document in the Task Manager. Column management and advanced filters. Empty states. |
| 4️⃣ Scope 4: Create from clause | Create a task directly from a clause highlighted in the Summary Sheet, with the clause and related document pre-populated automatically. |
Permissions
There is no dedicated task permission. Access to tasks follows your standard user role and the permissions you hold on the related document.
- Users see the Task Manager and the tasks it contains according to their role.
- Only the user or team set as Responsible can mark a task as done — both in the Task Manager and in the document view.
- Task visibility is also constrained by the permissions on the related document. A task linked to a document that you cannot access is displayed without its related-content value.
⭐ Getting started
- An administrator creates the task types your teams need (Configuration → Data customization → Task types).
- Users create tasks from the Task Manager, from a document view, or directly from a clause.
- For obligations that come back at regular intervals, enable recurrence so each checkpoint is generated as an occurrence.
The three entry points create the same kind of task; they differ only in what is pre-filled:
| Entry point | Pre-filled for you |
|---|---|
| Task Manager → Create a task | Nothing — you select the related content yourself. |
| Document view → Tasks panel → Create a task | Related content = the current document. |
| Summary Sheet → Create task for this clause | Clause and Related content. |
Article contents:
- ⭐ Getting started
- 1️⃣ Scope 1 — Task Types & Task Manager (Core)
- 2️⃣ Scope 2 — Recurring Tasks & Occurrences
- 3️⃣ Scope 3 — VisuScreen integration & Task Manager tools
- 4️⃣ Scope 4 — Create a Task from a Clause
- ⚠️ Limitations and known behaviors
- ❓ Frequently asked questions
1️⃣ Scope 1: Task Types & Task Manager (Core)
This scope covers the foundation of the module: an administrator first configures the task types available in the environment, then users create and manage tasks from the Task Manager.
Task Types Configuration (Admin)
Before users can create tasks, an Administrator must configure at least one task type. Task types define the obligation categories available in your environment and determine which custom fields are offered when a task is created.
⭐ Accessing the Task Types page
In the left navigation bar, go to Configuration → Data customization → Task types. The page lists all existing task types with their name, purpose, and number of associated tasks. When no task type exists yet, an empty state is displayed with a Create a task type call to action.
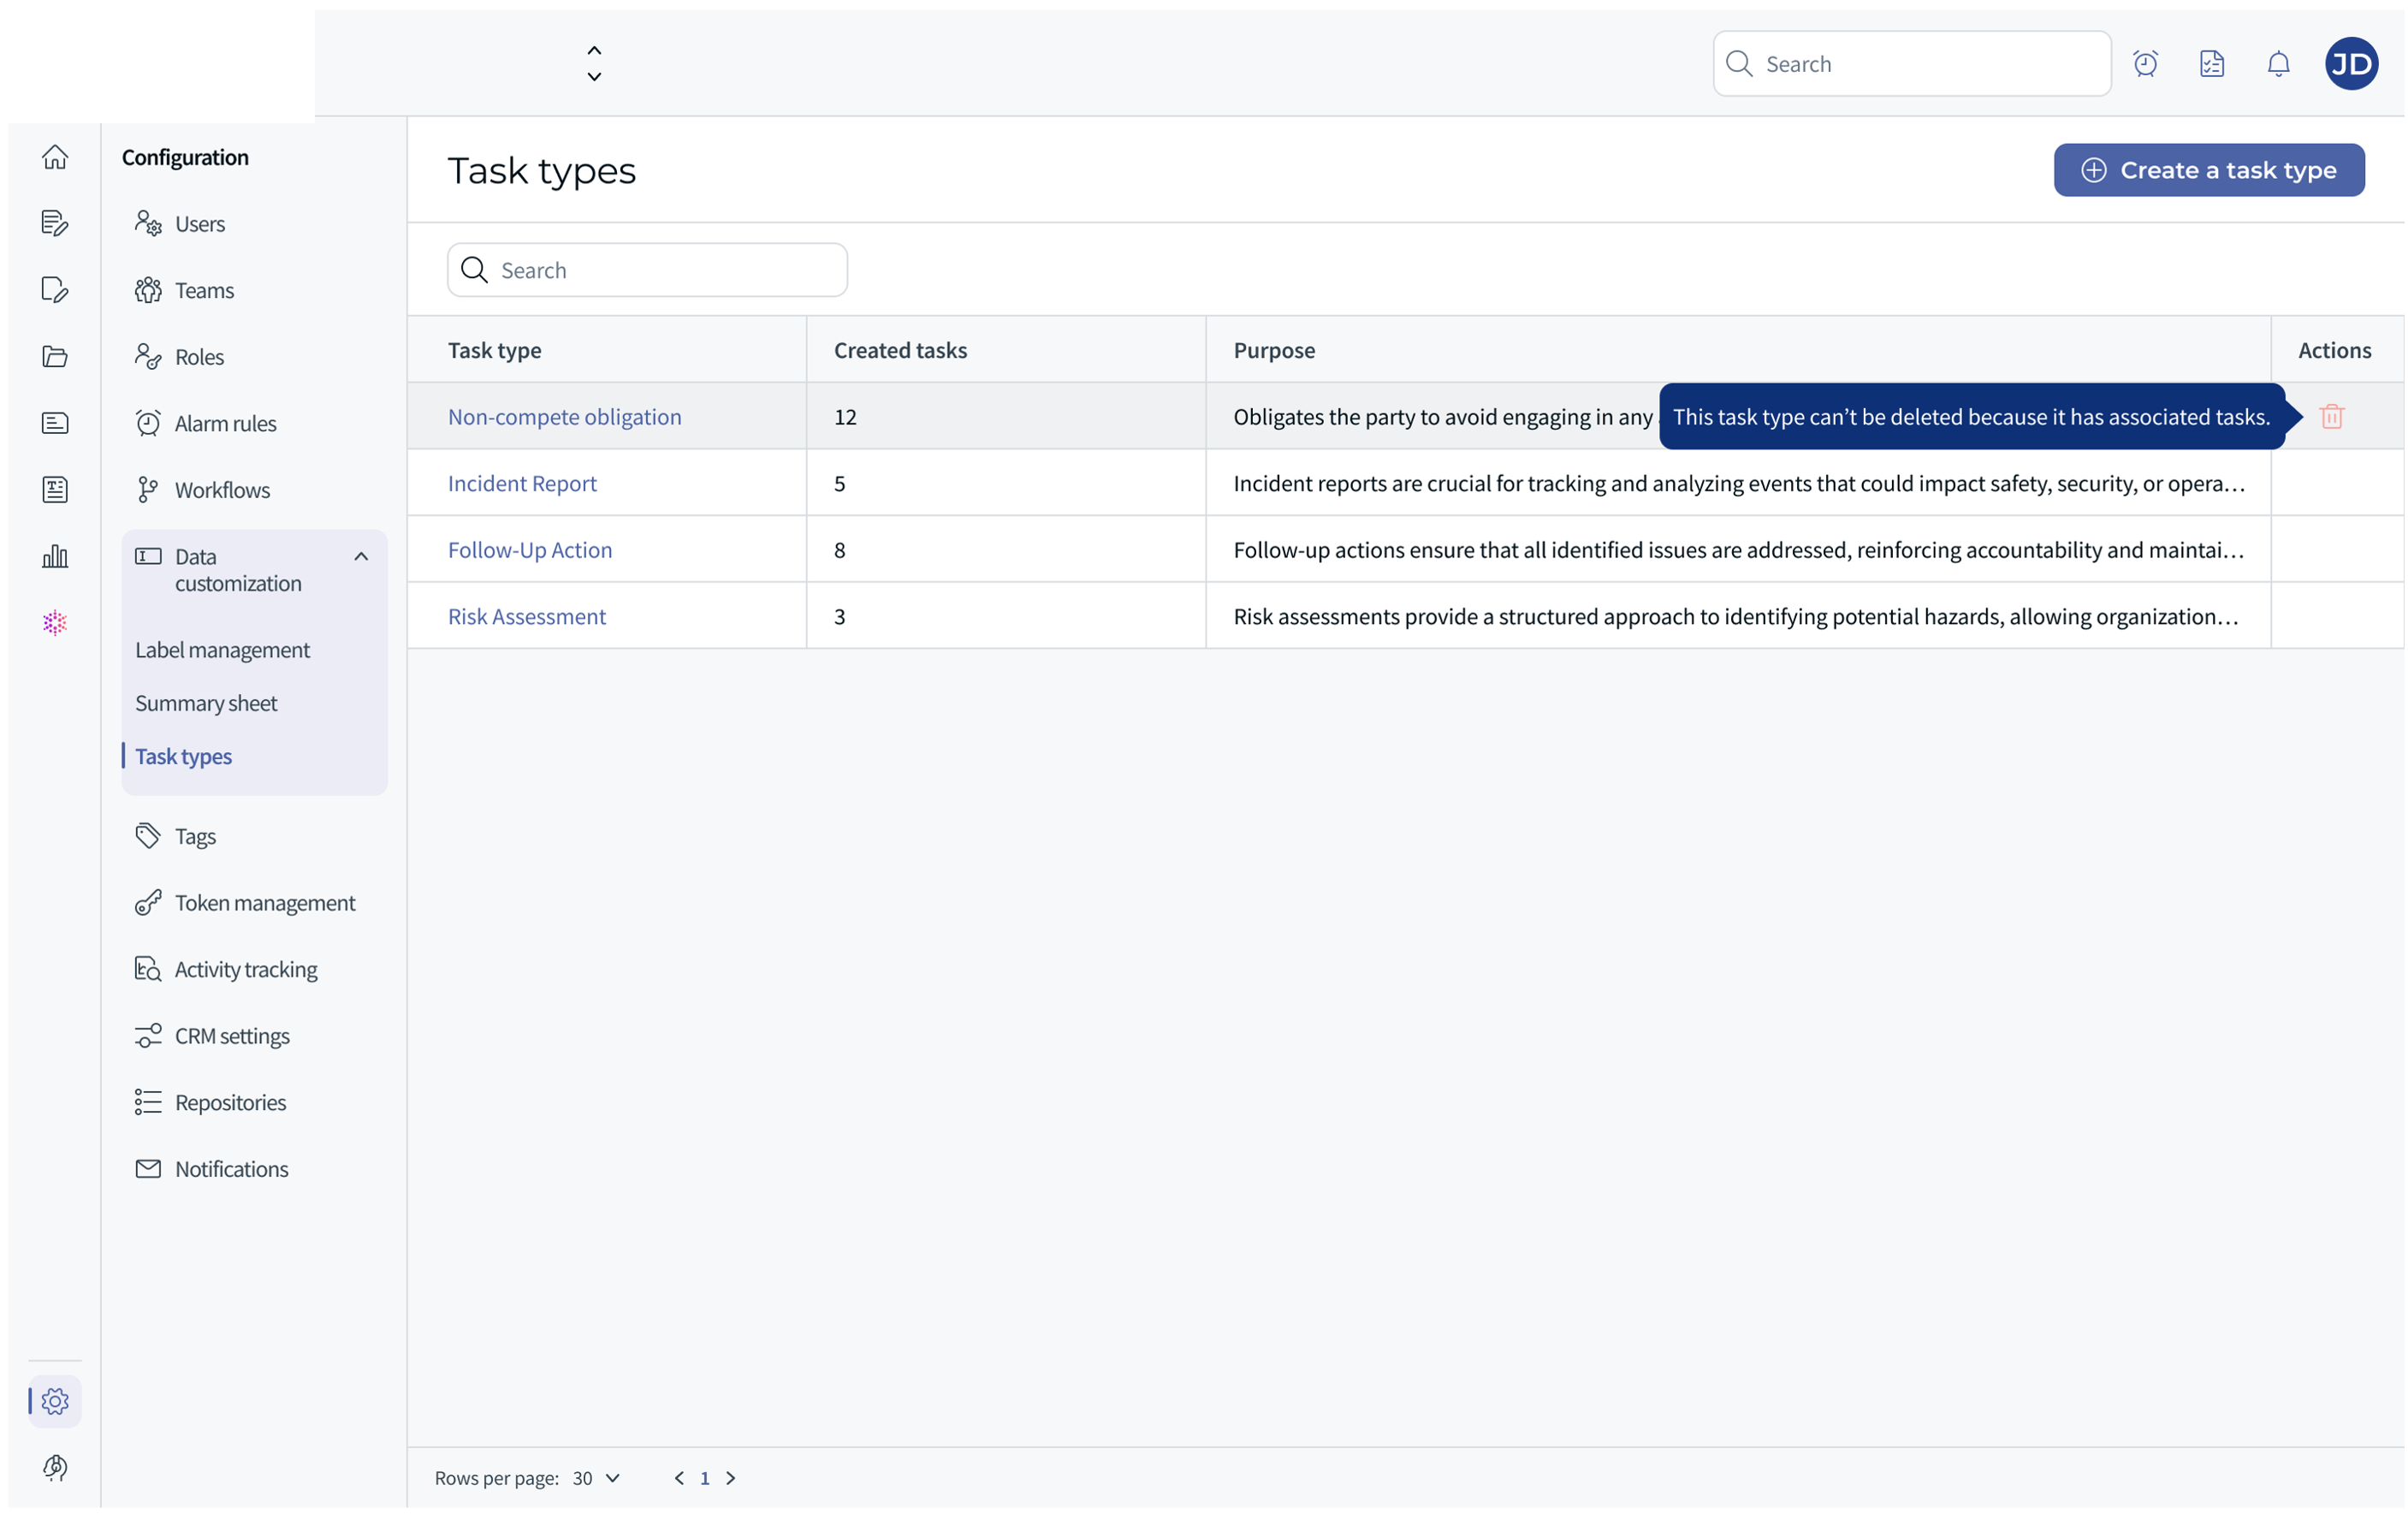
Figure 1 — The Task types page (Configuration → Data customization → Task types): list of existing task types with name, purpose, task count, and the "Create a task type" button.
⭐ Creating a task type
Click Create a task type. A pop-up opens. Fill in:
- Task type name (mandatory) — the category label (e.g. "Non-compete obligation").
- Purpose of the task type (mandatory) — a short description of what this category covers, up to 200 characters.
Click Confirm.
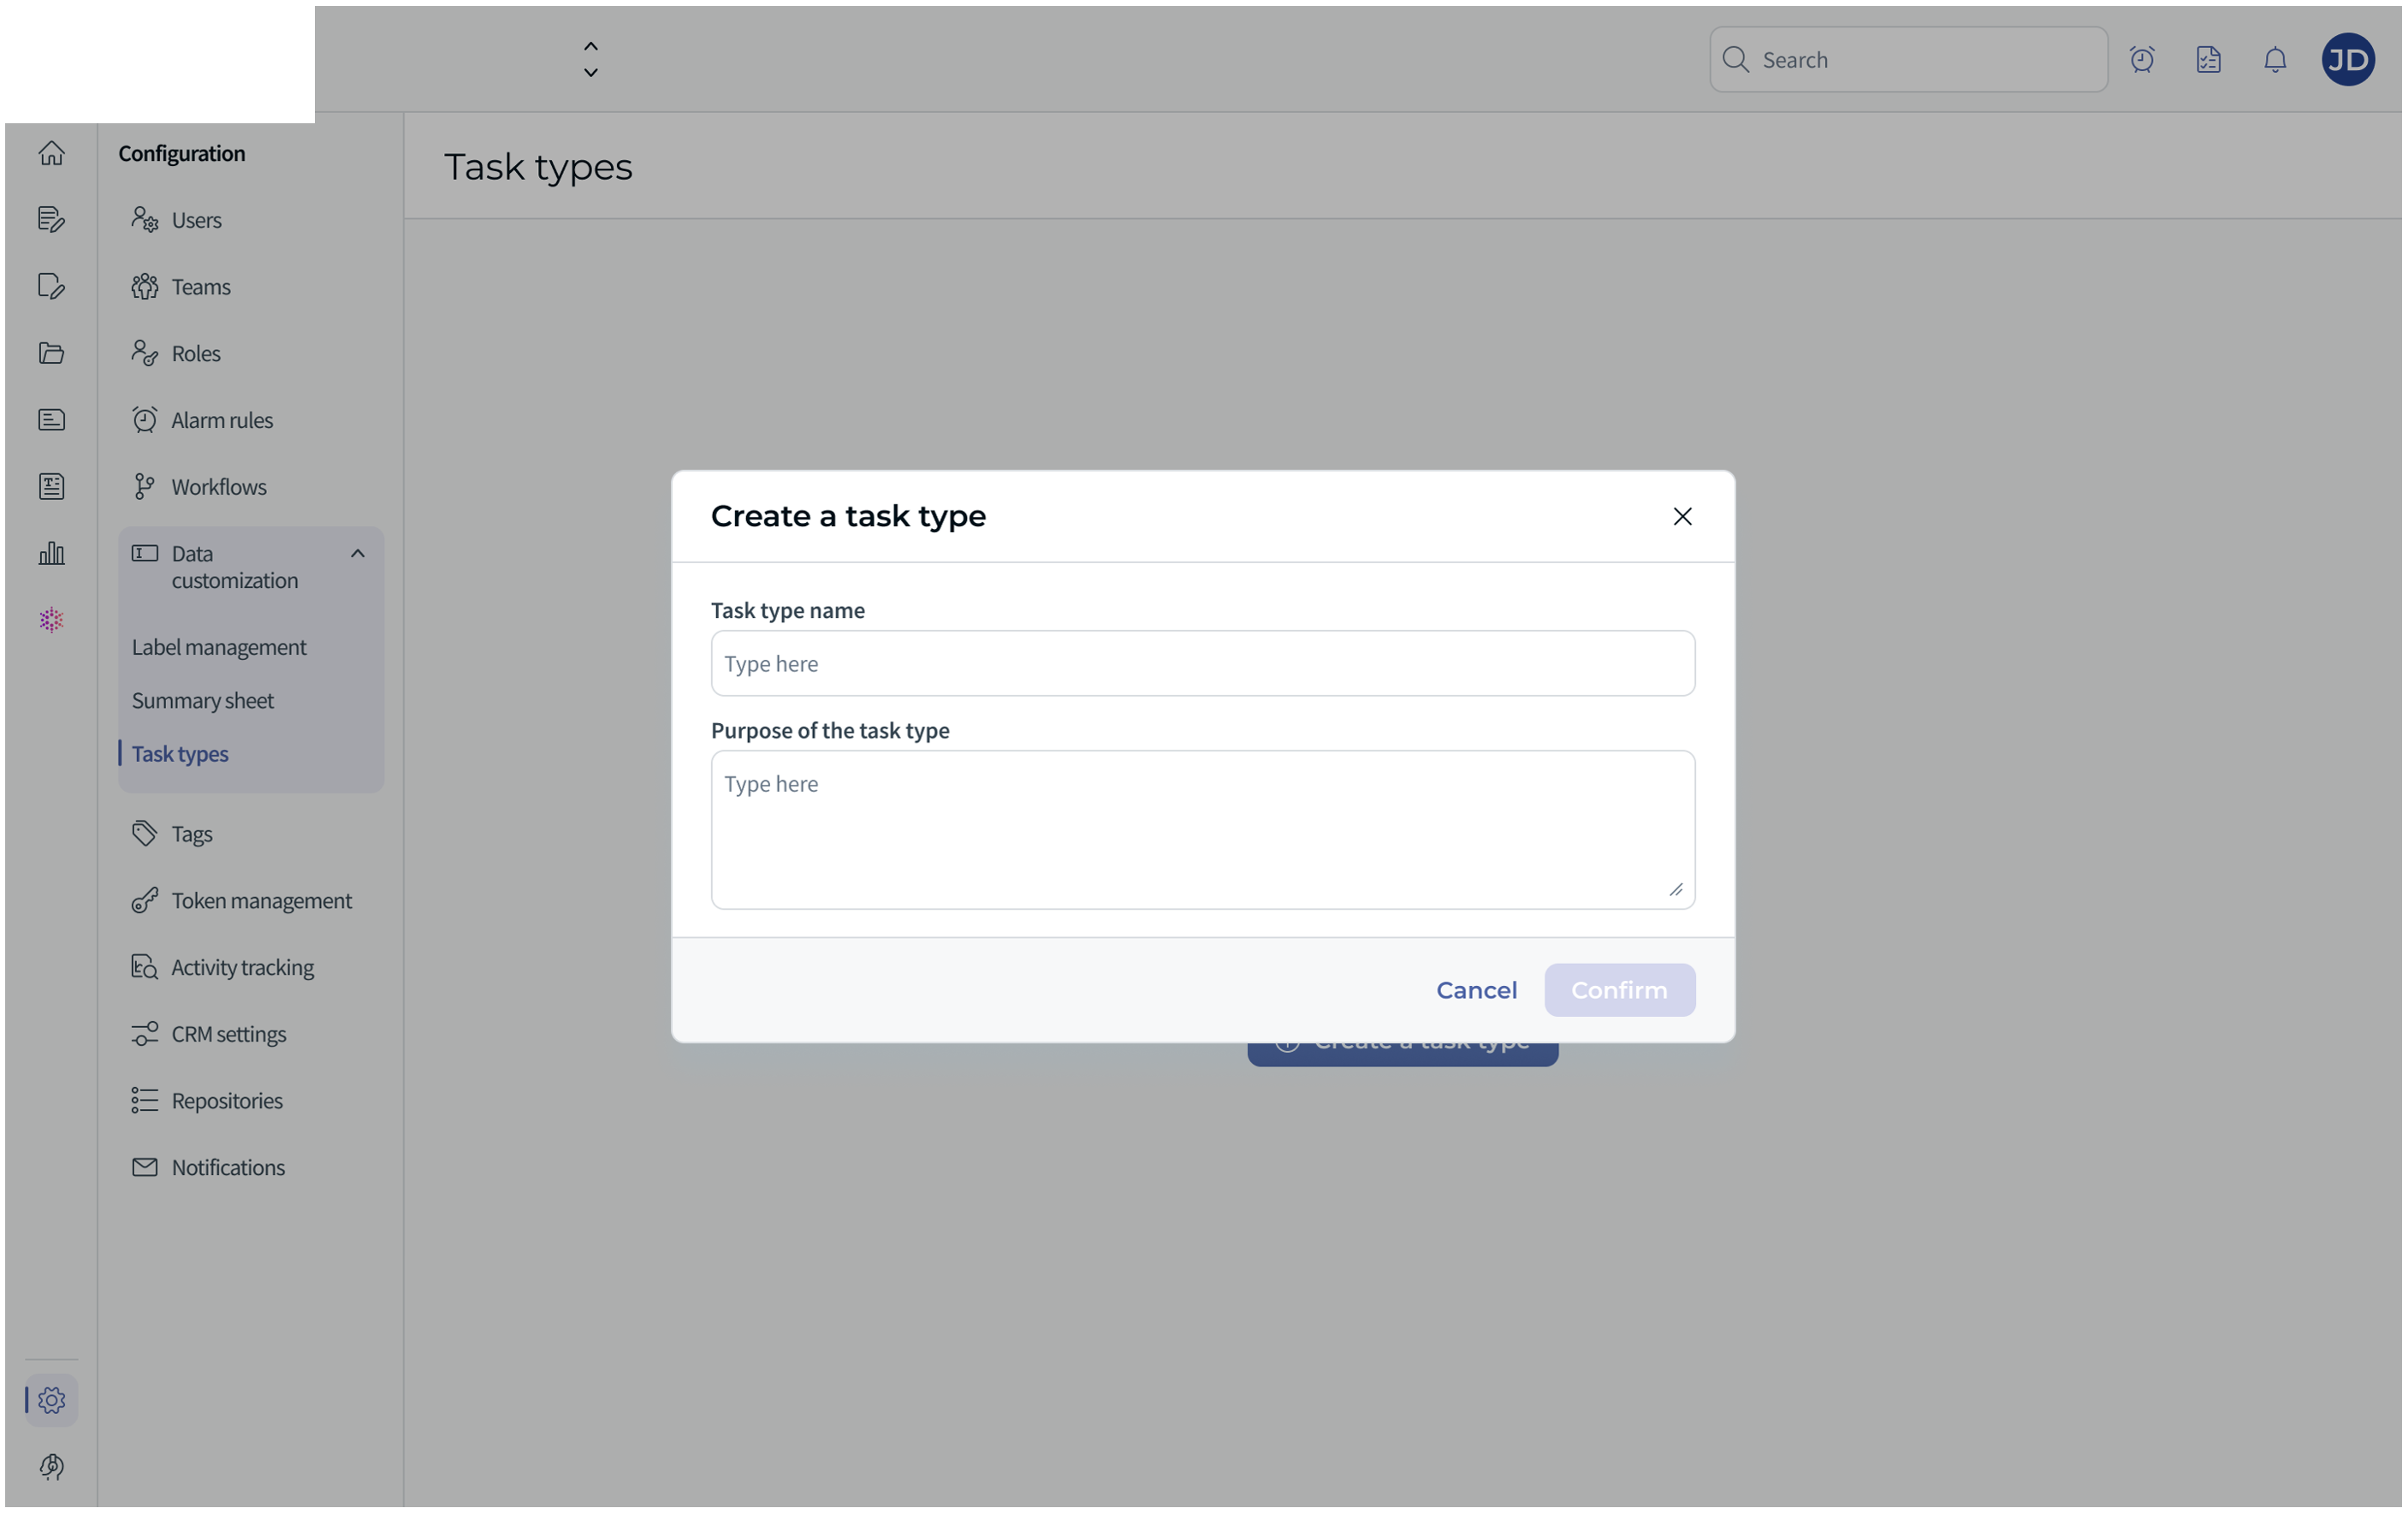
Figure 2 — "Create a task type" pop-up: task type name and purpose fields, with Confirm button.
Once created, the task type detail page opens, showing two tabs: General information (the fixed default fields shared by all tasks) and Extra information (where custom fields are configured).
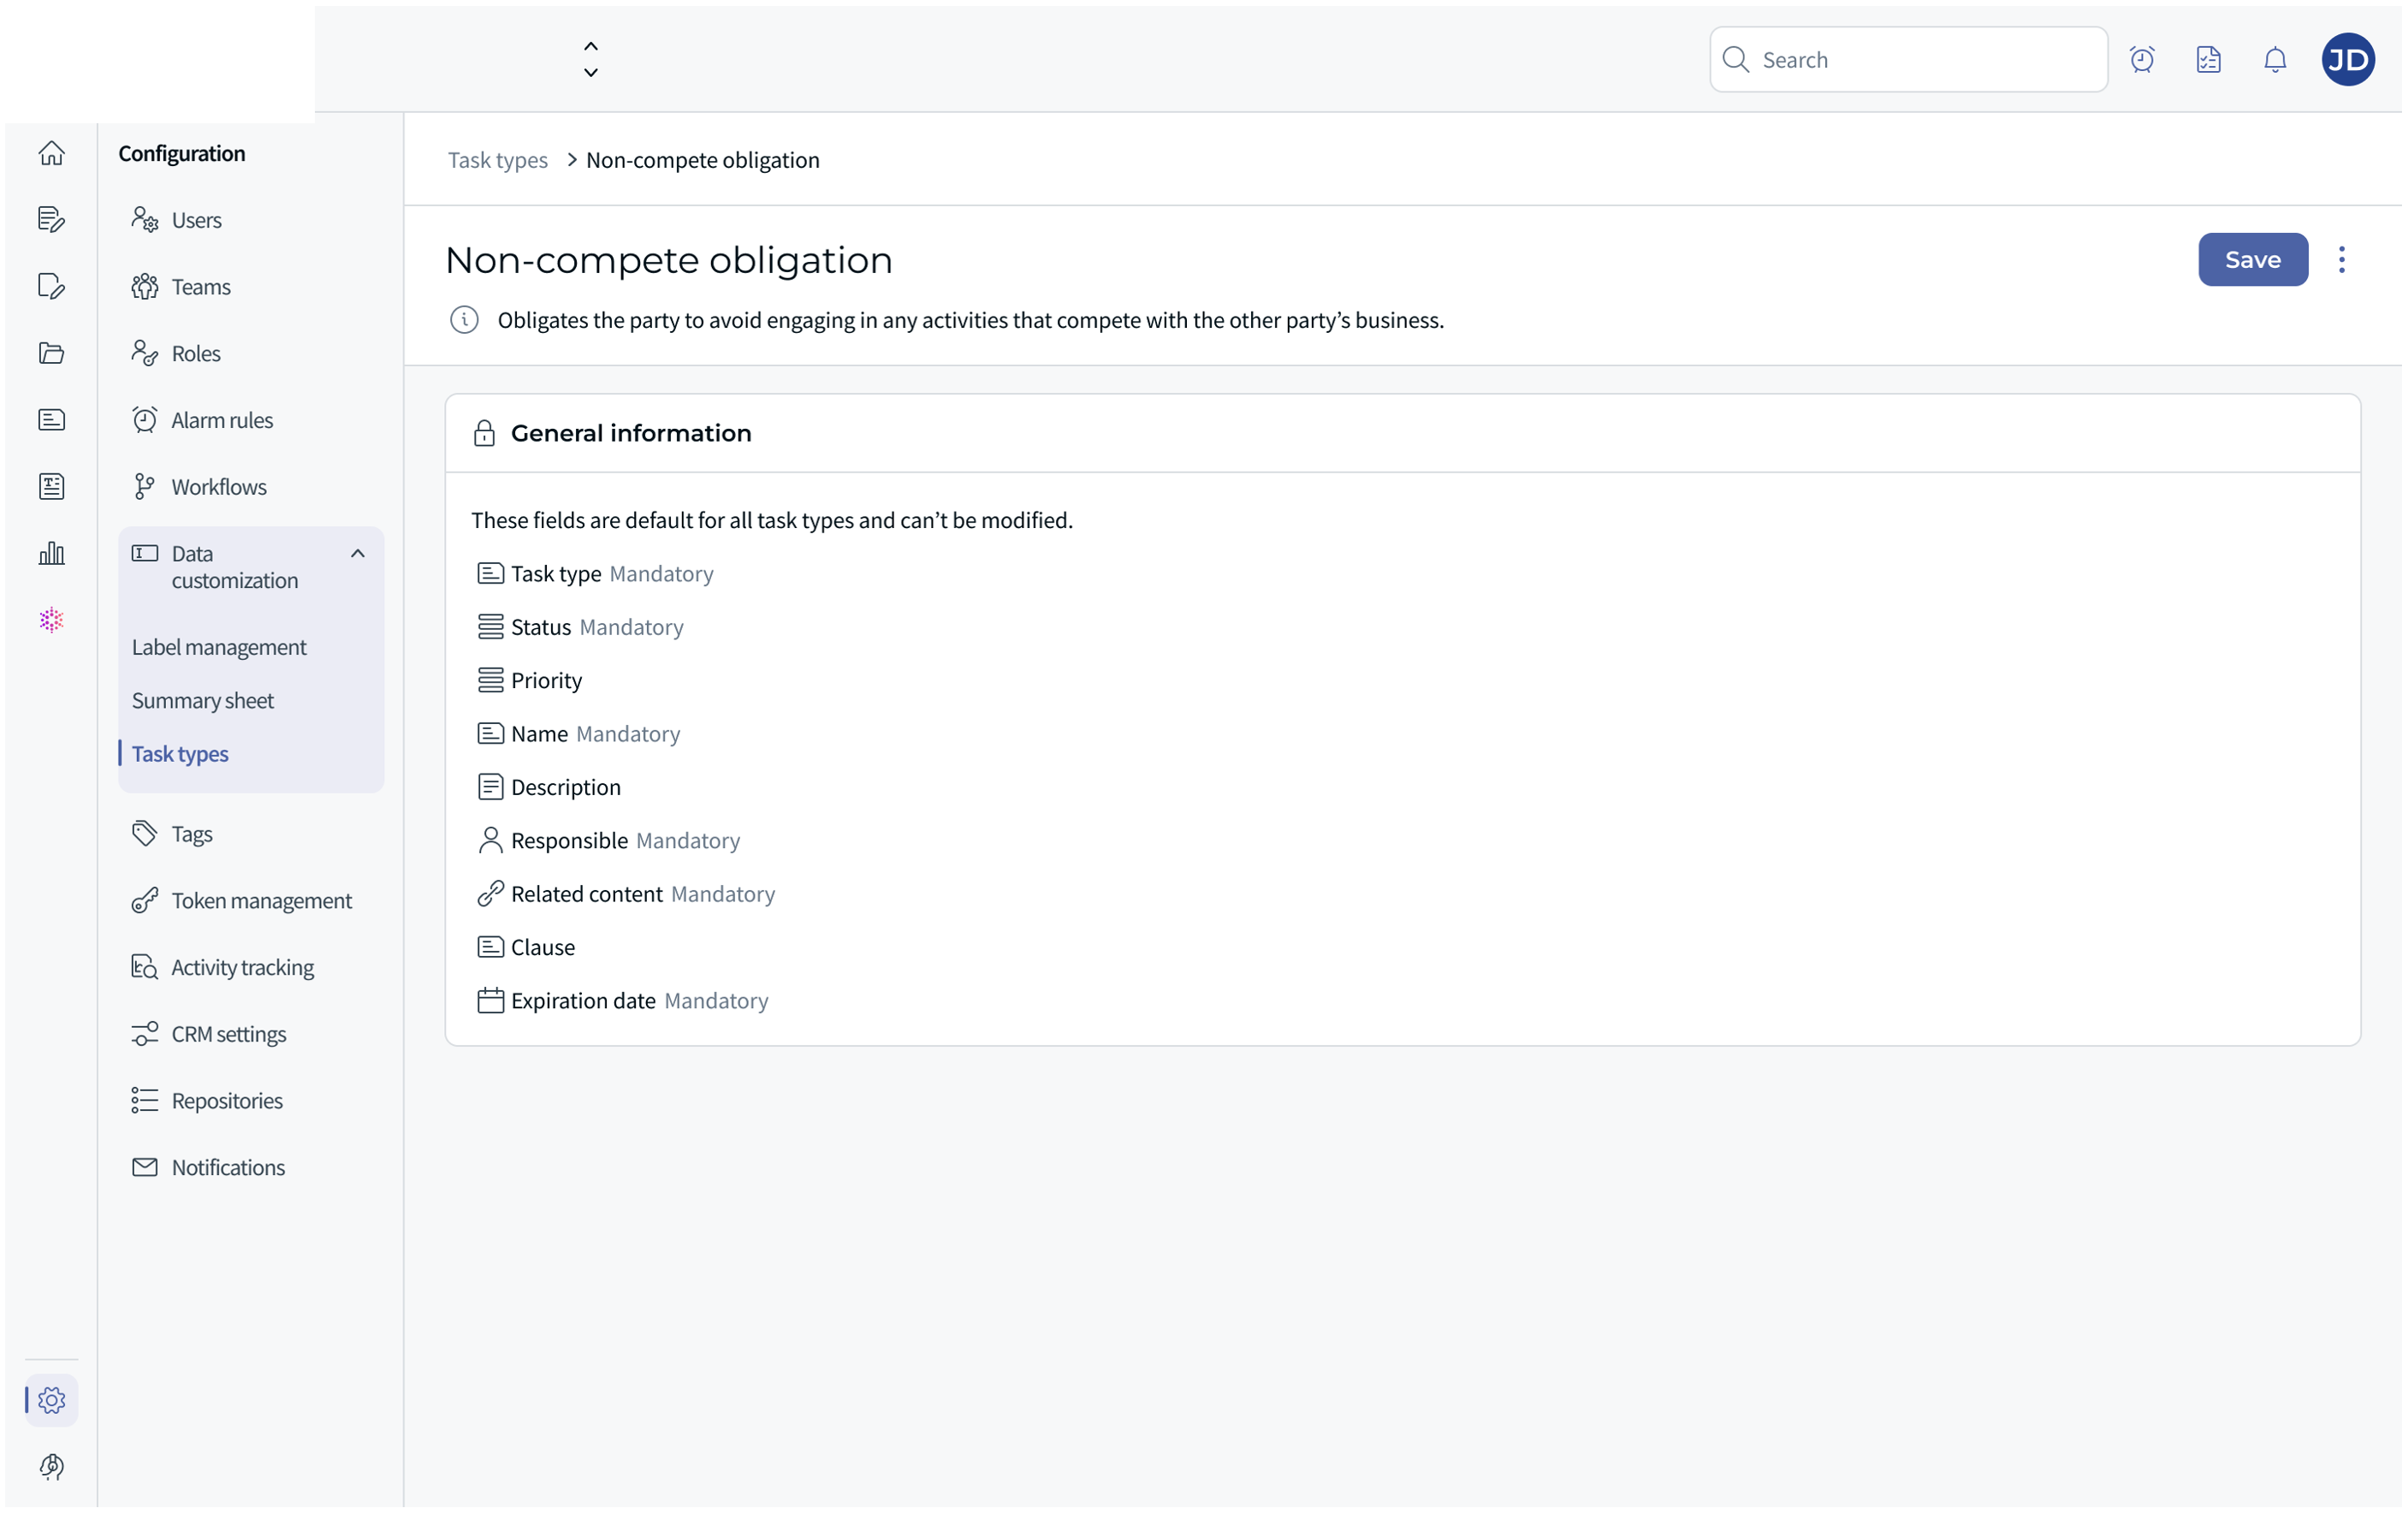
Figure 3 — Task type detail page, General information tab: the default fields common to all tasks are displayed as fixed, non-removable fields.
ℹ️ The following default fields exist on every task, regardless of its type, and cannot be removed or reordered:
| Field | Mandatory | Notes |
|---|---|---|
| Task type | ✅ Yes | Set at creation; cannot be changed afterwards. |
| Status | ✅ Yes | To do (default) / In progress / Done. |
| Name | ✅ Yes | Free text. |
| Responsible | ✅ Yes | One user or team. Only the Responsible can mark the task as done. |
| Related content | ✅ Yes | One or more linked contract documents; Confirm is disabled until at least one is selected. |
| Start date | ✅ Yes | Pre-filled with today's date; any date, including a past date, is allowed. |
| Due date | ✅ Yes | The deadline by which the obligation must be fulfilled. |
| Priority | No | Low / Medium / High. |
| Description | No | Free text. |
| Clause | No | Active only after Related content is selected; clauses are sourced from the chosen documents. |
⭐ Adding custom fields (Extra information)
Custom fields let your team collect obligation-specific data (e.g. "Risk level", "Third party", "Observed ratio") that goes beyond the default fields. The available fields come from the attributes defined in Label management (Configuration → Data customization → Label management), where new attributes can also be created.
- On the task type detail page, open the Extra information tab. Before any field is added, an empty state is shown: "No fields yet! Use this section to add fields to the task type, or use drag and drop to add fields from the Field library on the right."
- Click Add field. The "Add fields from the field library" dialog opens.
- On the left side (Find a field), use the Search by attribute name box and tick the checkbox of each attribute you want to add. Selected attributes appear on the right under Added fields, which has its own search box.
- Click Confirm to add the selected fields (or Cancel to discard them).
- Click Save at the top of the page to apply the changes to the task type.
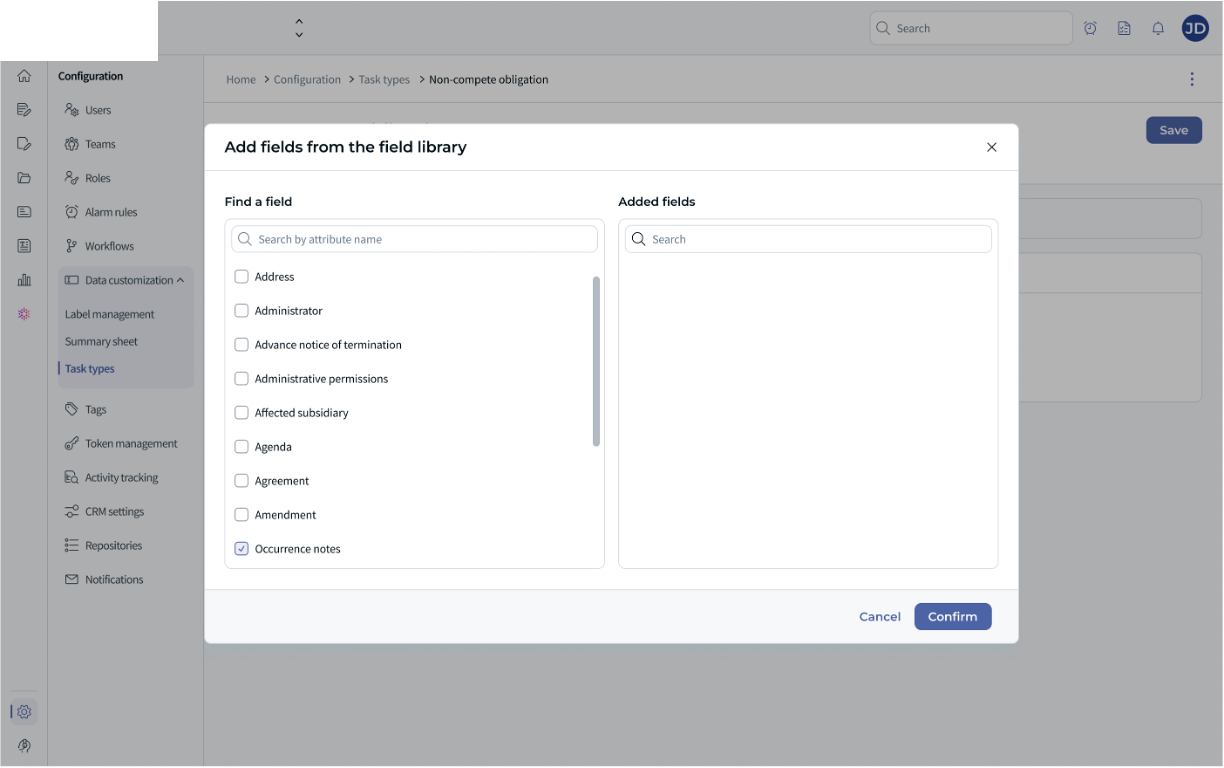
Figure 4 — The "Add fields from the field library" dialog: Find a field with attribute search and checkboxes on the left, Added fields on the right, and the Cancel / Confirm actions.
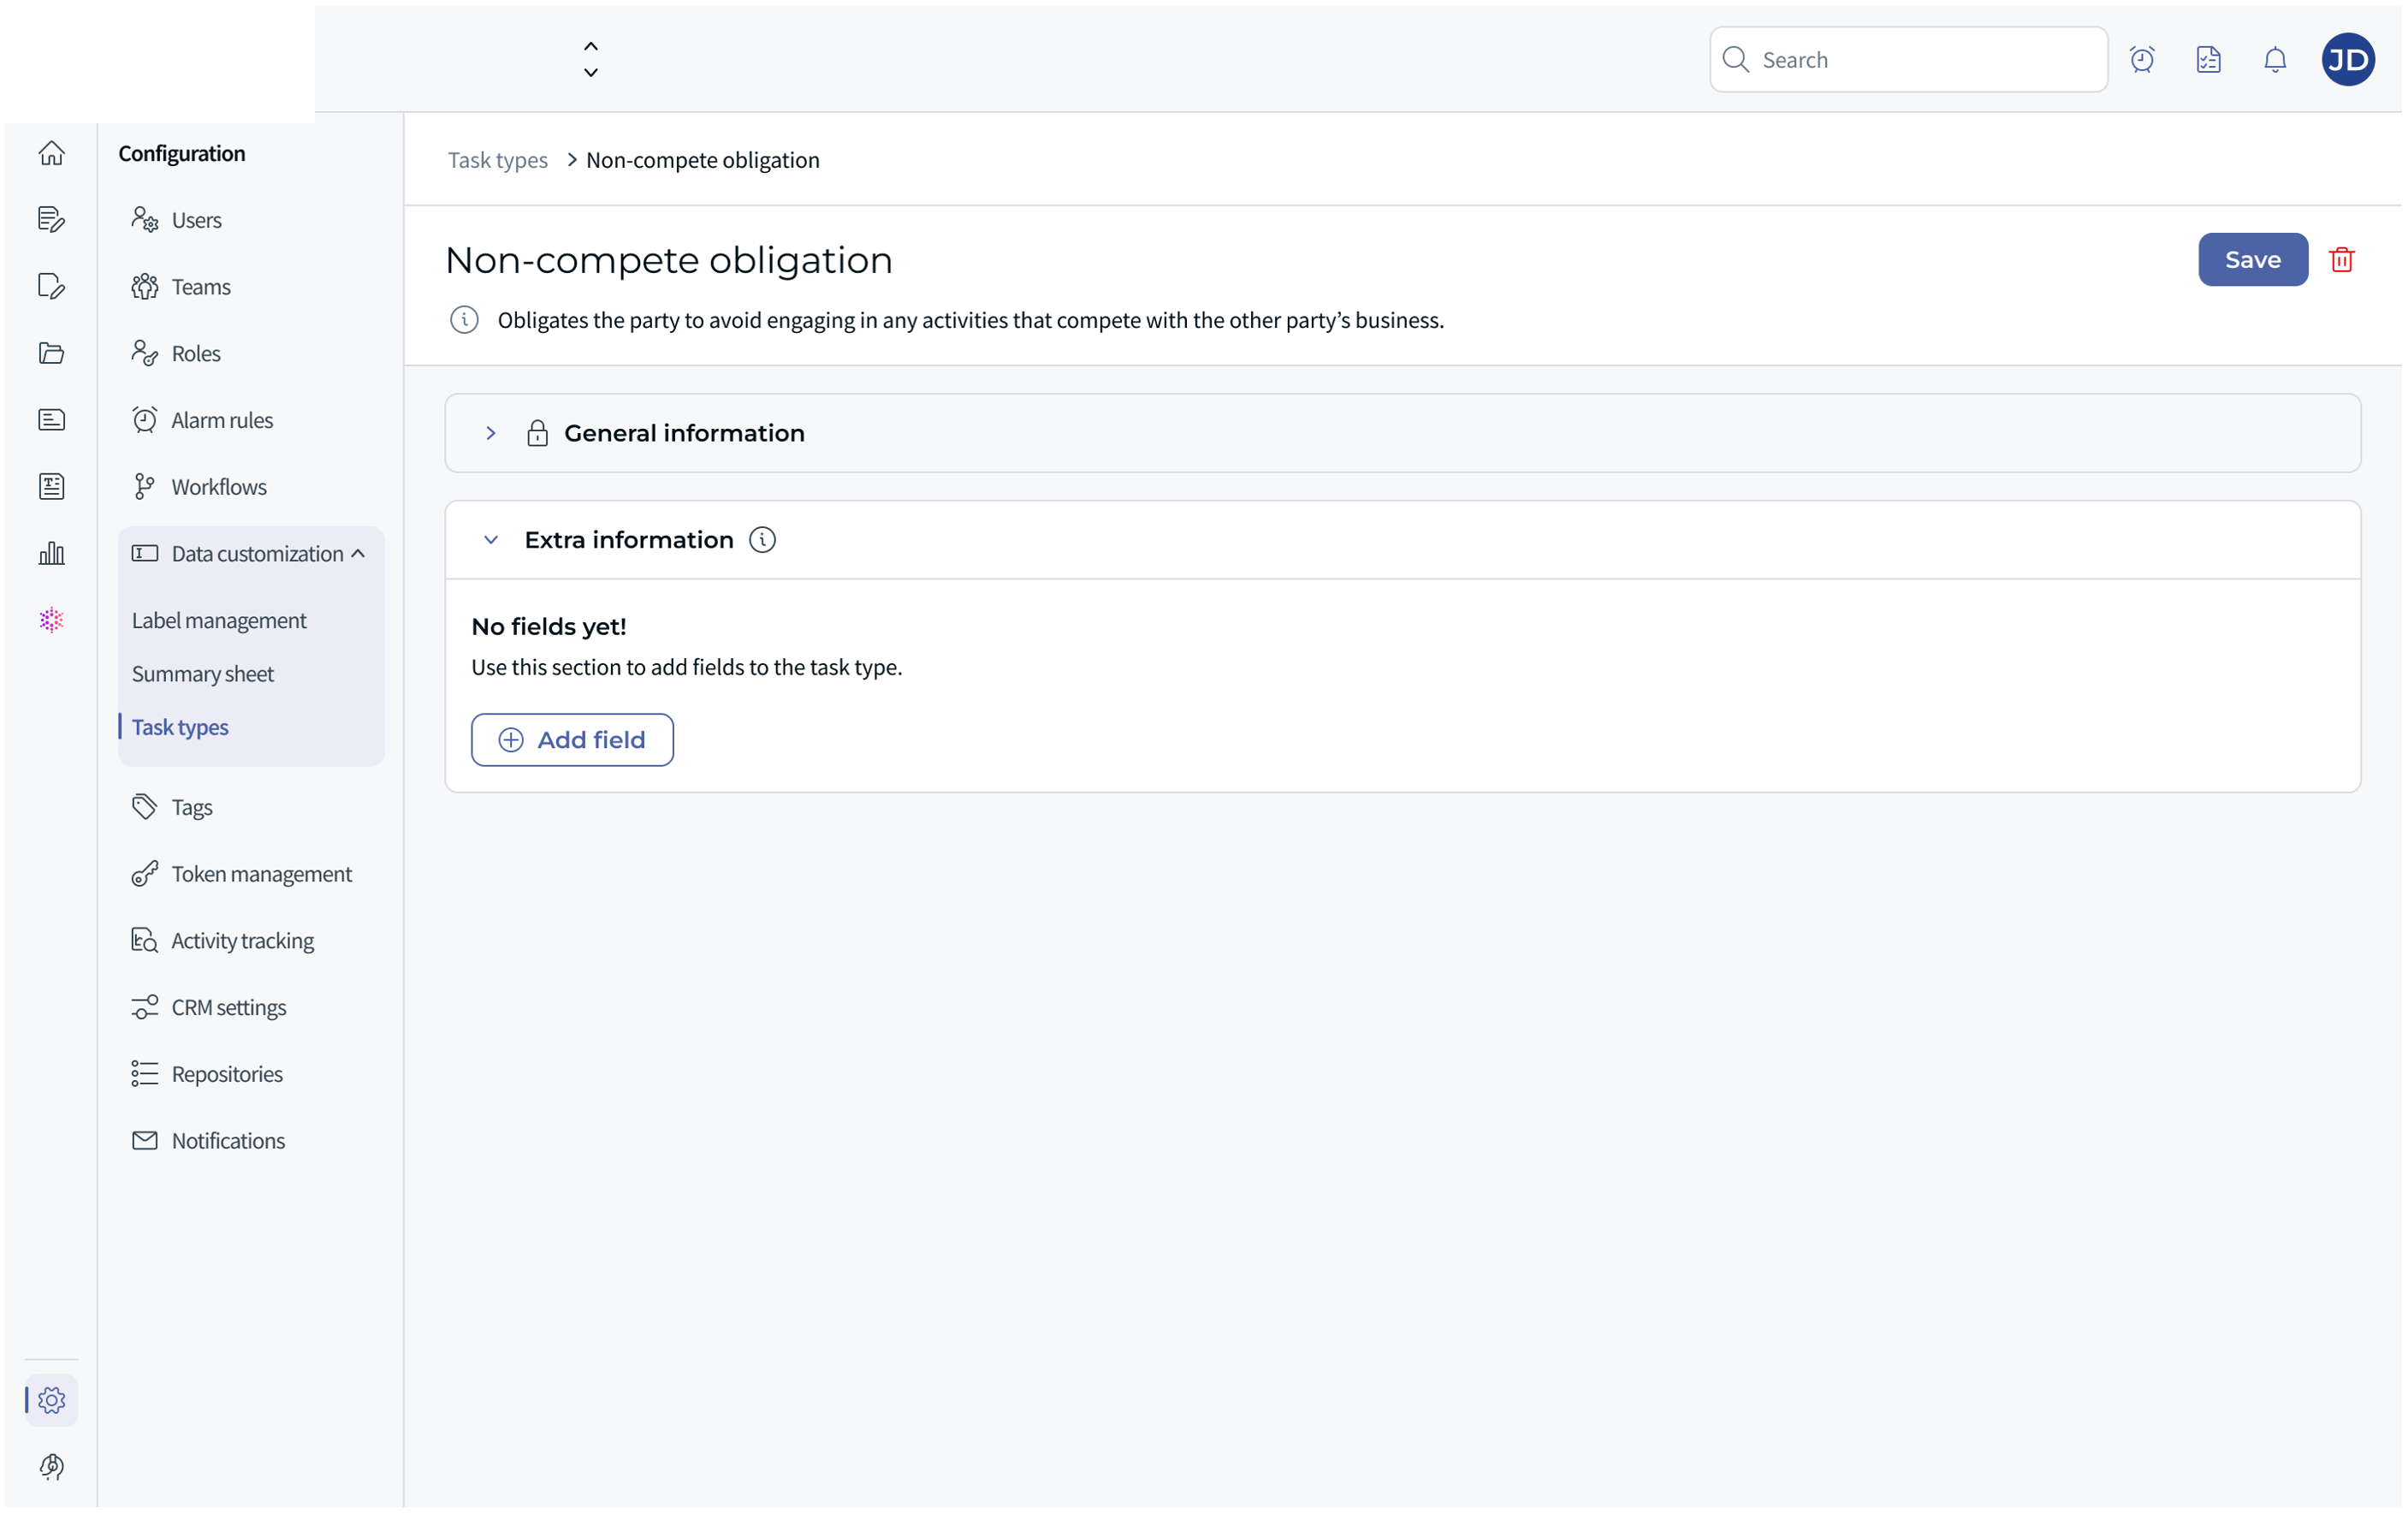
Figure 4b — Task type detail page, Extra information tab: the empty state ("No fields yet!") shown before any custom field is added, with the Add field button.
ℹ️ Custom fields are optional when a task is filled in and have no default value.
⚠️ When you save a change to a task type's custom fields, a warning is shown: "All existing tasks of this type must be manually reviewed by the task owners after saving." The save does not retroactively update existing tasks.
⭐ Editing or deleting a task type
To edit: on the task type detail page, click the name to rename it, edit the purpose, or add or remove custom fields, then click Save.
To delete: from the task types list, open the Actions menu (⋮) and select Delete task type, then confirm in the pop-up.
⚠️ A task type cannot be deleted if it has associated tasks. You will see the message: "This task type can't be deleted because it has associated tasks."
Task Manager (User)
The Task Manager is the central hub for viewing, creating, and managing all tasks.
⭐ Accessing the Task Manager
Click the Task Manager entry in the left navigation bar (listed alongside Home, Contracts, Projects, etc.). The Task Manager page opens, displaying the list of all tasks you have access to. When no task exists yet, an empty state is displayed with a Create a task call to action.
Figure 5 — The Task Manager page: header with Export and Create a task buttons, search bar, Manage columns and Filters buttons, and the task grid with sortable columns.
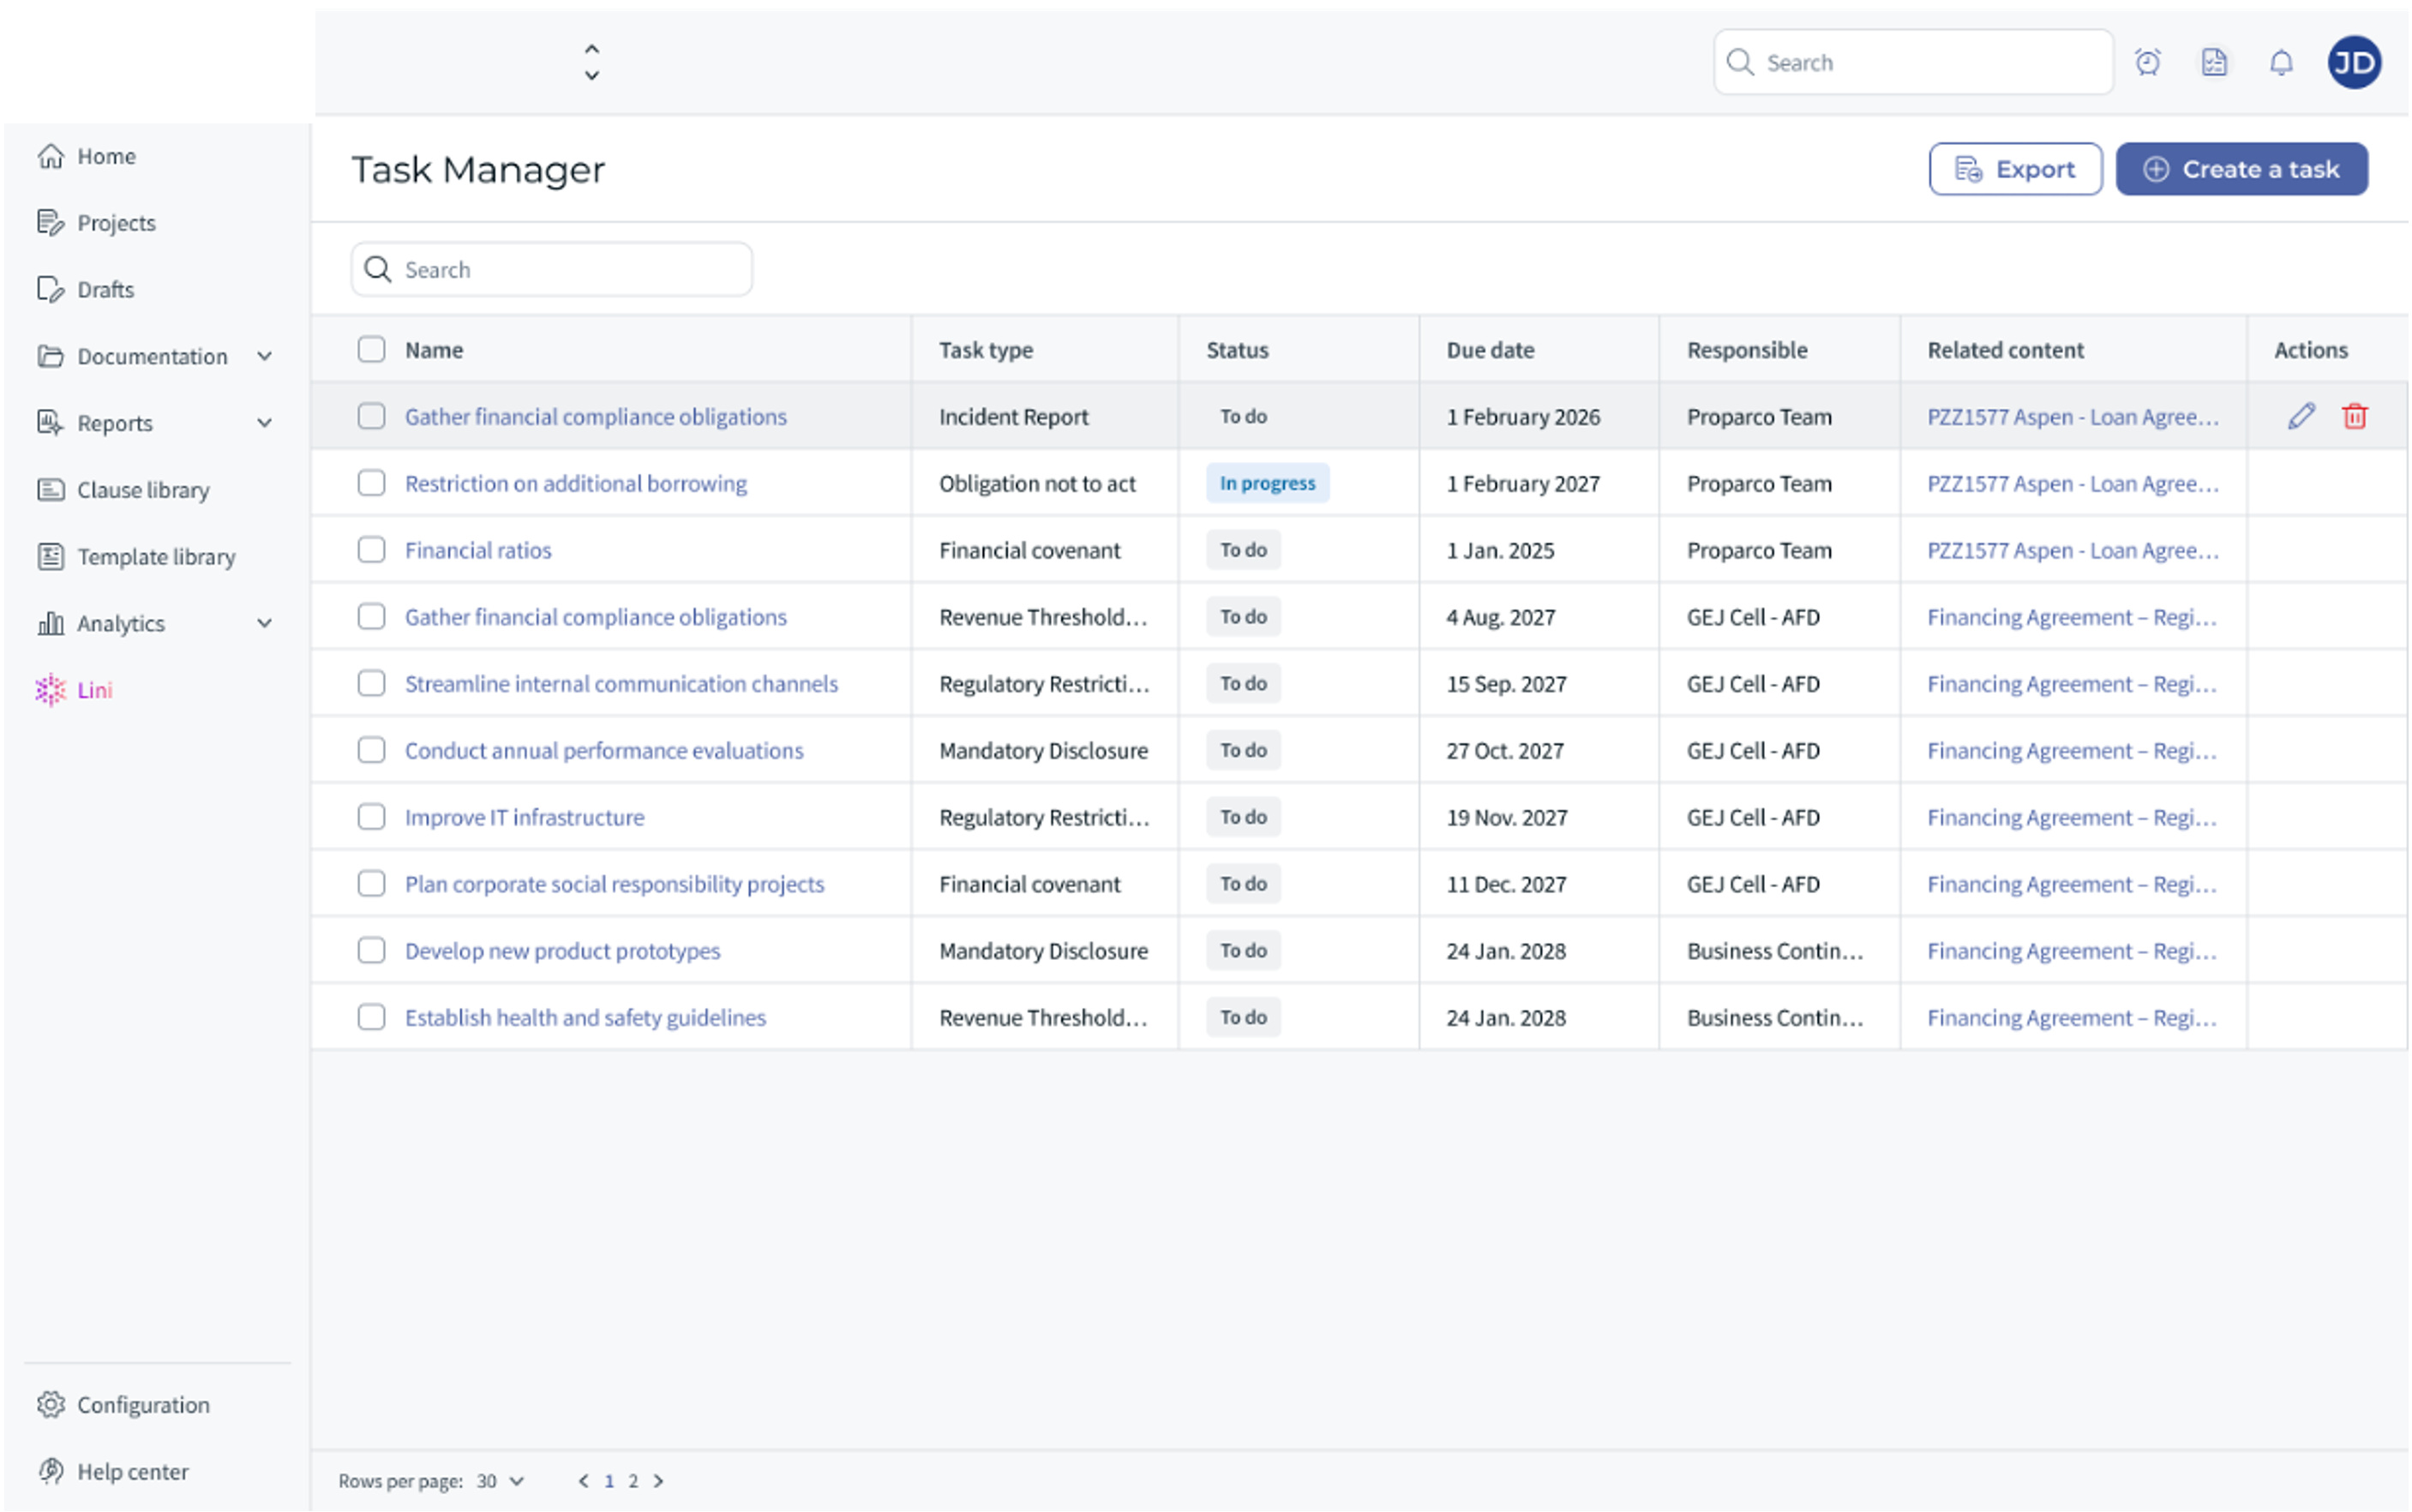
Figure 6 — Task Manager with existing tasks: default columns are Name, Task type, Status, Due date, Responsible, Related content, and Actions.
⭐ Creating a task
Click Create a task (from the Task Manager header or from the VisuScreen task panel — see Scope 3). A creation pop-up opens with three tabs: General information, Extra information, and Attached documents. When editing a recurring task, a fourth Occurrences tab is available.
General information tab:
- Select a Task type (mandatory).
- Set the Status (default: To do).
- Enter the Name (mandatory).
- Add a Description (optional).
- Select the Responsible user or team (mandatory).
- Select the Related content — one or more linked contract documents (mandatory; the Confirm button remains disabled until at least one document is selected).
- Select a Clause (optional; the dropdown activates only after Related content is chosen and lists clauses from the selected documents).
- Set the Start date (pre-filled with today's date; any date, including a past date, is allowed) and the Due date. Both are mandatory.
- Set the Priority (optional: Low / Medium / High).
- Optionally enable Make recurrence (see Scope 2).
Figure 7 — "Create a task" form, General information tab: task type, status, name, responsible, related content, start date and due date, and the Make recurrence section at the bottom.
ℹ️ The Clause dropdown lists the title and text of each clause from the selected document. If multiple related documents are selected, clauses are grouped by document name.
Figure 8 — Clause dropdown open: clauses are listed with their title and text, sourced from the document selected in the Related content field.
Extra information tab: always available. If the selected task type has custom fields, they appear here as optional inputs; if no custom fields are configured, the tab displays an empty state.
Attached documents tab: attach supporting CLM documents (not direct file uploads) to the task for reference. These attachments are informational and are distinct from the Related content (linked contract).
Click Confirm to create the task.
⭐ Editing, completing, and deleting a task
To edit: in the Task Manager, click the task name to open the edit pop-up. Modify the desired fields and click Save changes.
To mark as done:
Only the user or team set as Responsible can mark a task as done. This can be done from the Task Manager (open the task and click Mark as done) or from the Tasks panel in the document view.
To delete: from the Actions menu (⋮) on a task row, select Delete task and confirm the pop-up. ⚠️ This action is irreversible.
Sorting: tasks can be sorted by Task type, Status and Due date. Status sorting follows the workflow order: To do → In progress → Done.
⭐ Exporting tasks
In the Task Manager header, click Export. The export file is generated and downloaded automatically.
⚠️ Task status lifecycle
| Status | Description |
|---|---|
| To do | Default status when a task is created. |
| In progress | Work has started on the task. |
| Done | The task is complete. The Mark as done action is a shortcut to this status. |
Statuses can be changed freely at any time. Tasks do not switch to an "Overdue" status automatically when their due date passes.
2️⃣ Scope 2: Recurring Tasks & Occurrences
When an obligation must be verified at regular intervals (e.g. annually for five years), it can be set up as a recurring task. Each periodic checkpoint is called an occurrence.
⭐ Enabling task recurrence
When creating or editing a task, enable the Make recurrence toggle in the General information tab. A recurrence section expands. Fill in:
- Start date (mandatory).
- Frequency — the period type (e.g. Annual).
- Repeat every — the interval (e.g. 1 [year]).
- Repeat until — the end date of the recurrence schedule.
When Make recurrence is enabled, an ℹ️ tooltip on the option reads "Future occurrences will start after this task's due date", and an information callout is displayed: "The occurrence schedule will be available after the task is created." Click Confirm to save.
Figure 9 — Make recurrence section: the ℹ️ tooltip ("Future occurrences will start after this task's due date"), the information callout ("The occurrence schedule will be available after the task is created."), and the Frequency, Repeat every and Repeat until fields.
⭐ Occurrences in the Task Manager
Once a recurring task is saved, each occurrence appears as a separate row in the Task Manager, labeled "Occurrence – [task name]", with its own Start date and Due date. Occurrences are only created after the Confirm button has been clicked.
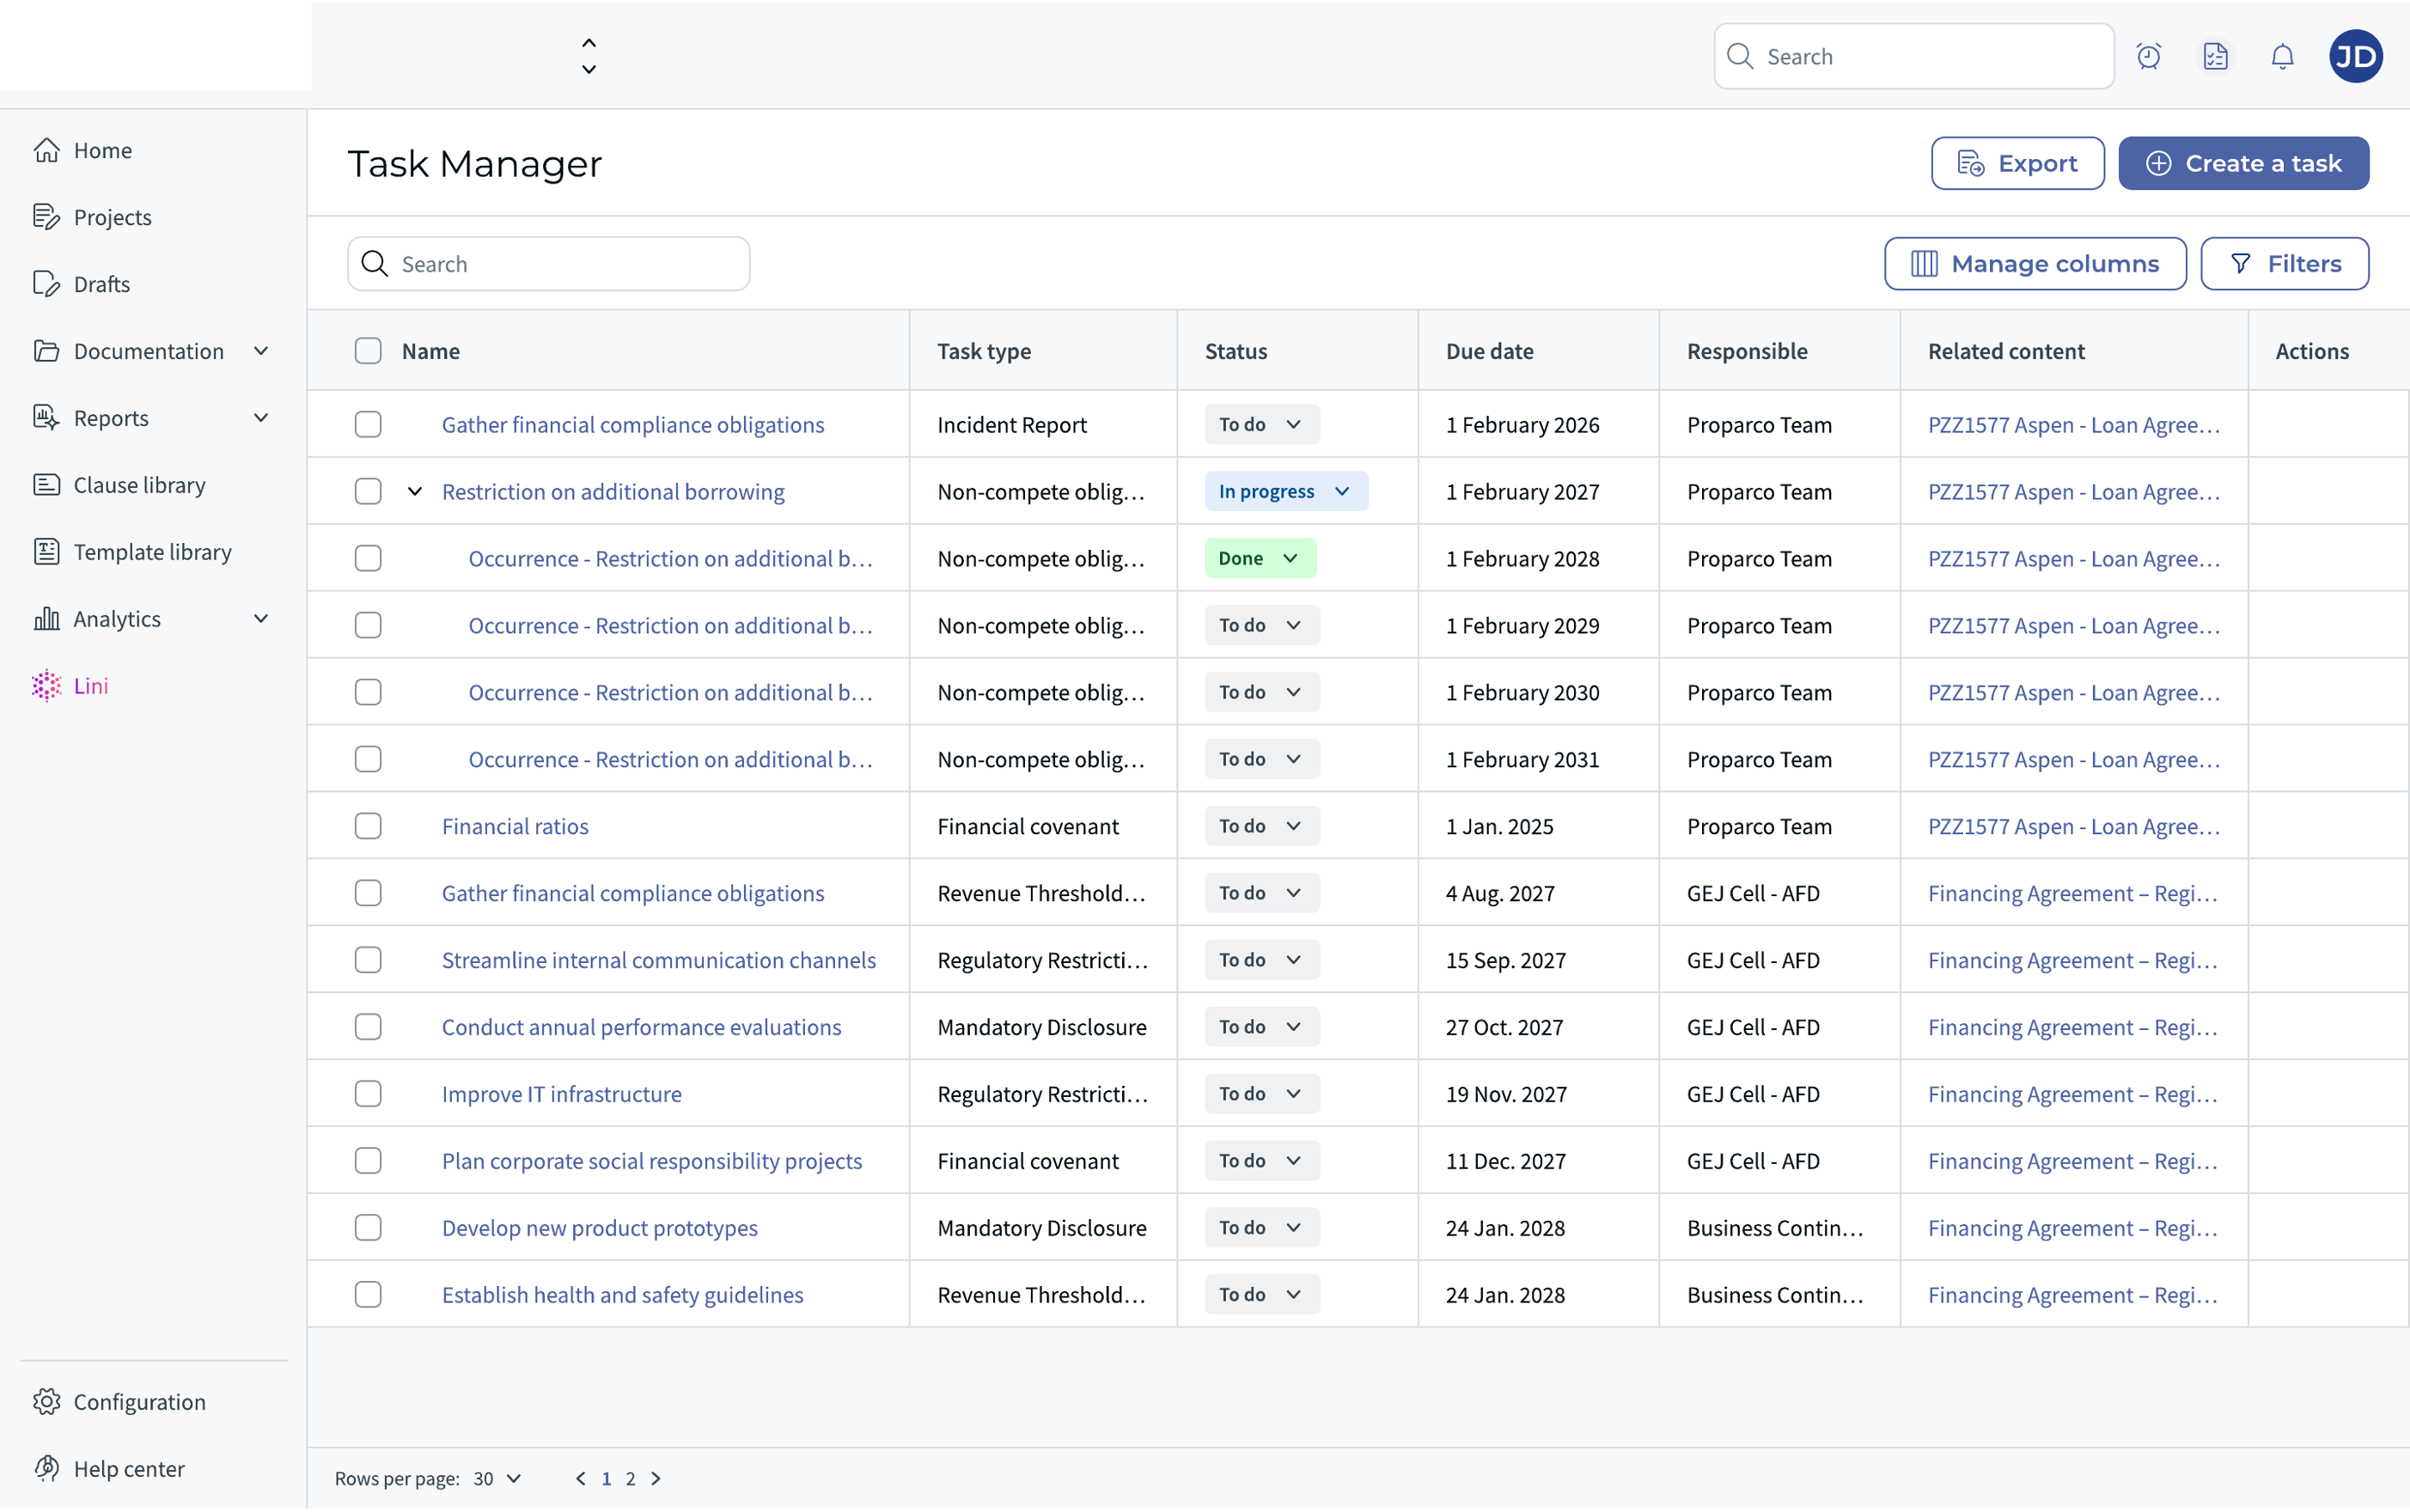
Figure 10 — Task Manager grid showing the main recurring task and its occurrences (labeled "Occurrence – [task name]"), each with individual Start date and Due date columns.
⭐ Editing an occurrence
Click the occurrence name in the Task Manager to open it. The following fields can be changed at the occurrence level:
- In General information: Status, Priority, Description, Responsible.
- In Extra information: all custom fields.
- In Attached documents: documents can be added or removed.
The following fields can only be changed on the main task — not on individual occurrences: Name, Clause, Due date, Related content.
⚠️ Recurrence rules and limitations
- Recurrence is permanent: once a task is saved as recurring, it cannot be converted back into a one-off task.
- Occurrences appear only after save: an information callout explains "The occurrence schedule will be available after the task is created."
- Retroactive updates are not applied: changes to the main task's recurrence configuration do not update already-created occurrences. Only future occurrences generated after the change reflect the updated settings.
3️⃣ Scope 3: VisuScreen integration & Task Manager tools
This scope brings task management into the document VisuScreen and adds power-user tools to the Task Manager, including advanced filters and column management.
VisuScreen Integration
Tasks can be viewed, created, and managed directly from a document's VisuScreen (the document viewer), without navigating to the Task Manager.
⭐ Viewing tasks linked to a document
Open a contract from the Contracts screen. In the right-hand panel of the VisuScreen, locate the Tasks tab. The panel shows all tasks where this document is the Related content. Each entry shows the task name, type, status, due date, and assignee avatar. Recurring tasks show a progress indicator (completed / total occurrences). It is read-only; the occurrence list cannot be expanded from here.
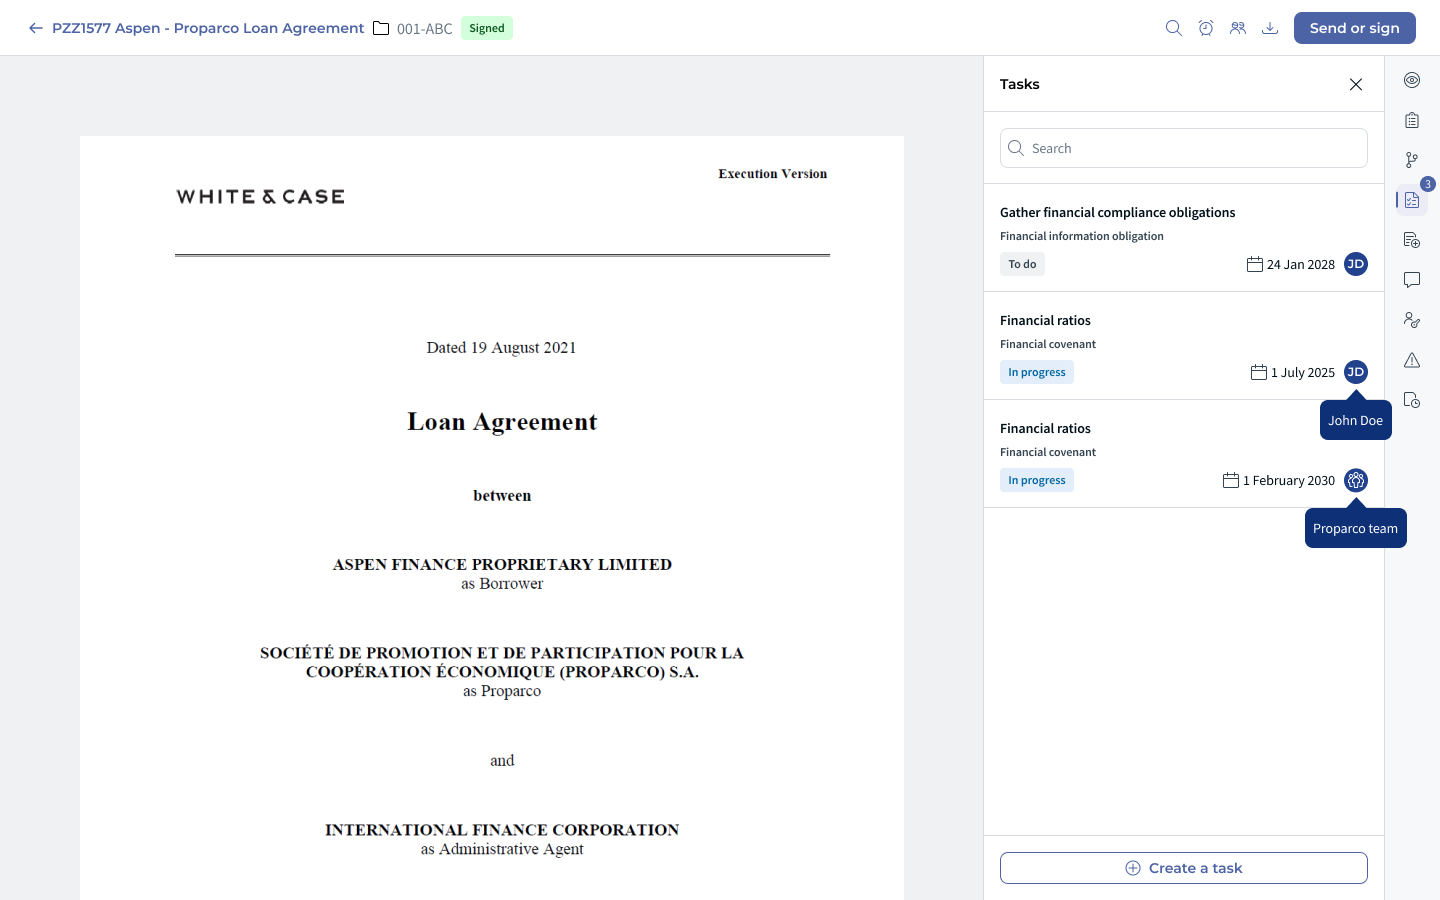
Figure 11 — VisuScreen right panel, Tasks tab: list of tasks linked to the current document, with status badges, due dates, assignee avatars, and the "Create a task" and "Open in Task Manager" buttons.
From the task row in this panel, you can Mark as done (if you are the Responsible user or team) or Delete the task.
⭐ Creating a task from the VisuScreen
In the Tasks panel, click Create a task. The standard task creation pop-up opens with the Related content field pre-filled with the current document. Complete the other required fields and click Confirm. A success banner appears and the new task appears immediately in the panel.
Figure 12 — Task creation pop-up launched from the VisuScreen: the Related content field is pre-filled with the current document.
⭐ Opening tasks in the Task Manager from the VisuScreen
In the Tasks panel, click Open in Task Manager. You are redirected to the Task Manager page, pre-filtered to show only tasks linked to the current document. The active filter appears as a tag in the filter bar and can be cleared at any time.
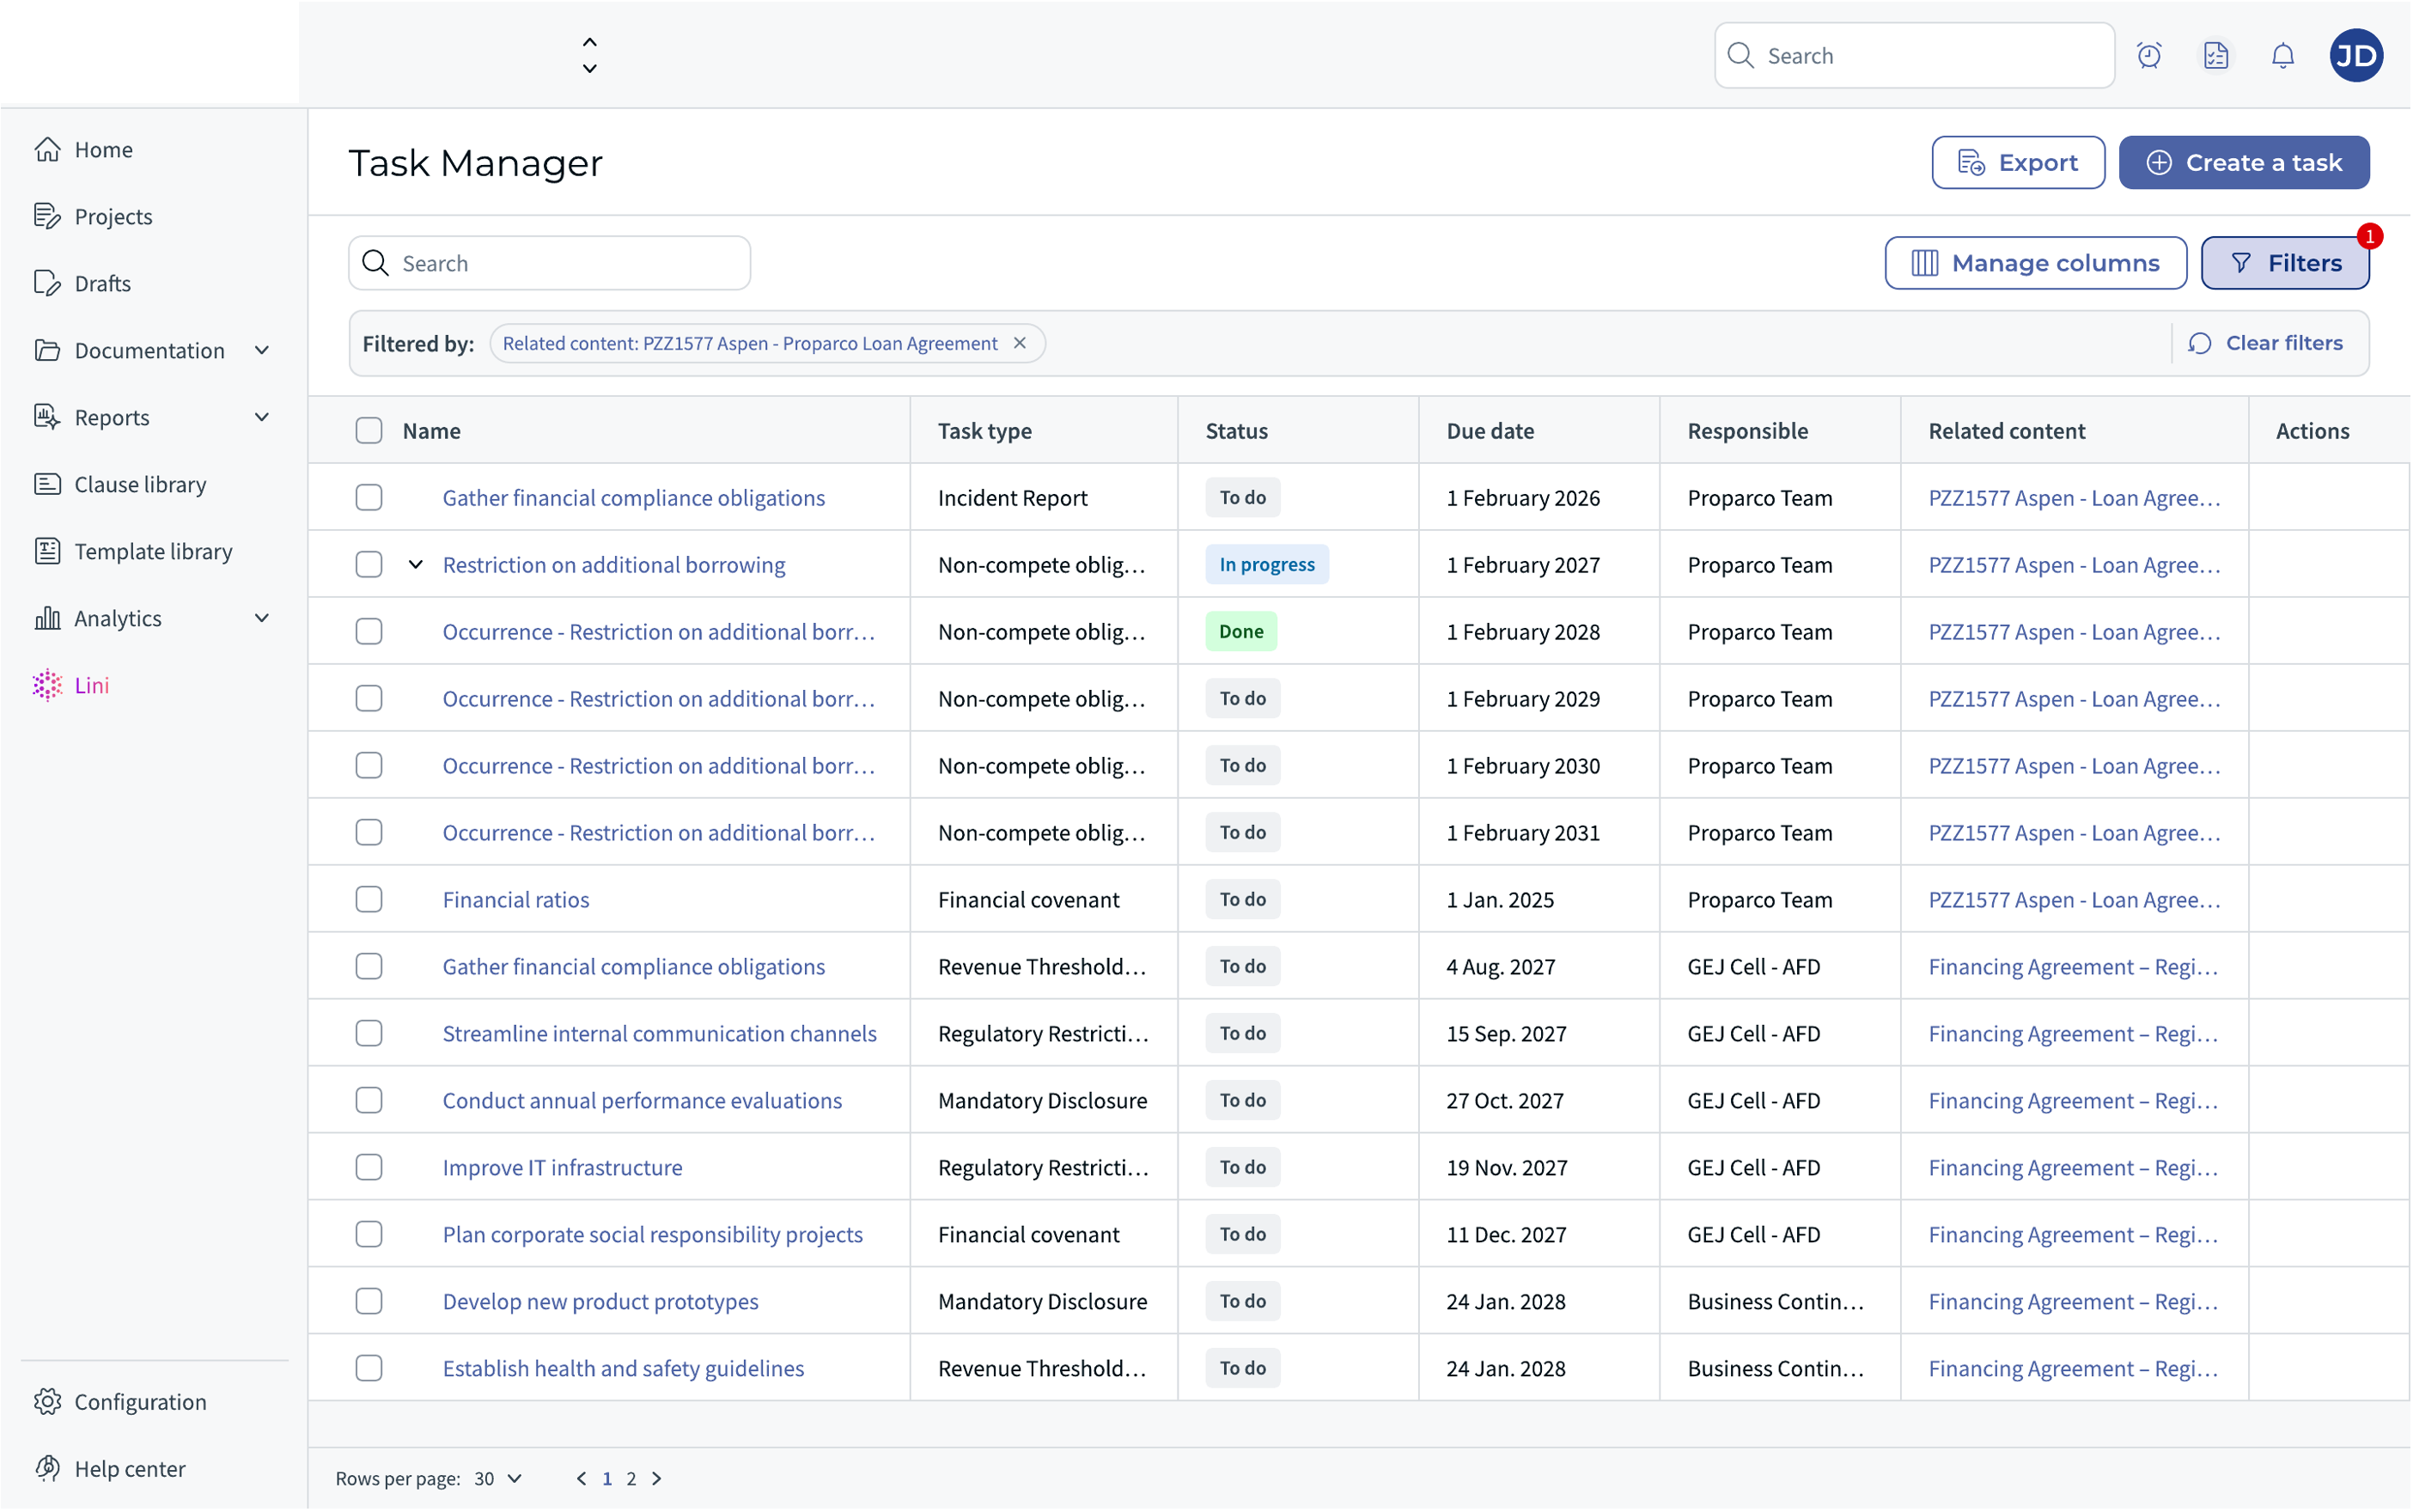
Figure 13 — Task Manager opened from the VisuScreen: an active "Related content" filter tag (showing the document name) is displayed above the task grid.
Task Manager: Filters & Column Management
⚙️ Filtering tasks
In the Task Manager, click the Filters button. A filter panel opens on the right. Each filter row is composed of a criterion, a condition, and a value. Click Add filter to combine multiple criteria simultaneously. Active filters are shown as tags above the task grid. Click Clear filters to remove all active filters at once.
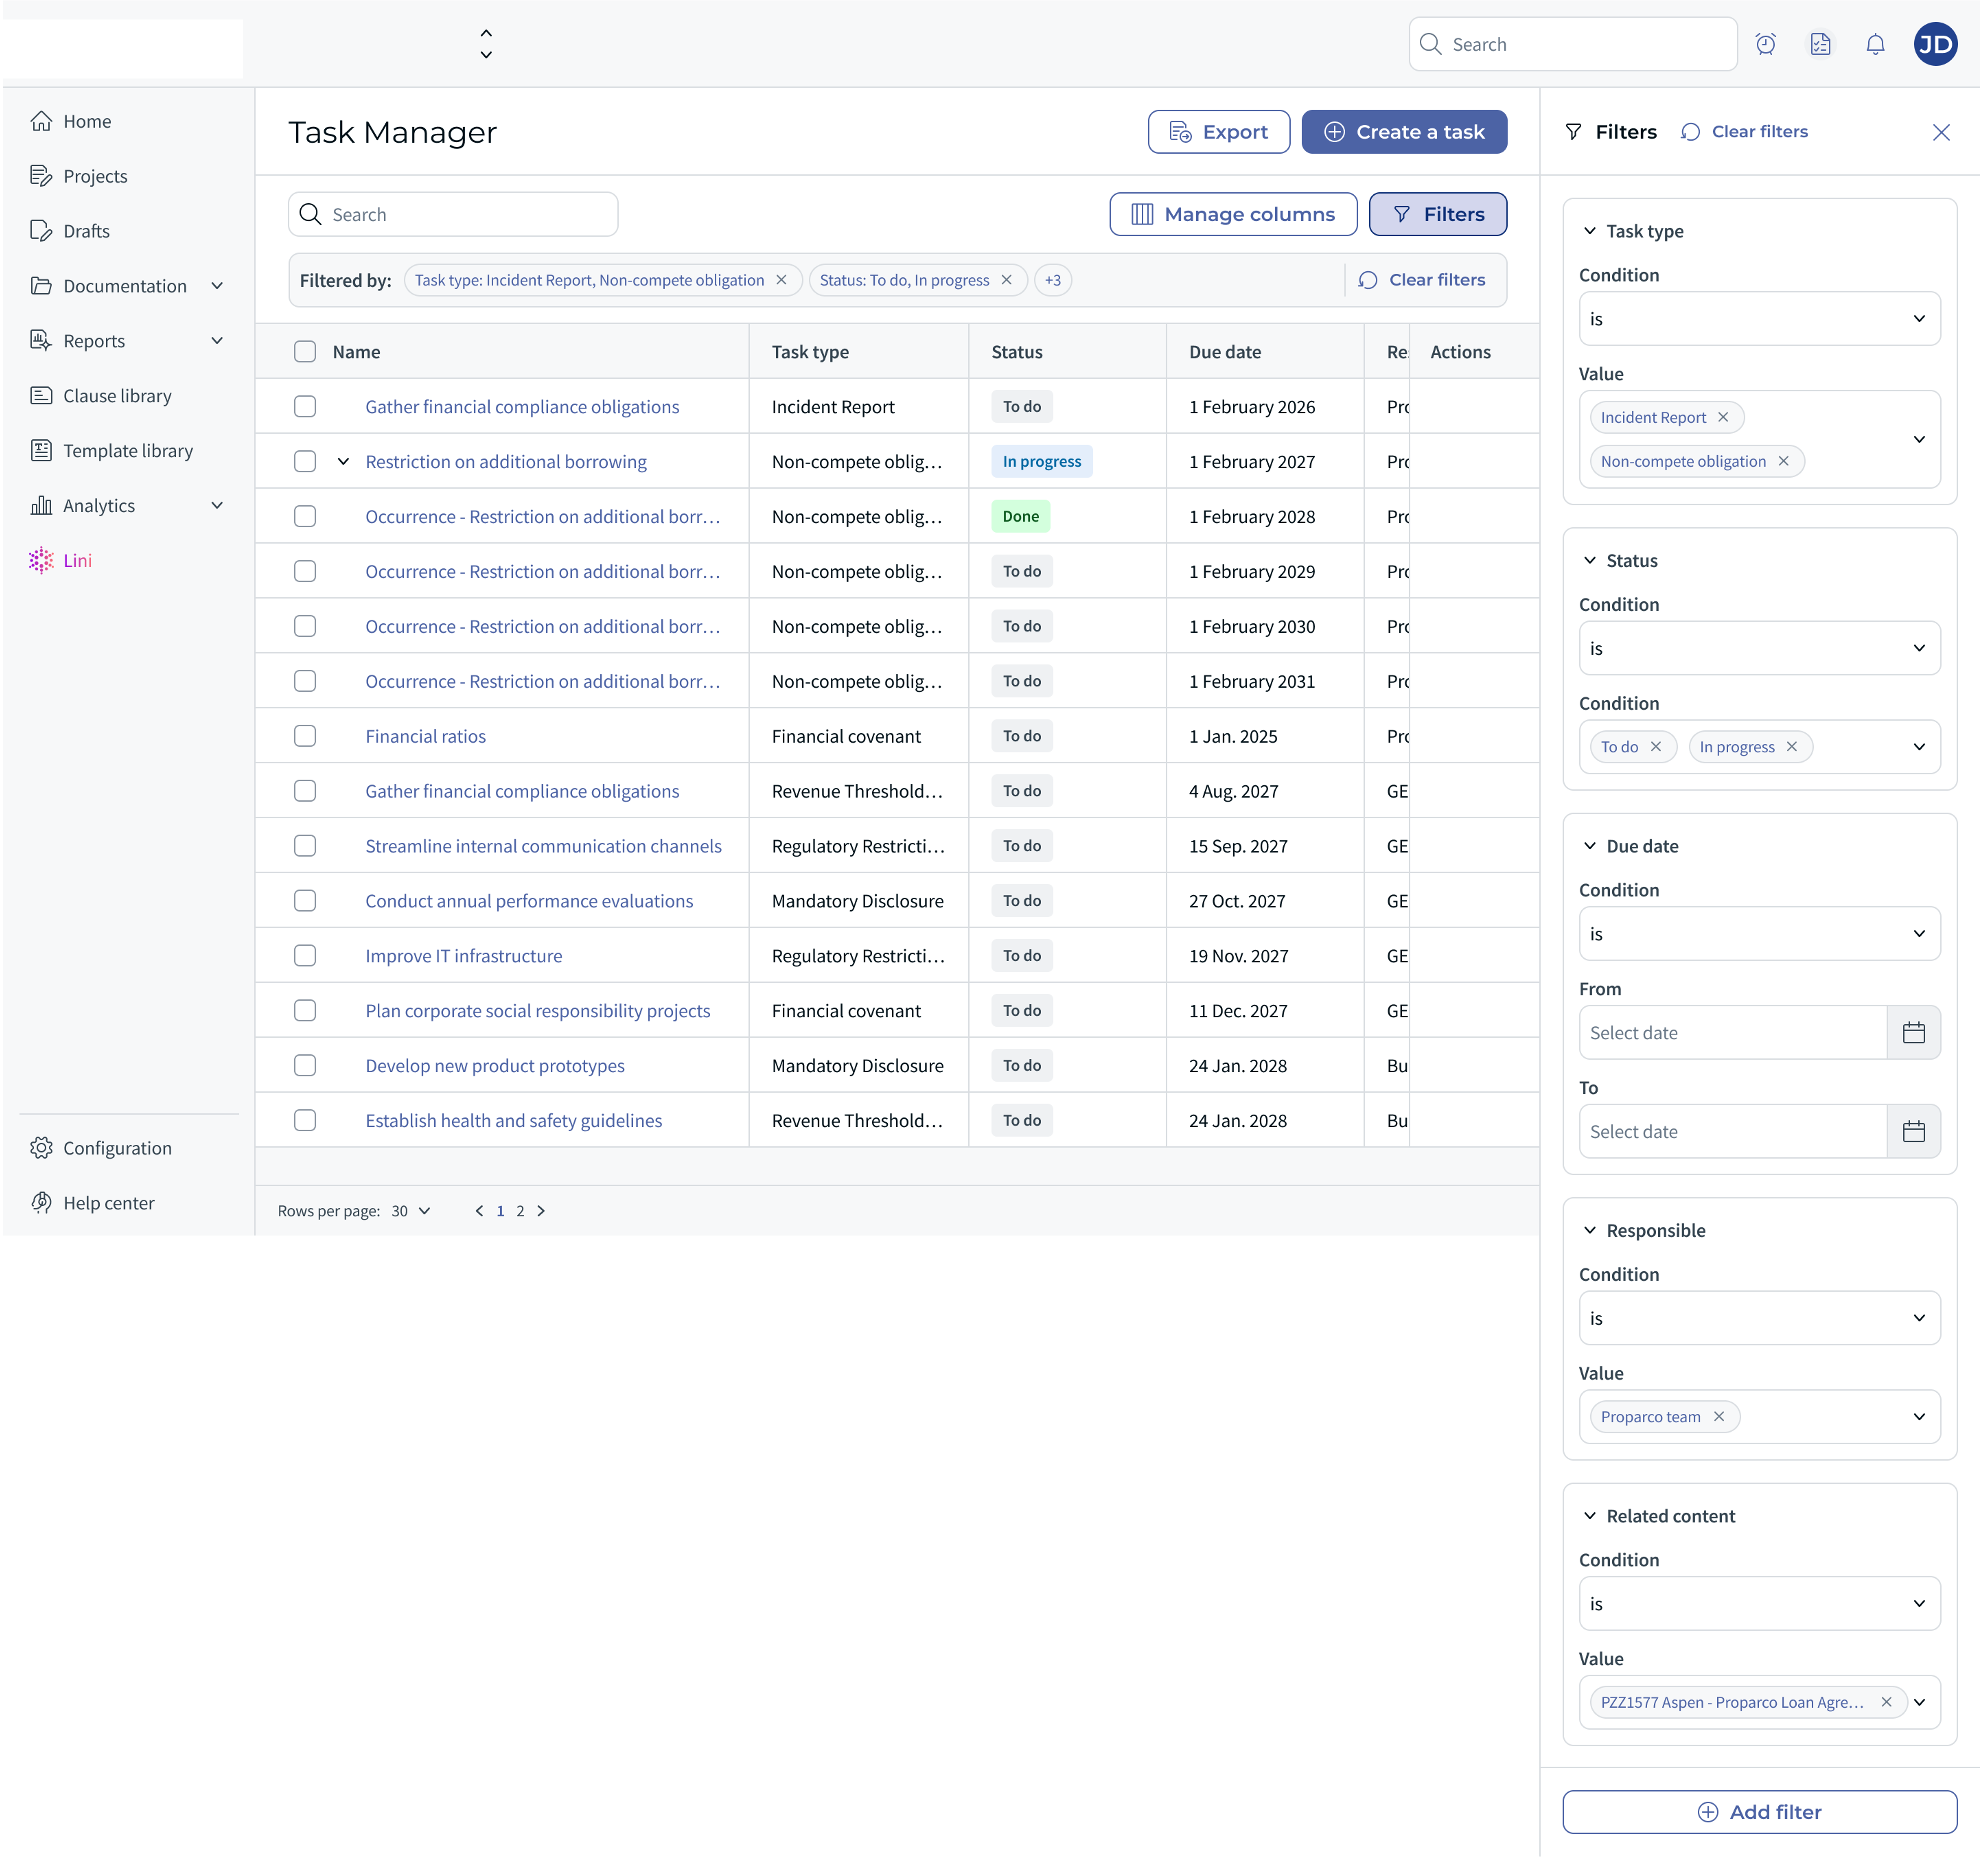
Figure 14 — Filter panel open: multiple criteria selected (Task type, Status, Due date, Responsible, Related content), each with its condition (Is / Is not / From / To) and value.
Available filter criteria:
| Criterion | Condition | Value type |
|---|---|---|
| Task type | Is / Is not | Select from existing task types |
| Status | Is / Is not | To do, In progress, Done |
| Due date | From / To | Date picker |
| Responsible | Is / Is not | Select a user or team |
| Related content | Is / Is not | Select a document |
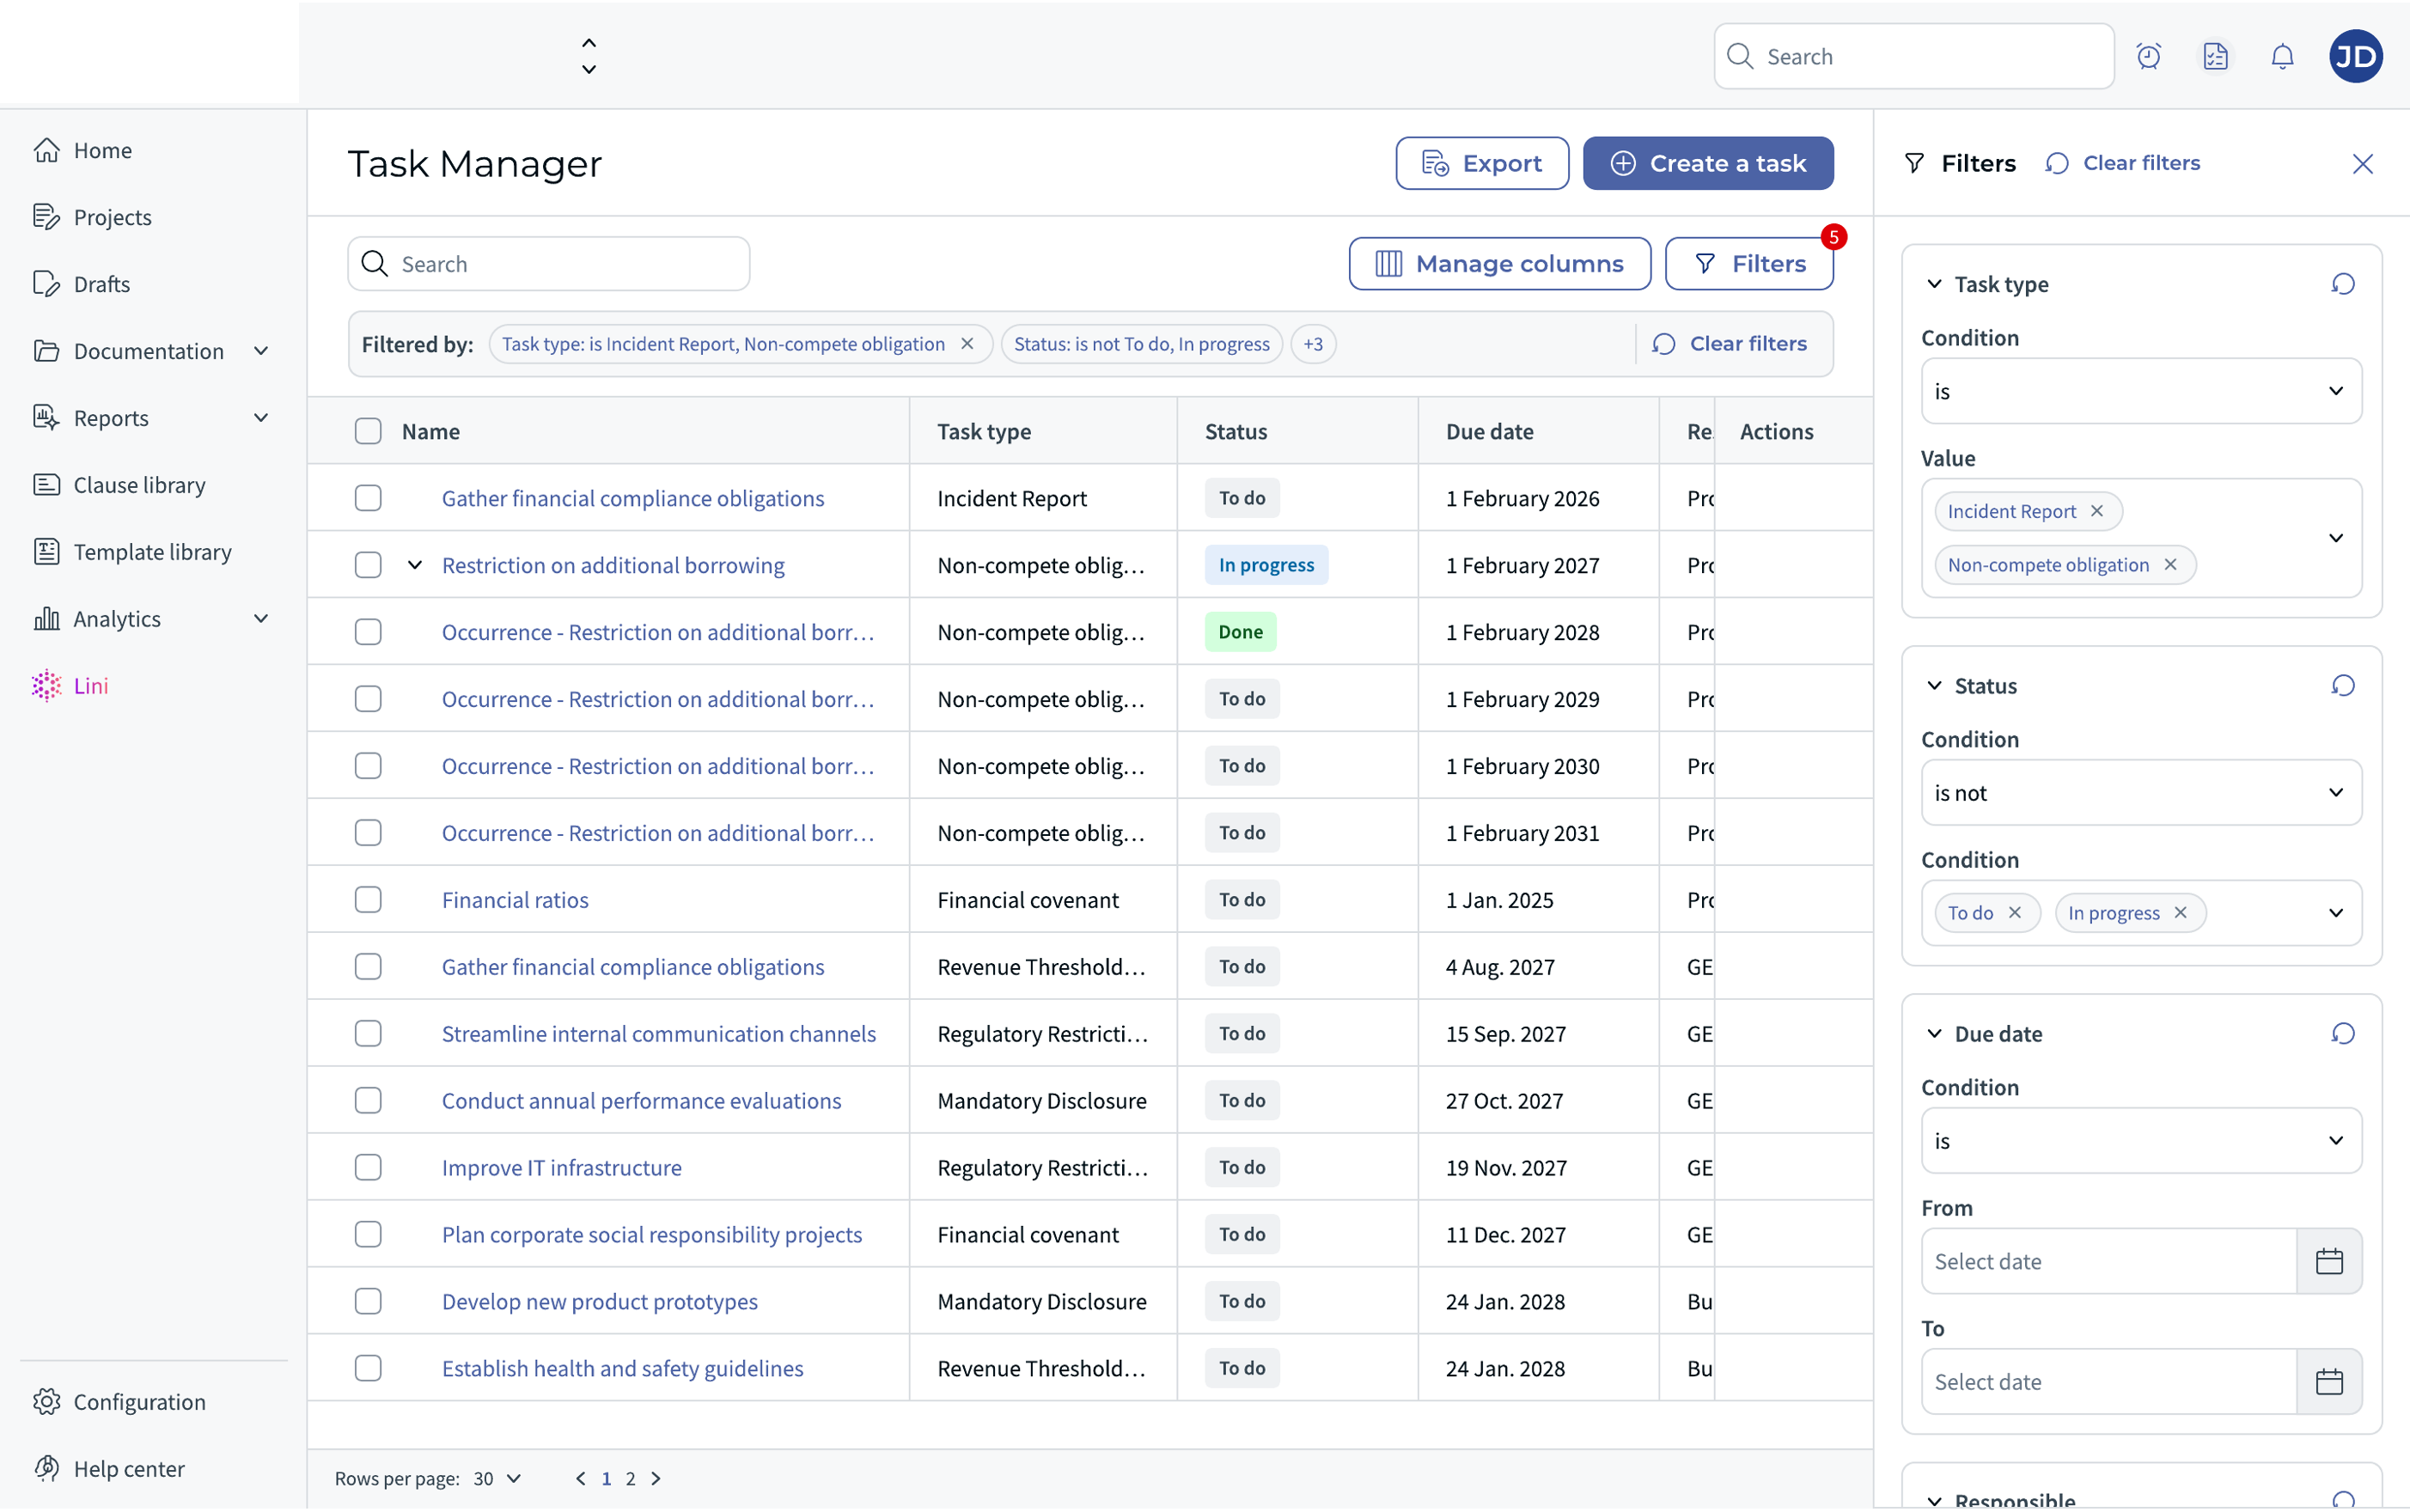
Figure 15 — Task Manager with active filters: the filter tags appear above the task grid, showing the active criteria. The filtered list shows only matching tasks.
⚙️ Managing columns
Click Manage columns in the Task Manager header. A panel opens listing all available columns. Select or deselect columns as needed and click Confirm. The Name column is mandatory and cannot be removed.
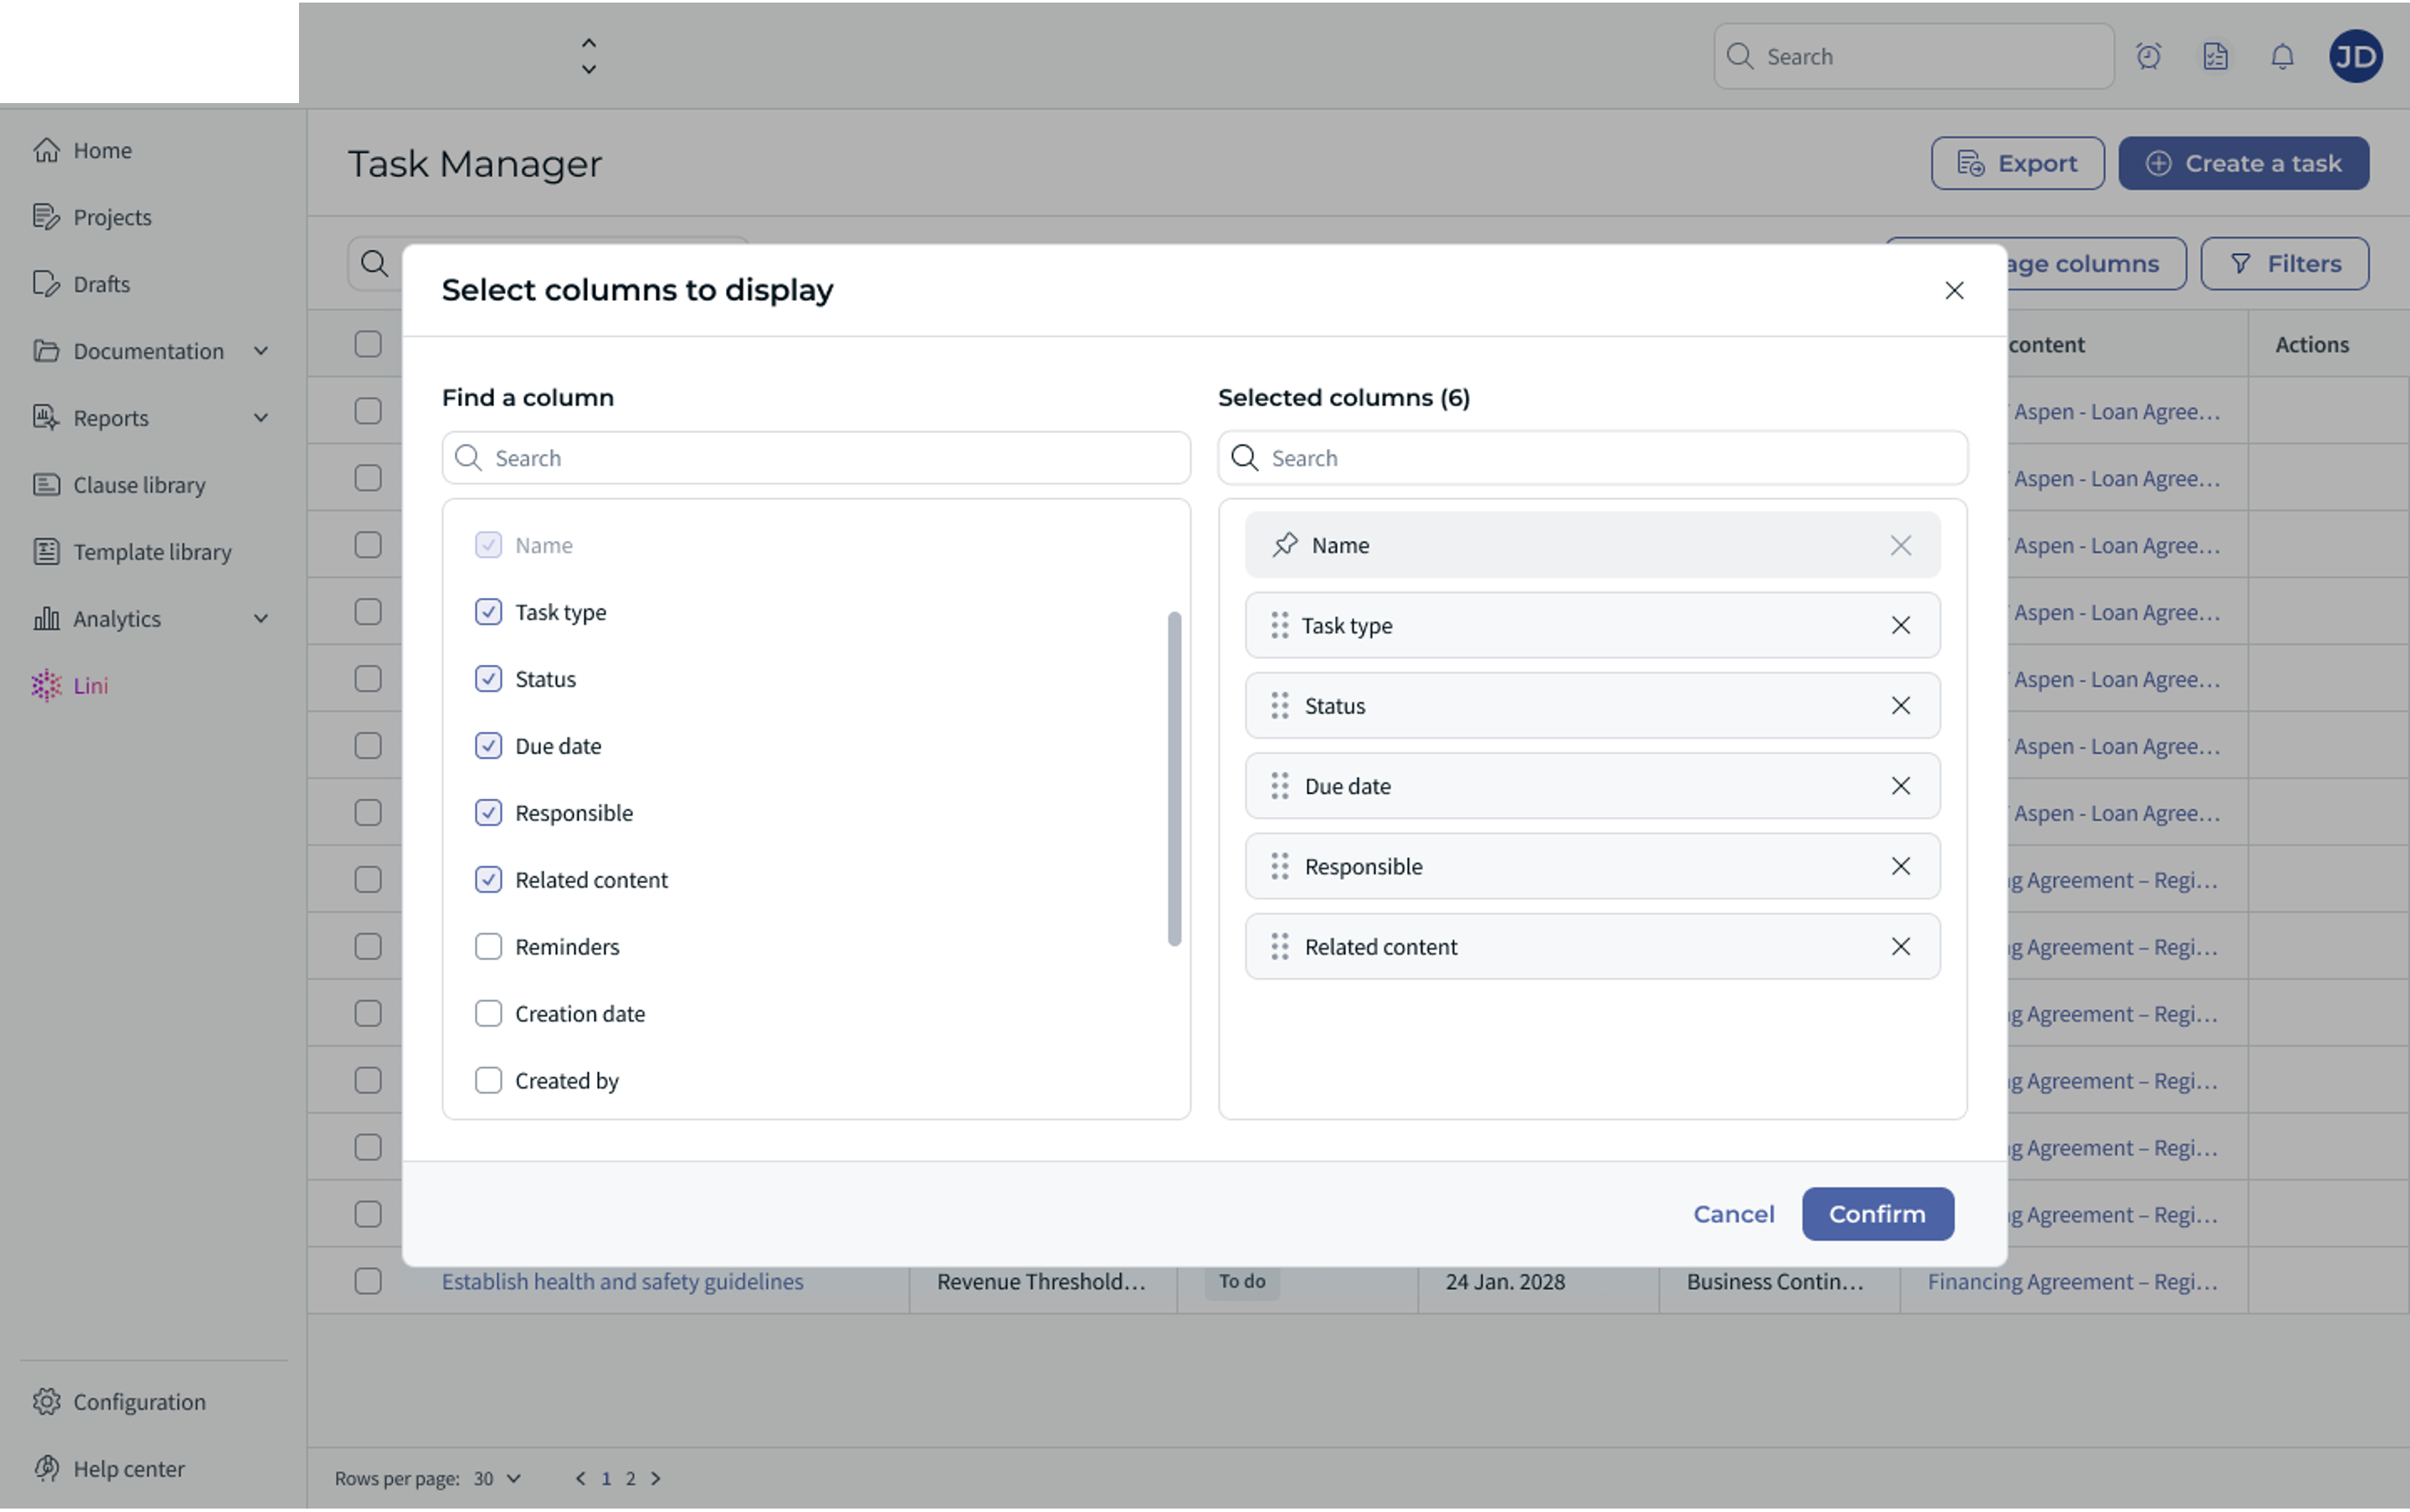
Figure 16 — Manage columns panel: available columns listed with checkboxes; the count of selected columns is shown at the top. Name is mandatory. Default selection: Name, Task type, Status, Due date, Responsible, Related content.
Available columns:
| Column | Default | Notes |
|---|---|---|
| Name | ✅ Yes | Mandatory — cannot be removed. |
| Task type | ✅ Yes | |
| Status | ✅ Yes | |
| Due date | ✅ Yes | |
| Responsible | ✅ Yes | |
| Related content | ✅ Yes | |
| Creation date | No | |
| Created by | No |
⭐ Task reminders
Task reminders are available: users can be notified about the tasks they are concerned by, so that a deadline is not missed.
Figure 17 — Task reminder settings.
4️⃣ Scope 4: Create a Task from a Clause
Tasks can be created directly from a clause identified in a document's Summary Sheet, with the clause and the related document pre-populated automatically.
⭐ Creating a task directly from a clause
- Open a contract in the VisuScreen and navigate to the Summary Sheet tab.
- In the clause list, click Create task for this clause next to the clause you want to track as an obligation.
- The standard task creation pop-up opens with:
- Clause pre-filled with the selected clause text.
- Related content pre-filled with the current document.
- Complete the remaining required fields (Task type, Name, Responsible, Due date).
- Optionally configure recurrence.
- Click Confirm. The task appears in the Tasks panel of the VisuScreen, next to the source clause.
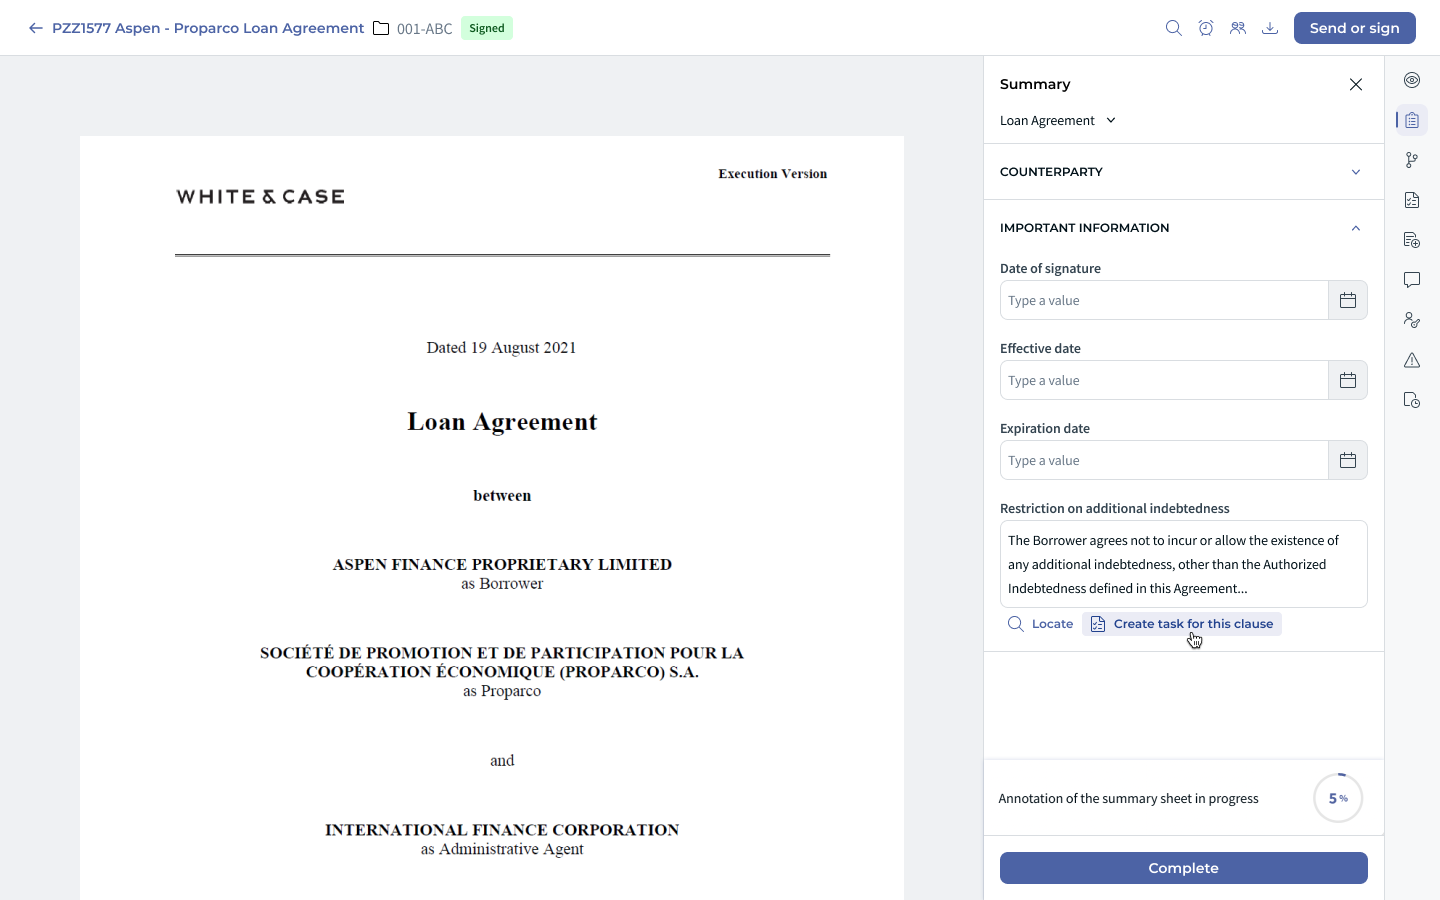
Figure 18 — Summary Sheet with the "Create task for this clause" button visible next to a clause entry.
Figure 19 — Task creation pop-up launched from a clause: the Clause field and the Related content field are pre-filled from the Summary Sheet context.
ℹ️ Once a task is linked to a clause, the clause entry in the Summary Sheet displays an Open task shortcut for quick navigation back to the task.
⚠️ Limitations and known behaviors
- Recurrence is permanent — once saved as recurring, a task cannot be converted back into a one-off task.
- Occurrences appear only after save — an information callout ("The occurrence schedule will be available after the task is created.") is shown instead.
- No retroactive recurrence update — changes to the recurrence configuration do not update already-created occurrences.
- Task type deletion blocked if tasks exist — a task type with associated tasks cannot be deleted.
- Related document deleted — if the linked document is deleted, the task loses its Related content field. Restoring the document does not restore the link.
- Document added as appendix — if a document with linked tasks is added as an appendix to another document, those tasks lose their Related content.
- Clause depends on Related content — the Clause dropdown remains inactive until a Related content document is selected. Changing the Related content resets the Clause selection.
- Attached documents (task) — only CLM documents can be attached. Direct file uploads are not supported. These attachments are informational and distinct from the Related content.
❓ Frequently asked questions
Does the Task Manager send reminders?
Yes — see Task reminders.
What is the difference between a task type and a task?
A task type is a category template (e.g. "Financial covenant") that defines which custom fields are available. A task is a specific obligation instance created within that category (e.g. "Restriction on additional indebtedness — Aspen Loan Agreement 2025").
Can a task be linked to multiple documents?
Yes. The Related content field supports multiple documents per task. Clauses are then grouped by document name in the Clause dropdown.
Can the due date be set in the past?
Yes. A past due date is allowed; the task keeps its current status.
What happens to occurrences if I edit the recurrence settings on the main task?
Changes are not retroactively applied to already-created occurrences. Only new occurrences generated after the change will reflect the updated settings.
Can I cancel or remove the recurrence from a task?
No. Once a task is saved as recurring, its recurrence cannot be removed. You can delete individual occurrences, but the main task will remain recurring.
What happens when I click "Open in Task Manager" from the VisuScreen?
You are redirected to the Task Manager, pre-filtered by the current document. The filter tag is visible above the task grid and can be cleared at any time.


Was this article helpful?
That’s Great!
Thank you for your feedback
Sorry! We couldn't be helpful
Thank you for your feedback
Feedback sent
We appreciate your effort and will try to fix the article